1. Introduction
Thank you for choosing the Arebos 8.8L Stainless Steel Hot Drink Dispenser. This appliance is designed for heating, boiling, and keeping various beverages warm, such as mulled wine, punch, tea, coffee, or water. To ensure safe and efficient operation, please read this instruction manual thoroughly before first use and keep it for future reference.

Image 1.1: The Arebos hot drink dispenser is versatile for various hot beverages.
2. Safety Instructions
- Always ensure the appliance is placed on a stable, heat-resistant surface, away from edges.
- Do not immerse the appliance, cord, or plug in water or any other liquid.
- Keep out of reach of children and pets. This appliance is not intended for use by persons with reduced physical, sensory, or mental capabilities unless supervised.
- The exterior surfaces of the dispenser, especially the stainless steel body, can become very hot during operation. Use the cool-touch handles for transport and operation.
- Always unplug the appliance from the power outlet before cleaning, filling, or when not in use.
- Do not operate the appliance if the power cord or plug is damaged, or if the appliance malfunctions or has been damaged in any way. Contact customer support for assistance.
- The lid features a locking mechanism. Ensure the lid is securely locked by twisting it into place to prevent accidental spills and enhance safety during use.

Image 2.1: Cool-touch handles and tap for safe handling.

Image 2.2: Secure stainless steel lid with locking device.
3. Product Components
Familiarize yourself with the parts of your Arebos hot drink dispenser:
- Main Unit: Stainless steel body with double-walled insulation.
- Lid: Stainless steel lid with a locking mechanism for secure closure.
- Cool-Touch Handles: Heat-resistant handles for safe transport.
- Tap: Integrated dispensing tap, made from heat-resistant material.
- Temperature Control Knob: Infinitely adjustable thermostat (30-110°C).
- Indicator Lights: Red light for 'Heating', Amber light for 'Keep Warm'.
- Water Level Indicator: Transparent gauge to show current liquid level.
- On/Off Switch: Main power switch.
- Drip Tray: Removable tray to catch drips from the tap.
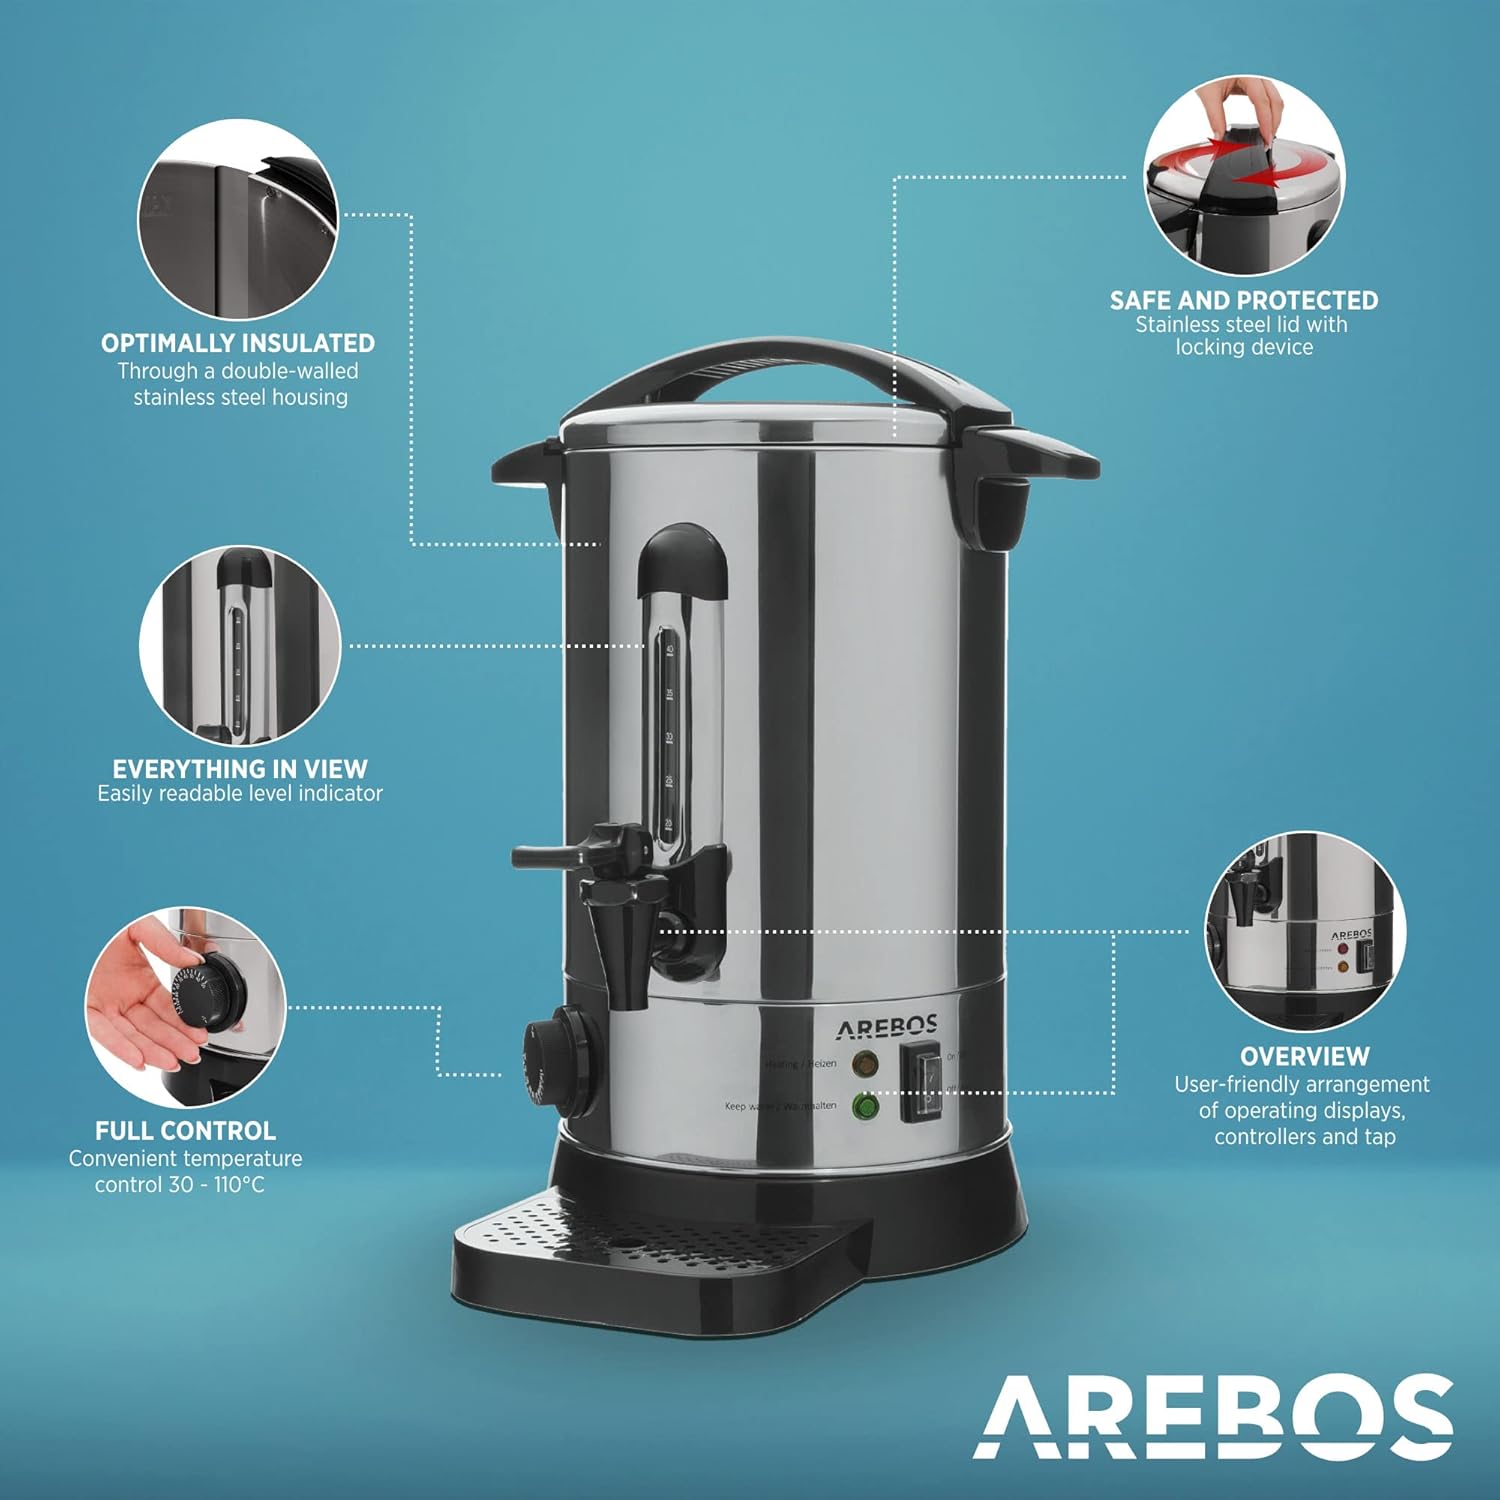
Image 3.1: Overview of product features and components.
4. Setup
- Unpack: Carefully remove all packaging materials and inspect the dispenser for any damage.
- Initial Cleaning: Before first use, wash the interior of the dispenser, the lid, and the drip tray with warm soapy water. Rinse thoroughly and dry.
- Placement: Place the dispenser on a flat, stable, and heat-resistant surface. Ensure there is enough space around the unit for ventilation and safe operation.
- Drip Tray: Position the drip tray under the tap.
5. Operating Instructions
- Fill the Dispenser: Open the lid and fill the dispenser with the desired liquid (water, mulled wine, tea, etc.). Do not exceed the maximum fill line indicated on the water level gauge.
- Secure the Lid: Place the lid back on the dispenser and twist it to lock it securely in place.
- Connect to Power: Plug the power cord into a grounded electrical outlet.
- Turn On: Flip the On/Off switch to the 'On' position. The red 'Heating' indicator light will illuminate.
- Set Temperature: Rotate the temperature control knob to your desired temperature between 30°C and 110°C. For boiling, set it to 100°C or higher.
- Heating Process: The dispenser will begin heating. The red 'Heating' light will remain on until the set temperature is reached.
- Keep Warm Function: Once the set temperature is reached, the red light will turn off, and the amber 'Keep Warm' light will illuminate, maintaining the liquid at the desired temperature. The heating element will cycle on and off as needed.
- Dispensing: To dispense liquid, place a cup under the tap and push the tap lever down. Release the lever to stop the flow.
- Turn Off: After use, flip the On/Off switch to the 'Off' position and unplug the dispenser from the power outlet.

Image 5.1: Temperature control knob for precise heating.

Image 5.2: Heating and Keep Warm indicator lights.
6. Maintenance and Cleaning
Regular cleaning ensures optimal performance and longevity of your dispenser.
- Always Unplug: Before cleaning, ensure the dispenser is unplugged and has cooled down completely.
- Exterior Cleaning: Wipe the exterior with a damp cloth and mild detergent. Do not use abrasive cleaners or scouring pads, as these can damage the stainless steel finish.
- Interior Cleaning: For the interior, use a soft brush or sponge with warm soapy water. Rinse thoroughly.
- Descaling: Over time, mineral deposits (limescale) may build up, especially if using hard water. To descale, fill the dispenser with a mixture of water and white vinegar (e.g., 1 part vinegar to 2 parts water) or a commercial descaling solution. Heat the mixture to about 60-80°C and let it sit for 30-60 minutes (do not boil). Drain the solution and rinse the interior several times with fresh water.
- Drip Tray: Remove and empty the drip tray regularly. Wash it with warm soapy water and rinse.
- Storage: Store the clean and dry dispenser in a cool, dry place.

Image 6.1: Removable drip tray for easy cleaning.
7. Troubleshooting
| Problem | Possible Cause | Solution |
|---|---|---|
| Dispenser does not heat. | Not plugged in; On/Off switch is off; Temperature knob set too low; Overheating protection activated. | Check power connection; Turn On/Off switch to 'On'; Adjust temperature knob; Unplug, let cool, then plug in again. |
| Liquid is not hot enough. | Temperature knob set too low. | Increase the temperature setting. |
| Leaking from the tap. | Tap not fully closed; Seal issue. | Ensure tap lever is fully released; If problem persists, contact customer support. |
| Slow heating. | Limescale buildup. | Descale the dispenser as per cleaning instructions. |
8. Specifications
- Model: 8.8 L
- Capacity: 8.8 Liters
- Power: 950 Watts
- Voltage: 220-240 Volts
- Material: Stainless Steel
- Temperature Range: 30°C - 110°C
- Product Dimensions: 27.2 x 27.2 x 45 cm
- Weight: 3.8 kg
- Special Features: Automatic shut-off, Overheating protection, Heat-resistant handles, Temperature control, Water level indicator.

Image 8.1: Product dimensions and capacity.
9. Warranty and Support
This Arebos product comes with a standard manufacturer's warranty. Please refer to the warranty card included in your packaging for specific terms and conditions. For technical support, spare parts, or warranty claims, please contact the retailer or manufacturer directly. Keep your proof of purchase for warranty purposes.


