
1. Introduction
Thank you for choosing the Ahuja DPA-570 Mixer Amplifier. This manual provides essential information for the safe and efficient operation of your device. Please read it thoroughly before use and retain it for future reference. The DPA-570 is designed for public address applications, offering versatile audio mixing and amplification capabilities.
2. Safety Instructions
- Power Source: Connect the amplifier only to the specified AC voltage or a compatible 12V DC car battery. Ensure the power outlet is properly grounded.
- Ventilation: Do not block ventilation openings. Ensure adequate airflow around the unit to prevent overheating.
- Moisture: Keep the amplifier away from water, rain, and excessive humidity. Do not operate with wet hands.
- Placement: Place the unit on a stable, flat surface. Avoid direct sunlight, heat sources, or areas with high vibration.
- Servicing: Do not attempt to service this product yourself. Refer all servicing to qualified service personnel.
- Cleaning: Disconnect power before cleaning. Use a soft, dry cloth. Do not use liquid cleaners or aerosols.
3. Package Contents
Please check that your package contains the following items:
- Ahuja DPA-570 Mixer Amplifier Unit
- AC Power Cord
- Remote Control for MP3 Player
- User Manual (this document)
If any items are missing or damaged, please contact your retailer immediately.
4. Product Overview
The Ahuja DPA-570 is a robust mixer amplifier designed for various public address needs. It features multiple inputs and controls for flexible audio management.
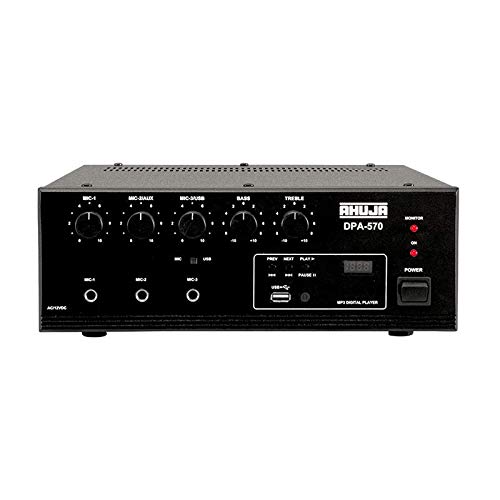
Figure 1: Front view of the Ahuja DPA-570 Mixer Amplifier, showing input jacks, control knobs, and the MP3 player interface.
Key Features:
- 3 Microphone Inputs & 1 Auxiliary Input: Allows connection of multiple audio sources.
- Built-in MP3 Player: Features a USB reader for playing audio files directly, controlled via the front panel or remote.
- Line Output: Provides an output for connecting to an external booster amplifier for expanded sound coverage.
- Active Bass & Treble Controls: Independent controls for adjusting the low and high frequencies of the audio output.
- AC/DC Operation: Automatically switches to DC power (car battery) if AC power fails, ensuring uninterrupted operation.
5. Setup
Follow these steps to set up your Ahuja DPA-570 Mixer Amplifier:
- Placement: Position the amplifier on a stable, flat surface in a well-ventilated area, away from direct heat or moisture.
- Speaker Connection: Connect your speakers to the appropriate speaker output terminals on the rear panel. Ensure correct polarity (+ to + and - to -) and impedance matching. Refer to the amplifier's specifications for compatible speaker impedance.
- Microphone Connection: Plug your microphones into the MIC 1, MIC 2, or MIC 3 input jacks on the front panel.
- Auxiliary Device Connection: Connect external audio sources (e.g., CD player, smartphone) to the AUX input jack using an appropriate cable.
- Power Connection:
- AC Power: Connect the supplied AC power cord to the amplifier's AC inlet and then to a suitable wall outlet.
- DC Power (Optional): For battery operation, connect a 12V DC car battery to the DC input terminals on the rear panel, observing correct polarity. The unit will automatically switch to DC power if AC power is interrupted.
- Initial Power On: Ensure all volume controls are set to minimum before turning on the amplifier.
6. Operating Instructions
6.1 Basic Operation
- Power On: Press the power switch to turn on the amplifier. The power indicator light will illuminate.
- Volume Adjustment: Gradually increase the MASTER volume control to the desired listening level. Adjust individual MIC and AUX volume controls as needed.
- Tone Control: Use the BASS and TREBLE knobs to adjust the low and high frequencies of the audio output to your preference.
6.2 Using the MP3 Player
- Insert USB Drive: Insert a USB flash drive containing MP3 audio files into the USB port on the front panel.
- Select Mode: The amplifier should automatically switch to USB mode. If not, press the 'MODE' button on the front panel or remote control until USB mode is selected.
- Playback Controls: Use the play/pause, next, and previous track buttons on the front panel or remote control to manage playback.
- Volume: Adjust the MP3 player's volume using its dedicated control or the main volume control.
7. Maintenance
- Cleaning: Regularly wipe the exterior of the amplifier with a soft, dry cloth. Do not use abrasive cleaners or solvents.
- Ventilation: Ensure that the ventilation grilles are free from dust and debris to maintain proper cooling.
- Storage: When not in use for extended periods, store the amplifier in a cool, dry place, protected from dust and extreme temperatures.
- Cable Inspection: Periodically check all cables for signs of wear or damage. Replace any damaged cables immediately.
8. Troubleshooting
| Problem | Possible Cause | Solution |
|---|---|---|
| No power | Power cord not connected; Power outlet faulty; Amplifier power switch off. | Check power cord connection; Try a different outlet; Ensure power switch is ON. |
| No sound output | Speaker cables disconnected; Volume controls too low; Input source not selected or faulty. | Check speaker connections; Increase MASTER and input volume; Verify input source is active and correctly connected. |
| Distorted sound | Volume too high; Incorrect impedance speakers; Faulty cables. | Reduce volume; Ensure speaker impedance matches amplifier; Replace faulty cables. |
| MP3 player not working | USB drive not inserted correctly; USB drive corrupted; Incorrect file format. | Reinsert USB drive; Try a different USB drive; Ensure files are in MP3 format. |
9. Specifications
| Feature | Specification |
|---|---|
| Brand | Ahuja |
| Model Number | DPA-570 |
| Number of Channels | 4 |
| Product Dimensions (D x W x H) | 34D x 36W x 32H Centimeters |
| Item Weight | 6900 Grams |
| Connectivity Technology | Auxiliary, USB |
| Power Source Type | AC (Mains), Battery Powered (12V DC) |
| Output Connector Type | 1/4" TRS (balanced) |
| Audio Input | USB |
| Country of Origin | China |
10. Warranty and Support
Ahuja products are manufactured to high-quality standards. For warranty information, please refer to the warranty card included with your product or visit the official Ahuja website. Keep your purchase receipt as proof of purchase for warranty claims.
For technical support, service, or inquiries, please contact Ahuja customer service through their official channels. Contact details can typically be found on the product packaging or the manufacturer's website.


