1. Introduction
This manual provides essential information for the safe and efficient operation of your OMNITRONIC PM-322P 3-Channel DJ Mixer. Please read these instructions thoroughly before using the device to ensure proper functionality and to prevent damage.
The OMNITRONIC PM-322P is a robust and versatile 3-channel DJ mixer designed for various audio mixing applications, featuring integrated Bluetooth connectivity and a USB MP3 player.

Figure 1: Angled view of the OMNITRONIC PM-322P DJ Mixer, showcasing its compact design and accessible controls.
2. Safety Instructions
- Read all instructions before operating the device.
- Keep this manual for future reference.
- Do not expose the device to rain or moisture.
- Ensure proper ventilation; do not block ventilation openings.
- Only connect to a grounded power outlet with the specified voltage (240 Volts).
- Do not open the device casing; refer all servicing to qualified personnel.
- Avoid placing the device near heat sources or in direct sunlight.
- Clean only with a dry cloth.
3. Key Features
- 3 Input Channels: Each channel features gain control, a 3-band equalizer (High, Mid, Low), a Cue button for pre-listening, and a smooth channel fader.
- Integrated Bluetooth Audio Streaming: Seamlessly stream music wirelessly from your Bluetooth-enabled portable devices directly to the mixer.
- DJ Microphone Channel: Dedicated microphone input with independent volume control and a 2-band equalizer for vocal adjustments.
- MP3 Player with USB Port: Play audio files directly from a USB storage device, with track information displayed on a clear blue LCD.
- Robust Construction: Designed for durability and reliable performance.
4. Controls and Connections
4.1 Front Panel Controls

Figure 2: Top view of the OMNITRONIC PM-322P DJ Mixer, highlighting the main control surface.
- USB Port: For connecting USB storage devices to the integrated MP3 player.
- MP3/Bluetooth Module: Includes LCD display, playback controls (Play/Stop, Skip), and Pairing button for Bluetooth.
- Channel Gain Controls (CH 1-3): Adjust the input level for each channel.
- 3-Band Equalizer (High, Mid, Low): Tone controls for each channel.
- Cue Buttons (CH 1-3): Activates pre-listening for the respective channel through headphones.
- Channel Faders (CH 1-3): Adjust the volume level of each channel in the mix.
- Microphone Level Control (MIC LEVEL): Adjusts the volume of the connected microphone.
- Microphone 2-Band Equalizer (MIC HIGH, MIC LOW): Tone controls for the microphone input.
- X-Fader Reverse Switch: Reverses the direction of the crossfader.
- X-Fader Curve Control: Adjusts the crossfader curve from sharp to smooth.
- Crossfader (CH 2/CH 3): Blends between channels 2 and 3.
- Master Level Control: Adjusts the overall output volume.
- Cue Level Control: Adjusts the volume of the headphone output.
- Cue Mix/PGM Control: Blends between the Cued signal and the Program (Master) signal in the headphones.
- LED Level Meters: Visual indication of output levels.
- Headphone Output (1/4" TRS): For connecting headphones for monitoring.
4.2 Rear Panel Connections
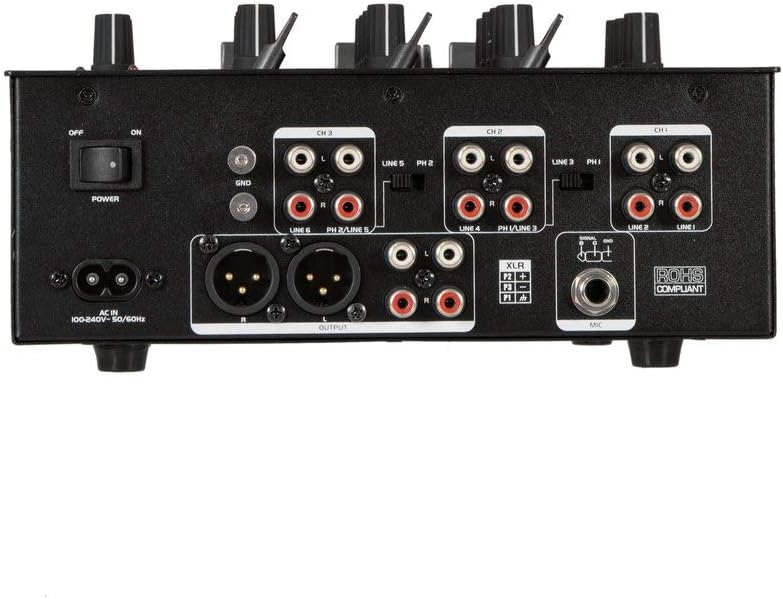
Figure 3: Rear panel of the OMNITRONIC PM-322P DJ Mixer, showing all input and output ports.
- Power Switch (ON/OFF): Turns the mixer on or off.
- AC IN: Power input for the included power cable (100-240V AC, 50/60Hz).
- Ground Terminal (GND): For connecting a turntable ground wire.
- Channel 3 Inputs (LINE 5/PH 2, LINE 6): RCA inputs for line-level devices (CD players, media players) and phono-level devices (turntables).
- Channel 2 Inputs (LINE 3/PH 1, LINE 4): RCA inputs for line-level devices and phono-level devices.
- Channel 1 Inputs (PLAYER/LINE 1, LINE 2): RCA inputs for line-level devices.
- Master Output (XLR, RCA): Balanced XLR and unbalanced RCA outputs for connecting to a power amplifier or active speakers.
- Microphone Input (XLR): Balanced XLR input for connecting a dynamic microphone.
5. Setup
- Power Connection: Connect the provided power cable to the AC IN socket on the rear panel and then to a suitable grounded power outlet (240V).
- Output Connection: Connect the MASTER OUTPUT (XLR or RCA) to your amplifier or active speaker system.
- Input Devices:
- Connect turntables to the PHONO inputs (CH 2 or CH 3) and ensure the PH/LINE switch is set to PH. Connect the turntable's ground wire to the GND terminal.
- Connect CD players, media players, or other line-level devices to the LINE inputs (CH 1, CH 2, or CH 3). Ensure the PH/LINE switch is set to LINE for channels 2 and 3.
- Connect a microphone to the XLR MIC input on the rear panel.
- Headphones: Connect your headphones to the 1/4" TRS HEADPHONE output on the front panel.
- Initial Settings: Before powering on, ensure all channel faders are down, gain controls are at minimum, and the Master Level is at minimum.
- Power On: Flip the POWER switch on the rear panel to the ON position.
6. Operation
6.1 Playing Audio from Input Channels
- Select the desired input source (LINE or PHONO) using the switch on the rear panel for Channels 2 and 3. Channel 1 is LINE only.
- Start playback on your connected audio source (turntable, CD player).
- Slowly increase the GAIN control for the selected channel until the LED level meter shows a strong signal without clipping (red LEDs).
- Adjust the 3-band EQ (HIGH, MID, LOW) to shape the sound of the channel.
- Raise the channel fader to bring the audio into the main mix.
- Adjust the MASTER LEVEL control to set the overall output volume.
- Use the CUE button to pre-listen to a channel through your headphones before fading it into the mix. Adjust CUE LEVEL and CUE MIX/PGM as needed.
6.2 Using the MP3 Player (USB)
- Insert a USB storage device (formatted as FAT32) containing MP3 files into the USB port.
- The LCD display will show track information.
- Use the PLAY/STOP button to start or pause playback.
- Use the SKIP buttons (<< / >>) to navigate between tracks.
- The MP3 player typically routes to Channel 1. Adjust Channel 1's GAIN, EQ, and FADER controls as described above.
6.3 Bluetooth Audio Streaming
- Press the PAIRING button on the MP3/Bluetooth module. The Bluetooth indicator will flash, indicating it's in pairing mode.
- On your Bluetooth-enabled device (smartphone, tablet), search for available Bluetooth devices and select "OMNITRONIC PM-322P".
- Once paired, the Bluetooth indicator will glow steadily.
- Start playing audio on your connected device. The Bluetooth audio will route to Channel 1.
- Adjust Channel 1's GAIN, EQ, and FADER controls to mix the Bluetooth audio.
6.4 Using the Microphone
- Connect a dynamic microphone to the XLR MIC input on the rear panel.
- Speak into the microphone and slowly increase the MIC LEVEL control until the desired volume is achieved without distortion.
- Use the MIC HIGH and MIC LOW controls to adjust the tone of your voice.
7. Maintenance
- Cleaning: Disconnect the device from power before cleaning. Use a soft, dry cloth to wipe the surface. Do not use liquid cleaners or solvents.
- Storage: When not in use for extended periods, store the mixer in a dry, dust-free environment.
- Service: There are no user-serviceable parts inside. Refer all servicing to qualified service personnel.
8. Troubleshooting
| Problem | Possible Cause | Solution |
|---|---|---|
| No power | Power cable disconnected; Power switch off; Outlet fault. | Check power cable connection; Ensure power switch is ON; Test outlet with another device. |
| No sound output | Master Level too low; Channel fader down; Gain too low; Amplifier/speakers off or disconnected. | Increase Master Level; Raise channel fader; Increase channel Gain; Check amplifier/speaker connections and power. |
| Distorted sound | Gain too high (clipping); Input signal too strong; Faulty cable. | Reduce channel Gain; Check input signal level; Replace cables. |
| Bluetooth not pairing | Mixer not in pairing mode; Device too far; Device already paired to another unit. | Press PAIRING button; Move device closer; Disconnect from other Bluetooth devices. |
| USB MP3 player not working | USB device not formatted correctly (FAT32); No MP3 files; USB device faulty. | Ensure USB is FAT32 and contains MP3s; Try a different USB device. |
9. Specifications
| Model: | PM-322P |
| Manufacturer: | Steinigke Showtechnic GmbH |
| Number of Channels: | 3 |
| Connectivity Technology: | Bluetooth, USB |
| Power Source: | Electric Cable |
| Voltage: | 240 Volts AC |
| Item Weight: | 3.18 Kilograms |
| Audio Input: | XLR (Microphone), RCA (Line/Phono) |
| Output Connector Type: | XLR, TRS 1/4", RCA |
| Model Number (Manufacturer): | 8283410 |
| UPC: | 04026397653403 |
10. Warranty and Support
For warranty information and technical support, please contact the manufacturer, Steinigke Showtechnic GmbH, or your authorized dealer. Keep your proof of purchase for any warranty claims.
For further assistance, please visit the official OMNITRONIC website or consult your local distributor.


