1. Introduction
The Steinel XLED CAM 1 SC is an advanced outdoor LED floodlight integrated with a high-definition surveillance camera and an intercom system. Designed for enhanced security and convenience, this device allows you to monitor your property, communicate with visitors, and control lighting via a dedicated smartphone application. It features a 180° infrared motion detector, night vision capabilities, and a dimmable main light and night light function.

Figure 1.1: Steinel XLED CAM 1 SC product overview with app interface.
2. Safety Information
Please read these safety instructions carefully before installation and operation. Failure to follow these instructions may result in electric shock, fire, or serious injury.
- Electrical Safety: Installation must be performed by a qualified electrician in accordance with national wiring regulations. Ensure the power supply is disconnected before installation or maintenance.
- Voltage: This product operates on 230 Volts AC. Verify your power supply matches this requirement.
- Outdoor Use: The product has an IP44 rating, indicating protection against solid objects larger than 1mm and splashing water from any direction. It is suitable for outdoor use but should not be submerged in water.
- Mounting: Mount the device securely on a stable surface as per the installation guidelines.
- Temperature: Do not operate the device outside its specified operating temperature range.
3. Package Contents
Verify that all components are present in the package:
- Steinel XLED CAM 1 SC LED Floodlight with Camera and Intercom
- Protective Cover
- Mounting Material (screws, wall plugs)
- 8 GB Micro SD Card
- User Manual (this document)
4. Setup and Installation
4.1 Physical Installation
The XLED CAM 1 SC is designed for wall mounting. Refer to the technical drawing for precise dimensions and mounting points.

Figure 4.1: Technical dimensions for installation (dimensions in mm).
- Choose Location: Select a suitable outdoor location for wall mounting, ensuring clear line of sight for the camera and optimal coverage for the motion sensor.
- Disconnect Power: Before starting any electrical work, ensure the main power supply to the installation area is switched off at the circuit breaker.
- Mounting: Use the provided mounting material to securely attach the floodlight to the wall. Ensure the device is level.
- Electrical Connection: Connect the floodlight to a 230V AC power supply. Follow local electrical codes and diagrams provided in the full installation guide.
- Insert SD Card: Locate the Micro SD card slot (usually near the camera lens) and insert the included 8GB Micro SD card for video recording.
4.2 App Setup and Wi-Fi Connection
The XLED CAM 1 SC requires the free "Cam light" app for full functionality. A stable Wi-Fi connection (minimum 2 Mbps, 2.4 GHz) is essential.

Figure 4.2: Wi-Fi connection and app download.
- Download App: Download the "Cam light" app from the Apple App Store or Google Play Store.
- Power On: Restore power to the floodlight. The device will enter pairing mode.
- Connect to Wi-Fi: Open the app and follow the on-screen instructions to connect your XLED CAM 1 SC to your home 2.4 GHz Wi-Fi network. Ensure your Wi-Fi signal is strong at the installation location.
- Device Pairing: Complete the device pairing process within the app. This may involve scanning a QR code or following specific prompts.
5. Operating Instructions
Control and manage your XLED CAM 1 SC primarily through the "Cam light" smartphone app.

Figure 5.1: "Cam light" app interface.
5.1 Lighting Control
- Main Light: Turn the main LED floodlight on/off or set schedules via the app.
- Night Light: Activate a dimmable night light function for continuous low-level illumination.
- Brightness Adjustment: Adjust the brightness of both the main and night lights through the app settings.
5.2 Camera and Surveillance
- Live View: Access real-time HD video streaming from the camera through the app.
- Motion Detection: The integrated 180° infrared sensor detects movement up to 10 meters. Configure sensitivity and detection zones in the app. When motion is detected, the light can activate, and the camera will record.
- Night Vision: The camera provides clear images even in low-light conditions or at night.
- Recording: Videos are automatically recorded to the 8GB Micro SD card upon motion detection. You can also manually initiate recording or capture screenshots from the live view.
- Camera Adjustment: The camera lens can be rotated and pivoted manually to optimize the viewing angle after installation.

Figure 5.2: 180° Infrared Motion Sensor Detection Range.
5.3 Intercom Function
Use the two-way audio intercom feature to communicate with visitors or deter unwanted guests.
- Speak: Press the microphone icon in the app's live view to speak through the floodlight's speaker.
- Listen: Listen to audio from the floodlight's microphone through your smartphone.
5.4 Notifications and Alarms
Configure push notifications or alarm tones in the app to be alerted when motion is detected.
6. Maintenance
To ensure optimal performance and longevity of your Steinel XLED CAM 1 SC, follow these maintenance guidelines:
- Cleaning: Regularly clean the light and camera lens with a soft, damp cloth. Do not use abrasive cleaners or solvents. Ensure power is off before cleaning.
- Inspection: Periodically check the mounting and electrical connections for any signs of wear or damage.
- Software Updates: Keep the "Cam light" app updated to the latest version to ensure compatibility and access to new features or security enhancements.
- SD Card: The 8GB Micro SD card will eventually fill up. The system typically overwrites the oldest recordings. If you need to save specific footage, download it to your device or computer. Consider formatting the SD card periodically via the app settings to maintain performance.
7. Troubleshooting
If you encounter issues with your XLED CAM 1 SC, refer to the following common problems and solutions:
| Problem | Possible Cause | Solution |
|---|---|---|
| Light does not turn on. | No power supply; faulty wiring; light sensor issue. | Check circuit breaker. Verify electrical connections. Ensure ambient light conditions are suitable for sensor activation. |
| Camera live view is black or frozen. | No Wi-Fi connection; app issue; camera malfunction. | Check Wi-Fi signal strength. Restart the app. Power cycle the floodlight. |
| Motion detection not working. | Incorrect sensitivity settings; obstructed sensor; outside detection range. | Adjust motion sensitivity in the app. Clear any obstructions. Ensure movement is within the 10m range and 180° field. |
| Intercom audio is unclear or not working. | Poor Wi-Fi connection; microphone/speaker obstruction; app settings. | Improve Wi-Fi signal. Check for debris blocking microphone/speaker. Verify app audio settings. |
| Cannot connect to Wi-Fi. | Incorrect Wi-Fi password; 5GHz network selected; weak signal. | Ensure correct 2.4 GHz Wi-Fi network and password. Move router closer or use a Wi-Fi extender. |
For persistent issues, contact Steinel customer support.
8. Specifications
| Feature | Specification |
|---|---|
| Model Number | 065294 |
| Dimensions (L x W x H) | 16.7 x 21 x 27.5 cm |
| Weight | 1.47 kg |
| Power Supply | 230 Volts AC |
| Power Consumption | 21 Watts |
| Luminous Flux | 2310 lm |
| Color Temperature | 3000K (Warm White) |
| Color Rendering Index (CRI) | 80 |
| Average Lifespan (LED) | 50,000 Hours |
| Ingress Protection (IP) Rating | IP44 |
| Motion Sensor Type | Infrared |
| Motion Sensor Detection Angle | 180° |
| Motion Sensor Max. Range | 10 m |
| Connectivity | 2.4 GHz Wi-Fi |
| Included Storage | 8 GB Micro SD Card |
| Energy Efficiency Class | E |
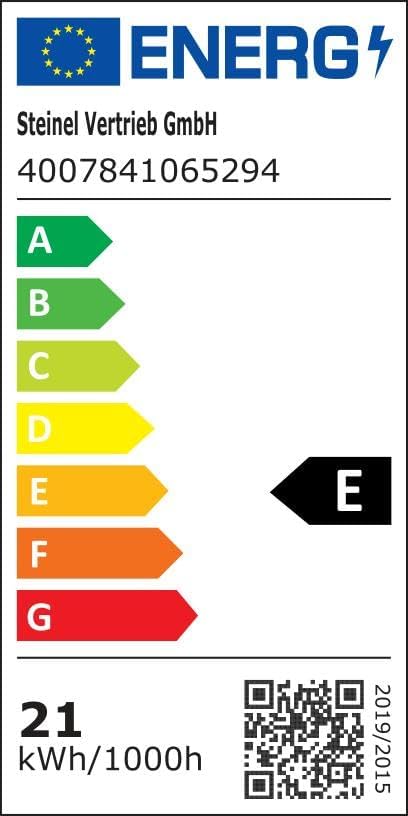
Figure 8.1: Energy Efficiency Label. For more details, visit the EPREL database.

Figure 8.2: Key Features Overview. Scan the QR code for an Augmented Reality view of the product.
9. Warranty and Support
Steinel products are manufactured to high quality standards. For warranty information, please refer to the specific terms and conditions provided at the time of purchase or visit the official Steinel website. Information regarding spare parts availability and guaranteed software updates is not explicitly provided in this manual.
For technical support, troubleshooting assistance beyond this manual, or warranty claims, please contact Steinel customer service or your local distributor. You can find contact information on the official Steinel website or through your point of purchase.
Visit the Steinel Brand Store for more products and information.


