1. Introduction
Thank you for purchasing the JONATHAN Y JYL9706A Mandy 52-inch 3-Light Crystal Prism Drum LED Ceiling Fan. This manual provides detailed instructions for the safe installation, operation, and maintenance of your new ceiling fan. Please read all instructions carefully before beginning installation and retain this manual for future reference.

Image 1.1: JONATHAN Y Mandy 52-inch Ceiling Fan with Remote Control.
2. Safety Information
To reduce the risk of electric shock, fire, or injury to persons, read and follow all instructions carefully.
- All electrical connections must be in accordance with local codes, ordinances, and the National Electric Code. If you are unfamiliar with wiring, consult a qualified electrician.
- Before starting installation, disconnect power by turning off the circuit breakers to the fan's electrical box.
- The outlet box and support structure must be securely mounted and capable of reliably supporting a minimum of 35 lbs (15.9 kg). Use only UL Listed outlet boxes marked "Acceptable for Fan Support."
- Do not operate the fan with damaged blades or housing.
- Avoid placing objects in the path of the blades.
- This product contains chemicals known to the State of California to cause cancer and birth defects or other reproductive harm. Wash hands after handling.
3. Package Contents
Verify that all components listed below are present and undamaged before proceeding with installation. If any parts are missing or damaged, contact customer service.
- Motor Housing Assembly
- Fan Blades (5)
- Blade Brackets
- Downrod (1x5 inch and 1x10 inch options)
- Canopy and Mounting Bracket
- Light Kit Assembly (Crystal Prism Drum, Diffuser Panel)
- LED Bulbs (3)
- Remote Control with Wall Mount
- Hardware Pack (screws, washers, wire nuts)
4. Specifications
| Feature | Specification |
|---|---|
| Brand | JONATHAN Y |
| Model Number | JYL9706A |
| Dimensions | 52"L x 52"W x 18.75"H (minimum height) to 23.75"H (maximum height) |
| Item Weight | 20.6 pounds (9.37 Kilograms) |
| Color | Chrome |
| Material | Iron, Metal/Crystal (Shade) |
| Voltage | 120 Volts |
| Wattage | 40 watts (total for light) |
| Light Source Type | LED (E12 Bulb Base) |
| Number of Light Sources | 3 |
| Brightness | 420 Lumen |
| Light Color | Warm White (2700 Kelvin) |
| Control Method | Remote Control (Infrared) |
| Special Features | Remote Control, Sloped Ceiling Compatible |
| Indoor/Outdoor Usage | Indoor |
| Efficiency | High Efficiency |
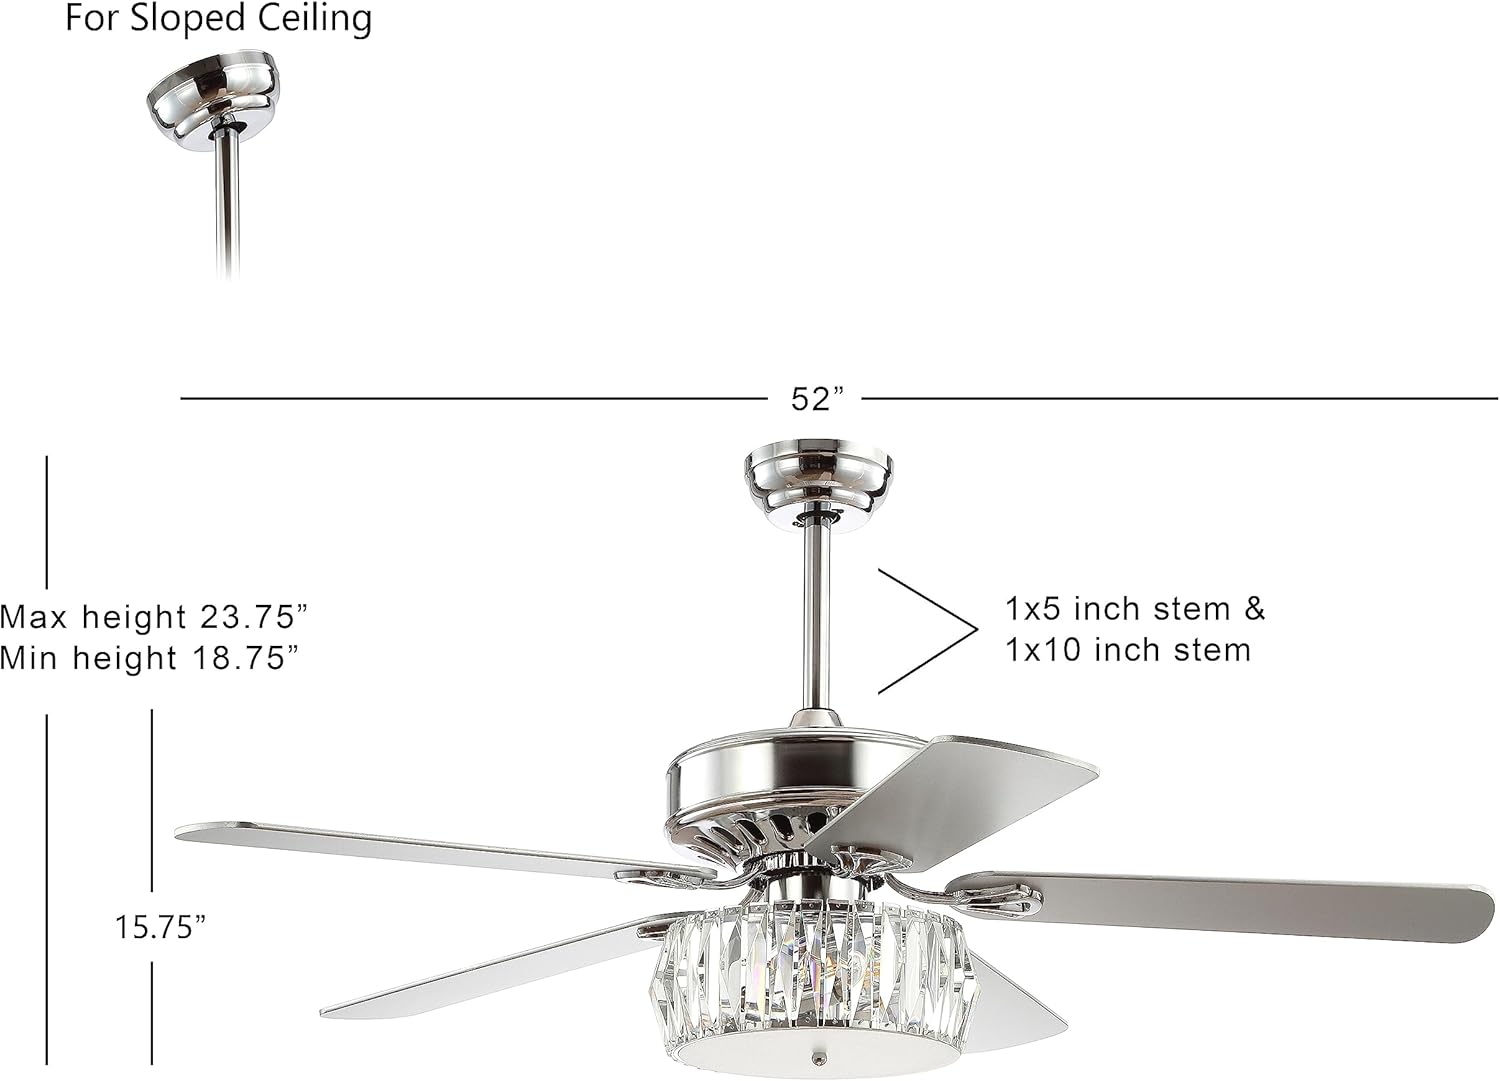
Image 4.1: Product dimensions and downrod options for various ceiling heights, including sloped ceiling compatibility.
5. Installation
Professional installation is recommended for safety and proper function. Ensure power is disconnected at the circuit breaker before beginning.
5.1 Mounting the Bracket
- Secure the mounting bracket to the ceiling outlet box using the provided screws and washers. Ensure the outlet box is rated for fan support.
- For sloped ceilings, ensure the mounting bracket is oriented correctly to allow the fan to hang plumb.

Image 5.1: Detail of the canopy and downrod connection point.
5.2 Assembling the Fan
- Attach the chosen downrod (5-inch or 10-inch) to the motor housing.
- Carefully lift the fan assembly and hang it from the mounting bracket.
- Connect the electrical wires from the fan to the household wiring according to the wiring diagram provided in the separate wiring guide (not included in this manual). Ensure all connections are secure with wire nuts.
- Install the fan blades onto the motor housing using the blade brackets and screws.
5.3 Installing the Light Kit
- Connect the light kit wiring to the fan motor wiring.
- Secure the light kit assembly to the bottom of the fan motor housing.
- Install the three E12 LED bulbs into the sockets.
- Attach the crystal prism drum and diffuser panel to the light kit.

Image 5.2: Key installation and feature highlights including sloped ceiling compatibility and adjustable height.

Image 5.3: The ceiling fan installed on a sloped ceiling, demonstrating its adaptability.
6. Operating Instructions
Your JONATHAN Y ceiling fan is operated via the included remote control.
6.1 Remote Control Functions
- Fan Speed Control: The remote allows you to select between 3 fan speeds (Low, Medium, High).
- Light Control: Turn the LED light on or off. Note: The light is not dimmable.
- Fan On/Off: Power the fan on or off independently of the light.

Image 6.1: Overview of key operational features including 3-speed settings and reversible motor.
6.2 Reversible Motor Function
The fan features a reversible motor for year-round comfort. A switch on the motor housing (usually located near the downrod) controls the blade direction.
- Summer Mode (Counter-clockwise): Blades rotate counter-clockwise to create a downward airflow, producing a cooling effect.
- Winter Mode (Clockwise): Blades rotate clockwise to create an upward airflow, circulating warm air trapped near the ceiling.
To change direction, turn off the fan and wait for the blades to stop completely before flipping the switch.

Image 6.2: Reversible fan blades, offering White Maple and Silver finish options.

Image 6.3: Visual representation of the reversible motor's function for summer cooling and winter heating.
7. Maintenance
Regular maintenance ensures optimal performance and extends the life of your ceiling fan.
- Cleaning: To clean the fan, wipe with a soft, damp cloth. Do not use abrasive cleaners or solvents, as these may damage the finish or crystal components.
- Blade Cleaning: Dust the fan blades regularly to prevent dust buildup, which can affect fan balance and performance.
- Light Bulb Replacement: Ensure power is off before replacing bulbs. Use only E12 base LED bulbs.
- Tighten Fasteners: Periodically check and tighten all screws and fasteners on the fan blades and motor housing to prevent wobbling or noise.
8. Troubleshooting
If you experience issues with your ceiling fan, refer to the following common problems and solutions:
| Problem | Possible Cause | Solution |
|---|---|---|
| Fan does not start | No power to the fan; Loose wire connections; Remote control battery low or not paired. | Check circuit breaker; Verify all wire connections are secure; Replace remote battery or re-pair remote. |
| Light does not work | Loose wire connection; Faulty bulb; Remote control issue. | Check light kit wiring; Replace bulbs; Check remote battery. |
| Fan wobbles | Loose blade screws; Unbalanced blades; Loose mounting bracket. | Tighten all blade screws; Ensure blades are balanced (balancing kit may be needed); Verify mounting bracket is secure. |
| Excessive noise | Loose screws; Motor housing rubbing; Remote sensor beep. | Tighten all screws; Ensure no parts are rubbing; The remote sensor may emit a beep upon command, which is normal operation. |
9. Warranty and Support
This product comes with a 30-day manufacturer warranty for defects only. Normal wear and tear is not warranted. Visible damages not noted upon delivery will be determined to be customer damage and will not be warranted. All products are inspected upon arrival.
For warranty information or technical support, please contact JONATHAN Y customer service. Please have your model number (JYL9706A) and purchase information ready when contacting support.


