
RUN-CHICKEN T50
RUN-CHICKEN T50 Automatic Chicken Coop Door Instruction Manual
Model: T50 | Brand: RUN-CHICKEN
1. Product Overview
The RUN-CHICKEN T50 Automatic Chicken Coop Door is designed to provide a secure and convenient solution for managing your poultry. Crafted from durable aluminum, it offers reliable operation in various weather conditions and can be programmed via a smartphone application.

Figure 1: RUN-CHICKEN T50 Automatic Chicken Coop Door
2. Key Features
- Plug and Play Technology: Easy installation within 10 minutes, no complicated wiring.
- Battery Operated: Minimum 1 year battery life (2x AA batteries included).
- Easily Programmable: Configure settings using the dedicated smartphone app (Timer, Light Sensor, GPS mode, Manual control).
- Works in Extreme Weather: Waterproof and resistant to snow, rain, and dust from -15°F to 140°F (-26°C to 60°C).
- All-in-One Design: Made from high-quality, powder-coated aluminum for durability.

Figure 2: Key Features of the T50 Door
3. Installation Guide
Installation of the RUN-CHICKEN T50 door is designed to be straightforward. Ensure you have the included screws and a drill.
3.1 Preparation
- Choose a vertical mounting surface on the outside of your chicken coop.
- Ensure at least 12 inches of clear space above the door's intended position for smooth operation.
- Mark the desired opening size on the coop wall. The door opening is approximately 9.4 inches wide by 13.8 inches high.
3.2 Mounting Steps
- Carefully saw out the marked opening on your coop wall.
- Position the RUN-CHICKEN T50 door over the opening.
- Secure the door using the six provided wood screws. Be careful not to overtighten the screws, as this can impede the door's movement.
- Remove the pull tab from the drive unit. This activates the door and prepares it for programming.

Figure 3: Door Installation on a Chicken Coop
3.3 Video Installation Guide
Video 1: Detailed installation instructions for the RUN-CHICKEN T50 door.
4. Operation and Programming
The T50 door can be operated manually or programmed for automatic opening and closing times using the RUN-CHICKEN app.
4.1 Initial Operation (Plug & Play)
Out of the box, the T50 is set to open 20 minutes after sunrise and close 20 minutes after sunset, using its built-in light sensor. This default setting is suitable for most users.
4.2 App Programming
For customized control, download the RUN-CHICKEN app from the Google Play Store or Apple App Store. Ensure Bluetooth is enabled on your smartphone and stay within 30 feet of the door for a stable connection.
- Add Device: Open the app and tap 'Add Device'. Your door should be detected after removing the pull tab.
- Name Device: Give your door a custom name and select its avatar.
- Opening Options: Choose between:
- Timer: Set a specific time for the door to open daily.
- Open Manually: The door opens only when commanded through the app.
- Sunrise: The app calculates local sunrise times using your location (requires location access) to open the door automatically.
- Closing Options: Similar to opening options, choose between Timer, Close Manually, or Sunset (requires location access).
- Advanced Settings: Customize opening and closing delays (e.g., 30 minutes after sunset) and activate the Anti-Pinch mode.
- Program Door: Tap 'Program My Door' to apply your settings.

Figure 4: Programming the Door via App
4.3 How it Works Video
Video 2: Demonstration of the RUN-CHICKEN T50 door's functionality.
5. Maintenance
Regular maintenance ensures the longevity and optimal performance of your RUN-CHICKEN T50 door.
5.1 Battery Replacement
The T50 operates on 2 AA batteries, offering a minimum of 1 year of life. When the battery level drops to 20%, the unit's red light will blink, and you may receive an app alert.
- Unscrew the four screws on the drive unit.
- Remove the battery guard.
- Insert fresh high-quality Duracell AA batteries, ensuring correct polarity.
- Reattach the battery guard and secure the drive unit with the screws.
Note: If batteries run out completely, the door will automatically close to keep your coop secure. All previous settings will be erased, requiring reprogramming via the app.
5.2 Cleaning
To ensure smooth operation, especially if the safety sensor prevents closing, clean the door rails regularly. Rinse the door with water, avoiding harsh chemicals to protect the paint.
6. Troubleshooting
6.1 Anti-Pinch Mode
The anti-pinch system is a safety feature that pauses the door for a few seconds if it encounters an obstruction (like a chicken) while closing. After the obstruction is clear, it will safely close again. Ensure this mode is activated in the app's advanced settings.
6.2 Door Not Opening/Closing
- Check battery level. If the red light is blinking, replace the batteries.
- Ensure the door rails are clean and free of debris.
- Verify app settings (Timer, Sunrise/Sunset, Manual) are correctly configured and programmed to the door.
- If using GPS/Light Sensor mode, ensure the door is exposed to natural light and your phone's location access is granted to the app.
7. Specifications
| Attribute | Detail |
|---|---|
| Model Name | T50 |
| Brand | RUN-CHICKEN |
| Material | Aluminum |
| Color | Brown |
| Product Dimensions (LxWxH) | 13.8" x 9.4" x 1.3" |
| Item Weight | 1 Milligram (Note: This weight seems incorrect, likely a data entry error) |
| Power Source | 2 AA batteries (included) |
| Operating Temperature | -15°F to 140°F (-26°C to 60°C) |
| Waterproof Rating | IP56 Standard (resistant to high-pressure water jets) |
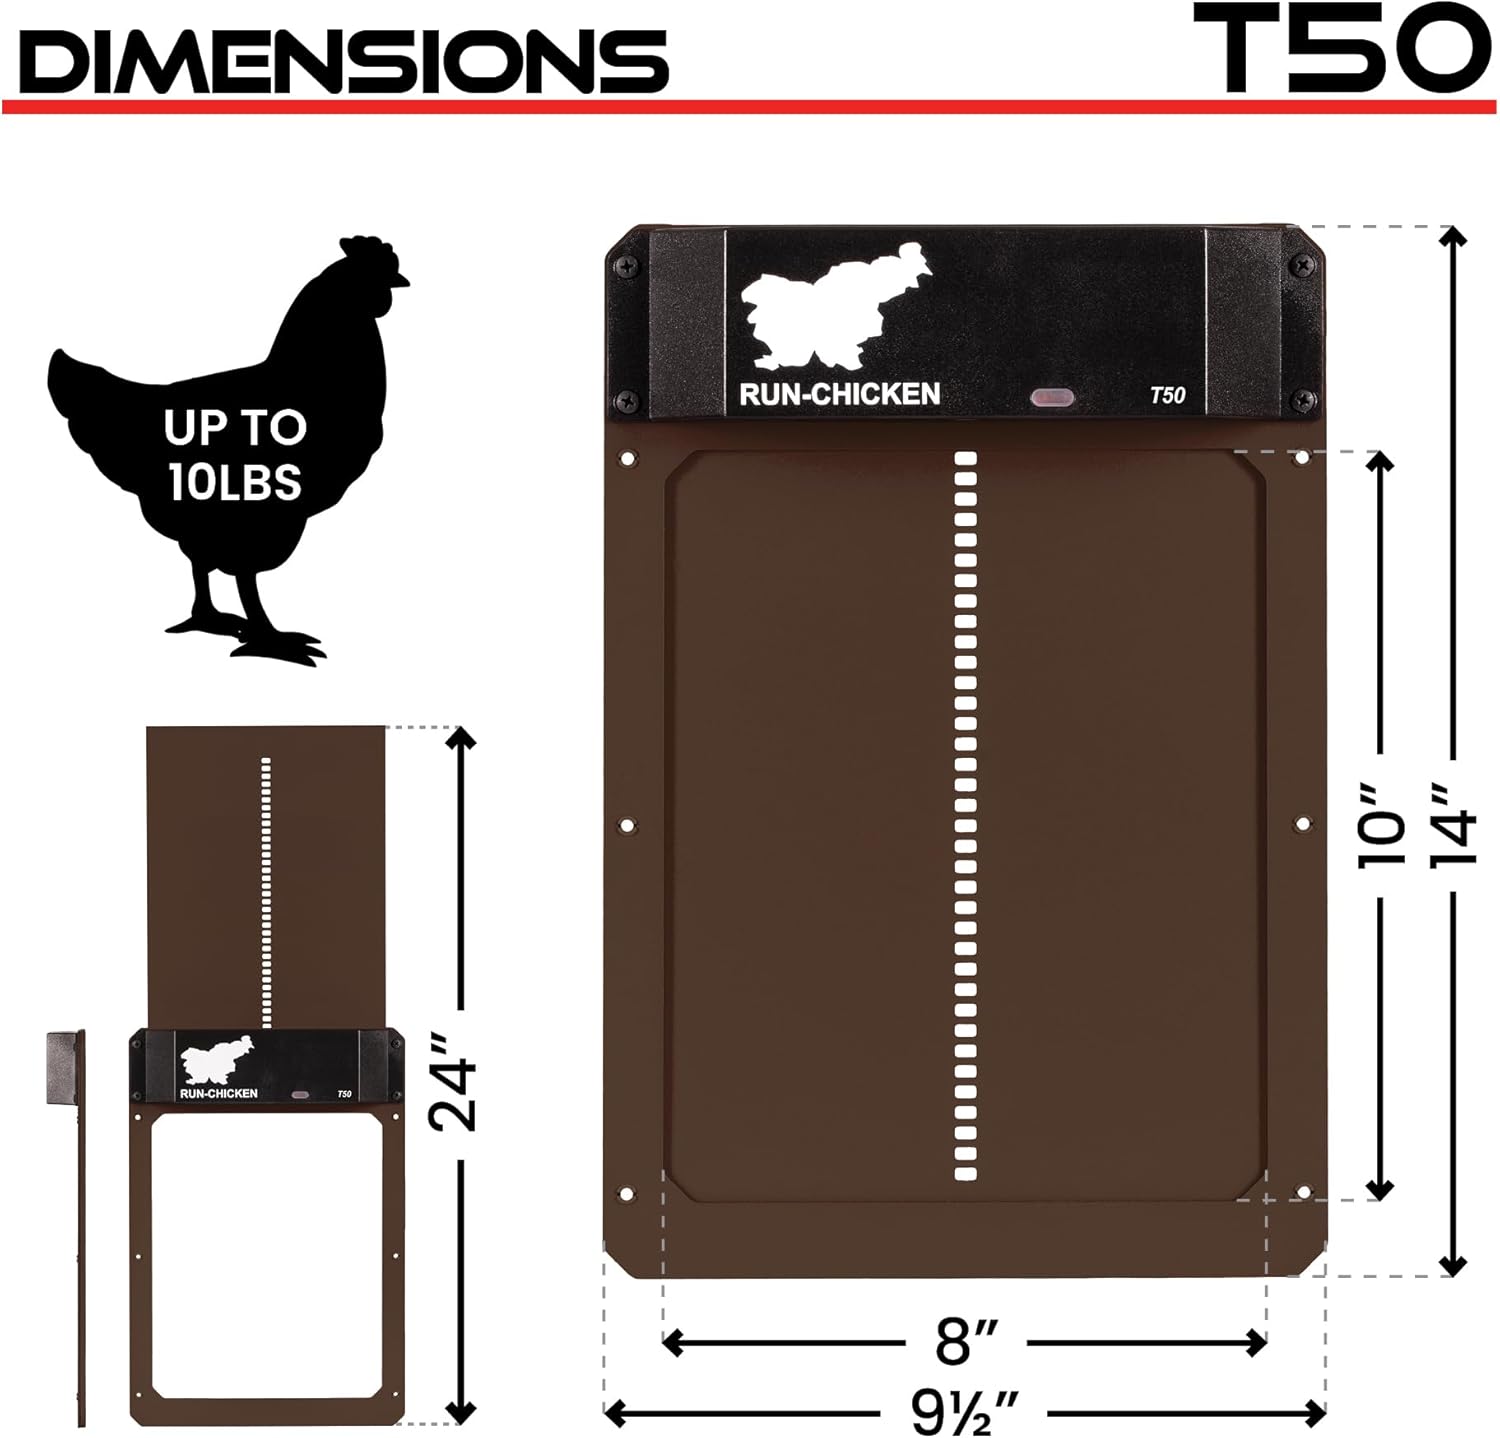
Figure 5: T50 Door Dimensions
7.1 Quality and Durability
Video 3: Overview of the RUN-CHICKEN door's quality and durability features.
8. Warranty and Support
For any problems or questions about your RUN-CHICKEN T50 door, please contact our customer support team. Support is available 24/7.
Email: info@run-chicken.com
The manufacturer, RUN-TIGER LLC, stands by the quality of its products. For specific warranty details, please refer to the documentation included with your purchase or contact customer support.
Related documentsT50


Ask a question about this manual
Ask about setup, troubleshooting, compatibility, parts, safety, or missing instructions. Manuals+ will review the question and use this page’s manual context to help answer it.