
1. Introduction
The GIMA Viatom Check-Me Pro is a compact, versatile, and portable device designed for comprehensive health monitoring. It integrates Holter ECG, SpO2, and temperature measurement capabilities, making it suitable for various applications including outpatient care, emergency situations, surgical environments, and telemedicine.
2. Safety Information
Before using the Check-Me Pro, please read all safety instructions carefully to ensure proper operation and to prevent injury or damage to the device.
- Consult a Medical Professional: This device is intended for health monitoring and should not be used as a substitute for professional medical diagnosis or treatment. Always consult with a healthcare provider for any health concerns.
- Device Placement: Ensure the device is placed on a stable, flat surface during use, or worn securely as instructed.
- Environmental Conditions: Operate the device within specified temperature and humidity ranges. Avoid extreme temperatures, direct sunlight, and high humidity.
- Water Resistance: The device is not waterproof. Avoid exposure to liquids.
- Cleaning: Refer to the maintenance section for proper cleaning procedures. Do not use abrasive cleaners or immerse the device in water.
- Interference: Keep the device away from strong electromagnetic fields, which may affect its performance.
3. Product Features
The GIMA Viatom Check-Me Pro offers a range of advanced features for comprehensive health monitoring:
- ECG Functionality: Usable with or without cables, featuring a 500 Hz sampling frequency and wide bandwidth. Capable of reproducing 30/60 second ECG traces. A professional ECG algorithm provides heart rate, QRS duration, ST segment, QT/QTC range, and rhythm analysis.
- Holter ECG Functionality: Easy to wear and operate, continuously records ECG for 24 hours. Allows monitoring of the ECG trace and report via a dedicated application or PC software. The report includes not only rhythm and heart rate but also HRV (Heart Rate Variability) parameters. The Holter report, including the ECG trace, can be shared in the cloud, printed, and saved as a PDF.
- SpO2 Functionality: Usable with or without cables, measures oxygen saturation and pulse rate.
- Temperature Functionality: Integrated infrared temperature sensor for fast and high-precision measurements.
- Bluetooth Connectivity: Enables seamless data transfer to compatible applications on smartphones or PCs for detailed analysis and record-keeping.
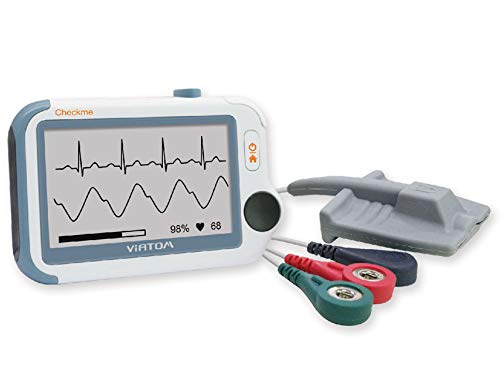
Image 1: The GIMA Viatom Check-Me Pro device. This image displays the compact design of the device, highlighting its screen and user interface.
4. Setup
Follow these steps to set up your GIMA Viatom Check-Me Pro device:
- Unpack the Device: Carefully remove the Check-Me Pro and all accessories from its packaging.
- Charge the Device: Before first use, fully charge the device using the provided charging cable and a compatible USB power adapter. The charging indicator will show the charging status.
- Power On: Press and hold the power button (usually located on the side or front) until the screen illuminates.
- Initial Settings: Follow the on-screen prompts to set the date, time, and preferred language.
- Install Mobile Application (Optional): For advanced features and data management, download the official GIMA Viatom application from your smartphone's app store. Pair the device via Bluetooth as instructed in the app.
5. Operating Instructions
5.1. ECG Measurement (Cable-Free)
- Ensure the device is powered on.
- Select the ECG mode from the main menu.
- Place your fingers on the designated electrodes on the device. Maintain a steady position and avoid movement.
- The device will begin recording. Wait for the measurement to complete (typically 30 or 60 seconds).
- Review the results on the screen. Data can be saved and transferred via Bluetooth.
5.2. Holter ECG Recording (24-Hour)
- Attach the ECG cables and electrodes to your body as per the diagram in the full manual (not provided here).
- Connect the cables to the Check-Me Pro device.
- Select the Holter ECG mode and initiate the 24-hour recording.
- Wear the device comfortably and continue with your daily activities.
- After 24 hours, stop the recording and transfer the data to the mobile application or PC for detailed analysis and report generation.
5.3. SpO2 Measurement
- Select the SpO2 mode.
- Place your finger into the SpO2 sensor opening (if applicable) or attach the external SpO2 probe.
- Remain still until the measurement is complete and the oxygen saturation and pulse rate are displayed.
5.4. Temperature Measurement
- Select the Temperature mode.
- Point the infrared sensor towards the measurement area (e.g., forehead) at the recommended distance.
- Press the measurement button. The temperature reading will be displayed instantly.
6. Maintenance
Proper maintenance ensures the longevity and accuracy of your Check-Me Pro device.
- Cleaning: Use a soft, dry cloth to clean the device. For stubborn marks, slightly dampen the cloth with isopropyl alcohol. Do not use harsh chemicals or abrasive materials. Ensure the device is powered off before cleaning.
- Storage: Store the device in a cool, dry place, away from direct sunlight and extreme temperatures. Keep it in its original packaging or a protective case when not in use.
- Battery Care: Recharge the battery regularly, even if the device is not used frequently, to maintain battery health. Avoid fully discharging the battery for extended periods.
- Software Updates: Periodically check for software updates via the mobile application or manufacturer's website to ensure optimal performance and access to new features.
7. Troubleshooting
If you encounter issues with your Check-Me Pro, refer to the following common problems and solutions:
| Problem | Possible Cause | Solution |
|---|---|---|
| Device does not power on. | Low battery; device malfunction. | Charge the device fully. If the problem persists, contact customer support. |
| Inaccurate ECG/SpO2 readings. | Poor electrode contact; movement during measurement; incorrect sensor placement. | Ensure firm and proper contact with electrodes/sensors. Remain still during measurement. Clean electrodes if necessary. |
| Bluetooth connection issues. | Bluetooth off on device/phone; device out of range; pairing issue. | Ensure Bluetooth is enabled on both devices. Keep devices within range. Re-pair the device through the app settings. |
| Screen is unresponsive. | Software glitch; device frozen. | Perform a soft reset (refer to the full manual for instructions, usually holding the power button for an extended period). |
If the issue is not resolved by the above steps, please contact GIMA customer support for further assistance.
8. Specifications
- Model Number: 35187
- Brand: GIMA
- Manufacturer: SHENZHEN LIVENPACE TECHNOLOGY CO.
- ECG Sampling Frequency: 500 Hz
- Holter ECG Recording Duration: Up to 24 hours
- Connectivity: Bluetooth
- Temperature Sensor: Integrated Infrared
- Item Shape: Rectangular
- Water Resistance Level: Not waterproof
- Indoor/Outdoor Use: Indoor
- Unit Count: 1 Total
- International Article Code (EAN): 06934440100348
- Package Dimensions: 40 x 35 x 12 cm; 1 Kilogram
- Available on Amazon.com.be since: September 2, 2019
9. Warranty and Support
GIMA products are manufactured to high-quality standards. For specific warranty information, please refer to the warranty card included with your product or visit the official GIMA website. For technical support, troubleshooting assistance beyond this manual, or to inquire about spare parts, please contact GIMA customer service directly. Contact details can typically be found on the manufacturer's website or in the product packaging.


