
Prolinemax 8 Cubic TALL Cement Mixer
Prolinemax 8 Cubic TALL Cement Mixer User Manual
Model: 8 Cubic TALL Cement Mixer
1. Important Safety Information
Read and understand all safety warnings and instructions before operating this cement mixer. Failure to follow these instructions may result in electric shock, fire, and/or serious injury.
- Always wear appropriate personal protective equipment (PPE), including safety glasses, gloves, and sturdy footwear.
- Ensure the mixer is placed on a firm, level surface to prevent tipping during operation.
- Keep hands, feet, and clothing clear of moving parts, especially the mixing drum and blades.
- Do not overload the mixer. Refer to the specifications for maximum batch output.
- Disconnect power before performing any maintenance, cleaning, or adjustments.
- Use only a 3-prong grounded outlet for power connection. Do not bypass the grounding feature.
- Keep children and bystanders away from the operating area.
- Do not operate the mixer in wet conditions or near flammable liquids or gases.
2. Product Overview
The Prolinemax 8 Cubic TALL Cement Mixer is designed for efficient mixing of concrete, mortar, and stucco. Its portable design and robust construction make it suitable for various construction and home improvement projects.
2.1 Components
- Mixing Drum: The main container for mixing materials.
- Motor Housing: Encloses the electric motor.
- Control Box: Contains the power switch and electrical connections.
- Frame/Stand: Provides stability and support.
- Wheels: For easy portability.
- Drum Tilt Mechanism: Allows for tilting the drum for loading and unloading.
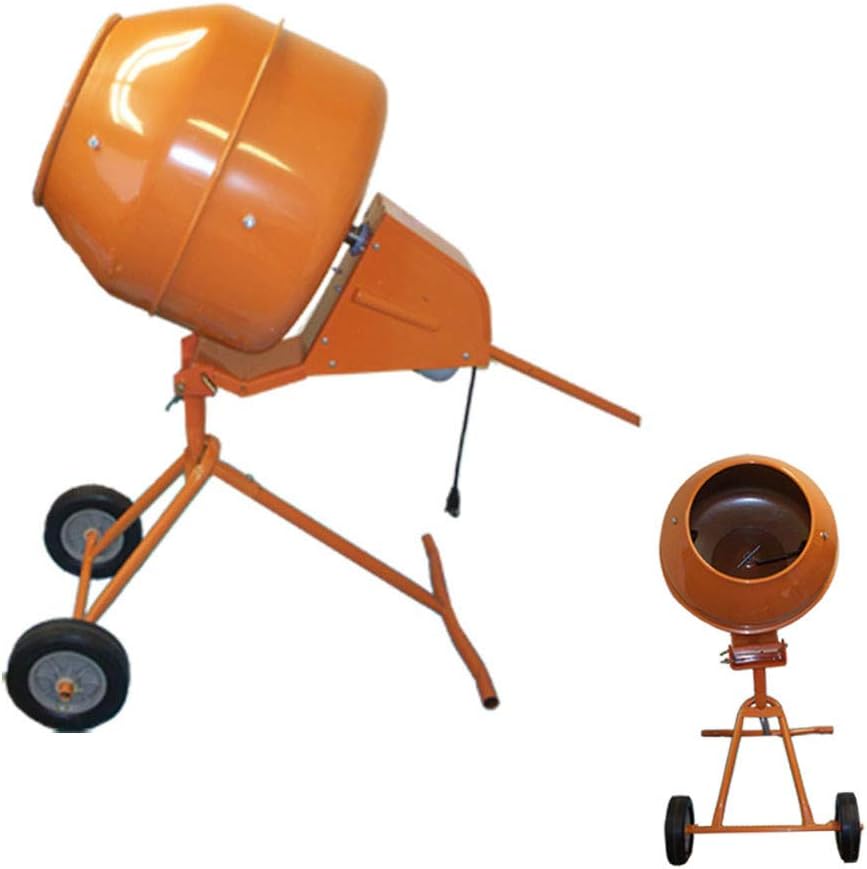
Figure 2.1: Fully assembled Prolinemax 8 Cubic TALL Cement Mixer, showing the drum, motor, frame, and wheels.

Figure 2.2: Front view of the cement mixer, highlighting the drum opening and overall compact design.

Figure 2.3: Close-up view of the interior of the mixing drum, showing the integrated mixing blades designed for efficient material blending.

Figure 2.4: Detailed view of the motor housing and control box, including the power switch and safety labels.
3. Setup and Assembly
The Prolinemax cement mixer typically requires minimal assembly. Follow these steps to prepare your mixer for use:
- Unpack Components: Carefully remove all parts from the packaging. Verify all components are present according to the packing list (not provided in this manual, refer to product packaging).
- Attach Wheels: Securely attach the wheels to the frame using the provided hardware. Ensure they are firmly in place for stability and portability.
- Assemble Stand/Frame: Connect the frame sections as instructed in the assembly diagram (refer to product-specific assembly sheet). Ensure all bolts are tightened.
- Mount Drum Assembly: Attach the drum assembly to the main frame. Pay attention to the tilting mechanism and ensure it operates smoothly.
- Electrical Connection: Ensure the power cord is securely connected to the motor and control box. The mixer comes with a 3-prong grounded plug.
- Positioning: Place the assembled mixer on a firm, level, and stable surface away from any obstructions or potential hazards.
Note: Specific assembly steps may vary. Always refer to the detailed assembly instructions included with your product packaging.
4. Operating Instructions
Follow these steps for safe and effective operation of your cement mixer:
- Pre-Operation Check:
- Inspect the mixer for any visible damage, loose parts, or frayed electrical cords.
- Ensure the drum is clean and free of debris from previous use.
- Confirm the mixer is on a stable, level surface.
- Power Connection: Plug the mixer into a properly grounded 110 Volt, 60Hz outlet.
- Start Mixer: Press the 'ON' button on the control box to start the drum rotation.
- Add Ingredients:
- With the drum rotating, gradually add the required amount of water.
- Slowly add dry ingredients (cement, sand, gravel) into the drum. Avoid dumping large quantities at once to prevent motor strain.
- Ensure the batch output does not exceed 400 pounds.
- Mixing: Allow the ingredients to mix thoroughly until a consistent, uniform mixture is achieved. The drum rotates at approximately 23 RPM.
- Unloading:
- Once mixing is complete, carefully tilt the drum using the tilt mechanism to pour the mixture into a wheelbarrow or container.
- Ensure the container is positioned correctly to catch all material.
- Shut Down: After unloading, press the 'OFF' button on the control box to stop the mixer. Disconnect the power cord from the outlet.
5. Maintenance
Regular maintenance ensures the longevity and optimal performance of your cement mixer.
- Cleaning After Each Use:
- Immediately after each use, clean the inside and outside of the drum to prevent concrete or mortar from hardening.
- Add water and a small amount of gravel to the drum and let it run for a few minutes to help clean the interior.
- Rinse thoroughly with water. Do not spray water directly onto the motor or electrical components.
- The drum is designed to be easily cleaned.
- Lubrication: Periodically lubricate moving parts such as the drum bearings and tilt mechanism with appropriate grease to ensure smooth operation.
- Inspect Electrical Components: Regularly check the power cord, plug, and control box for any signs of wear, damage, or loose connections. Replace damaged parts immediately.
- Tighten Fasteners: Periodically check and tighten all nuts, bolts, and screws to ensure the mixer remains stable and secure.
- Storage: Store the mixer in a dry, covered area to protect it from weather elements when not in use.
6. Troubleshooting
This section addresses common issues you might encounter with your cement mixer.
| Problem | Possible Cause | Solution |
|---|---|---|
| Mixer does not start. | No power supply; Loose connection; Overload protection tripped. | Check power outlet and circuit breaker; Ensure plug is fully inserted; Reduce load and reset if applicable. |
| Drum rotation is slow or stops. | Overloaded drum; Low voltage; Motor issue. | Reduce material in drum; Check power supply voltage; Contact qualified technician if motor issue persists. |
| Excessive noise or vibration. | Loose fasteners; Worn bearings; Unbalanced load. | Tighten all bolts and nuts; Inspect and replace worn bearings; Ensure material is evenly distributed in drum. |
| Material sticks to drum. | Insufficient water; Improper mixing ratio; Dried material from previous use. | Adjust water content; Follow recommended mixing ratios; Clean drum thoroughly after each use. |
If you encounter problems not listed here or if solutions do not resolve the issue, please contact customer support.
7. Specifications
| Feature | Detail |
|---|---|
| Model | 8 Cubic TALL Cement Mixer |
| Drum Size | 8 Cubic Feet |
| Motor Specs | 1/2 HP (Single Phase) @ 1680RPM |
| Voltage | 110 Volt, 60Hz @ 2.3 AMP |
| Plug Type | 3 Prong Grounded |
| Drum Rotation Speed | 23 RPM |
| Drum Diameter | 29 Inch x 26 Inch |
| Batch Output | 400 Pounds |
| Product Dimensions | 33"D x 48"W x 58"H (Rough Estimation) |
| Item Weight | 400 pounds |
| Color | Orange |
| Special Feature | Portable |
8. Warranty and Support
For warranty information and customer support, please refer to the documentation included with your purchase or contact Prolinemax directly.
Typical support options include:
- Online Support: Visit the official Prolinemax website for FAQs, product registration, and contact forms.
- Phone Support: Contact the customer service hotline during business hours.
- Email Support: Send inquiries via email for non-urgent matters.
Please have your model number (8 Cubic TALL Cement Mixer) and purchase date ready when contacting support.
Ask a question about this manual
Ask about setup, troubleshooting, compatibility, parts, safety, or missing instructions. Manuals+ will review the question and use this page’s manual context to help answer it.