
1. Introduction and Overview
The JJC WT-868F2 Wireless Intervalometer Timer Remote Control is a versatile device designed for precise camera control, offering both wired and wireless functionality. It operates on a 2.4 GHz frequency, providing a reliable range of up to 328 feet (100 meters).
This remote control features specialized functions including self-timer, continuous shooting timer, long exposure timer, interval shooting timer, and a programmable number of shots. Its backlit LCD screen allows for easy adjustment of various time settings, from 1 second up to 99 hours, 59 minutes, and 59 seconds, and can set the number of shots from 1 to 999 or for infinite captures.

Image 1.1: The JJC Wireless Intervalometer Timer Remote Control (left) and its FSK 2.4GHz Receiver (right).
2. Product Components
The package includes the following components:
- 1 x Transmitter
- 1 x Receiver
- 1 x CR2 3V Lithium Battery (for Receiver)
- 2 x AAA 1.5V Batteries (for Transmitter)
- 1 x Camera Connecting Cable (ensure correct size for your camera model)
2.1 Transmitter Overview

Image 2.1: Diagram of the Transmitter, highlighting its LED Display Screen, Power Switch, Shutter Release Button with LOCK function, LED/LOCK Button, START/STOP Button, Cursor Control Button, SET Button, Connection Cable Port, and Count Down Indicator Lamp.
2.2 Receiver Overview

Image 2.2: Diagram of the Receiver, showing its LED Display Screen, Power Switch, Channel Selection Buttons (+ and -), Battery Compartment, Connection Cable Port, 1/4"-20 Tripod Mount Socket, Cold Shoe Mount, and Locking Disk.
2.3 LCD Display Indicators

Image 2.3: The LCD display showing Selection Cursor, Time Display, Lock Display, Shots Number Display, Plan Start Display, Shutter Release Display, Set Display, Speaker Display, Multiple Exposure Display, and Channel Selection Page.
3. Setup
3.1 Battery Installation
- Transmitter: Open the battery compartment on the back of the transmitter and insert two AAA 1.5V batteries, observing polarity.
- Receiver: Open the battery compartment on the receiver and insert one CR2 3V Lithium battery, observing polarity.
3.2 Connecting to Camera
Connect one end of the provided camera connecting cable to the "Connection Cable Port" on the receiver and the other end to your camera's remote control terminal. The receiver can be mounted on the camera's hot shoe for convenience, but this is not required for electrical connection.
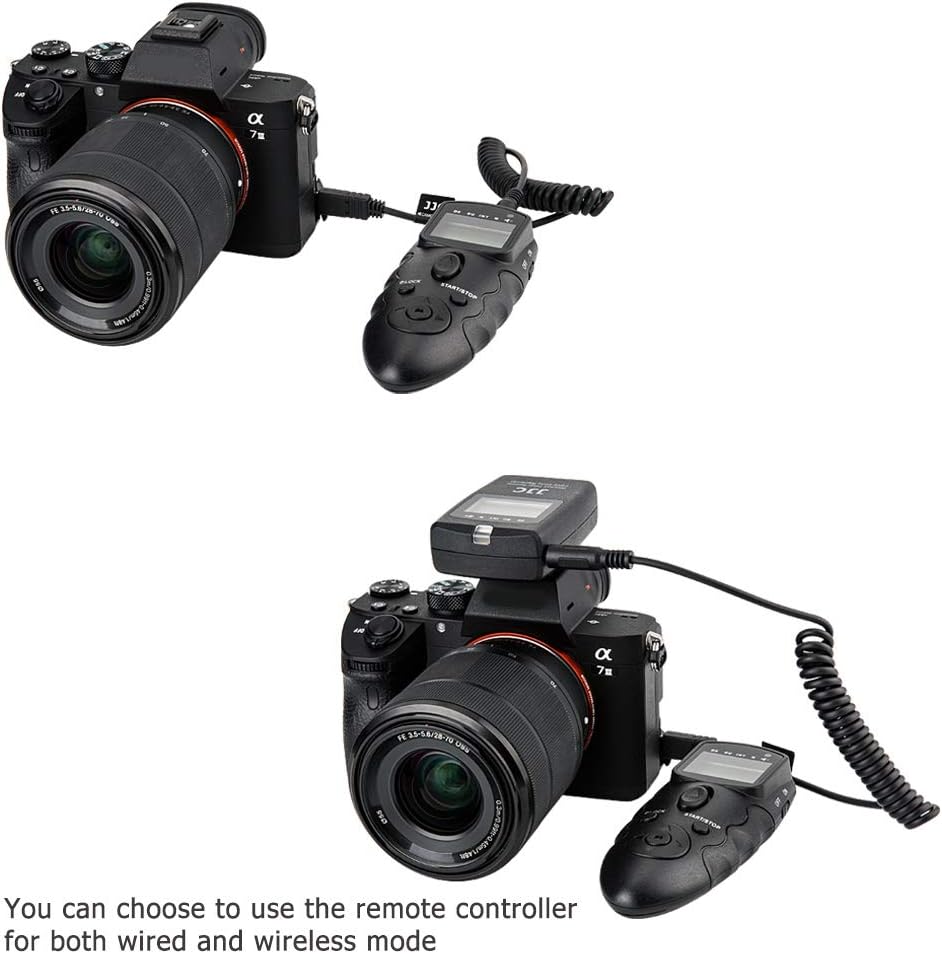
Image 3.1: The remote controller can be used in both wired (top) and wireless (bottom) configurations with a camera.
3.3 Powering On and Channel Selection
Slide the power switch on both the transmitter and receiver to the "ON" position. Ensure both devices are set to the same channel for wireless operation. Use the "CH +" and "CH -" buttons on the receiver to adjust the channel. The channel number will be displayed on the LCD screen (refer to Image 2.3).
4. Operating Instructions
The WT-868F2 offers various shooting modes and timer functions. Use the Cursor Control Buttons and SET button on the transmitter to navigate and confirm settings on the LCD display.
4.1 Basic Shutter Release
- Press the Shutter Release Button halfway to autofocus.
- Press the Shutter Release Button fully to take a picture.
- Use the LOCK function by sliding the Shutter Release Button upwards to lock it for continuous shooting or long exposures.
4.2 Timer Functions
The remote allows setting various parameters: Delay (DE), Bulb (BU), Interval (INT), and Number of Shots (N).
- Delay (DE): Sets the delay before the first shot is taken.
- Bulb (BU): Sets the exposure time for bulb mode.
- Interval (INT): Sets the time between shots. Note that the interval time includes the exposure time (BU).
- Number of Shots (N): Sets the total number of pictures to be taken (1-999 or infinite).
To set these parameters, use the cursor buttons to select the desired parameter on the LCD, then use the up/down buttons to adjust the value, and press SET to confirm.
4.3 Starting and Stopping
After setting your desired parameters, press the START/STOP button to begin the timed sequence. Press it again to stop.
4.4 Wireless Operation Range
The wireless range is approximately 100 meters (328 feet) in open areas. Ensure there are no significant obstructions between the transmitter and receiver for optimal performance.

Image 4.1: A user demonstrating the wireless functionality of the remote control with a camera set up on a tripod.

Image 4.2: Examples of photography applications possible with the remote, such as self-timer, single shoot, continuous shooting, time-lapse, long exposure, and utilizing its 100m wireless range.
4.5 Official Product Video
Video 4.1: An official product video demonstrating the JJC Wireless Intervalometer Timer Remote Shutter Release in various usage scenarios, including time-lapse photography and remote control of a camera.
5. Compatible Cameras
This remote control is compatible with select Sony cameras, including but not limited to:
- Sony A6000 / A6100 / A6300 / A6400 / A6500 / A6600
- Sony A3000 / A3500 / A5000 / A5100 / A58
- Sony A9 / A9III / A1 / A1 II
- Sony A7 / A7 II / A7 III / A7 IV / A7R / A7R II / A7R III / A7R IV / A7R V / A7S / A7S II / A7SIII
- Sony DSC-HX300 / DSC-HX400 / DSC-HX400V / DSC-HX50V / DSC-HX60V / DSC-HX90 / DSC-HX90V
- Sony DSC-RX10 / DSC-RX10 II / DSC-RX10 III / DSC-RX10 IV
- Sony DSC-RX100 II / DSC-RX100 III / DSC-RX100 IV / DSC-RX100 V / DSC-RX100 VA / DSC-RX100 VI / DSC-RX100 VII
- Sony DSC-RX1R II / DSC-WX500 / ZV-1 / FX3 / FX30
Always ensure you have the correct connecting cable for your specific camera model.
6. Troubleshooting (Frequently Asked Questions)
- Q1: I need 50 pictures, the exposure time for each picture is 10s, and the interval time between each picture is 5s. How do I set this?
- A1: (Assuming camera is in Bulb mode) Set the [BU] (Bulb time) to 10s and [INT] (Interval time) to 15s. Then, set the [N] (Number of shots) to 50 and press the [Start] button. The [INT] needs to be 15s because the remote's default program includes the exposure time within the interval. So, 15s (INT) minus 10s (BU) results in a 5s real interval between pictures.
- Q2: What batteries does it use?
- A2: The receiver uses a CR-2 battery, while the transmitter uses AAA batteries.
- Q3: Does the remote receiver require connection to a hot shoe on the camera?
- A3: The receiver can connect to the camera hot shoe, but this is for mounting convenience only. There is no electrical connection through the hot shoe, so you can mount it elsewhere or let it hang free.
- Q4: Can this be used to control video?
- A4: No, this device cannot control video recording.
- Q5: Does it include the necessary cable to connect the camera?
- A5: Yes, a camera connecting cable is included in the packaging. Please ensure you order the correct size as different cameras require different connecting cables.
- Q6: Can I set the interval to daily?
- A6: No, it does not have an independent time of day clock and cannot be set to daily. However, it can be set from 1 second to 99 hours, 59 minutes, and 59 seconds.
- Q7: Can I set the bulb time longer than the interval time?
- A7: No, the interval time must be longer than the bulb time, because the interval time contains the bulb time.
- Q8: Can I use one transmitter to trigger multiple cameras at the same time?
- A8: Yes, but the transmitter and multiple receivers must use the same channel, and the shooting distance should be within 100 meters. You would need to acquire extra receivers for this setup.
7. Specifications
| Feature | Detail |
|---|---|
| Model Number | WT-868F2 |
| Connectivity Technology | Radio Frequency (2.4 GHz) |
| Max Number of Supported Devices | 1 (per receiver) |
| Special Feature | Backlit LCD Screen |
| Item Weight | 6.7 ounces (approx. 190g) |
| Package Dimensions | 5 x 4.96 x 1.54 inches (approx. 12.7 x 12.6 x 3.9 cm) |
| Manufacturer | JJC |
8. Maintenance
To ensure the longevity and optimal performance of your JJC Wireless Intervalometer, follow these maintenance guidelines:
- Cleaning: Use a soft, dry cloth to clean the exterior of the transmitter and receiver. Do not use liquid cleaners or solvents.
- Battery Care: Remove batteries from both units if the device will not be used for an extended period to prevent leakage and damage.
- Storage: Store the device in a cool, dry place away from direct sunlight, extreme temperatures, and high humidity.
- Handling: Avoid dropping the device or subjecting it to strong impacts, as this may damage internal components.
9. Warranty and Support
For any product inquiries, technical support, or warranty information, please contact JJC customer service. You can find more information and contact details by visiting the official JJC store: