1. Introduction
Thank you for purchasing the DotCom Hx 750 Drone Quadcopter. This manual provides essential information for the safe operation, assembly, and maintenance of your drone. Please read this manual thoroughly before operating the device to ensure proper function and to prevent damage or injury.
2. Safety Precautions
To ensure safe operation and prevent damage, please observe the following safety guidelines:
- Adult Supervision: This product is recommended for users aged 14 and above. Adult supervision is advised for younger users.
- Flight Environment: Operate the drone in open, clear areas, away from people, animals, buildings, and power lines. Avoid flying in strong winds or adverse weather conditions.
- Battery Safety: Use only the provided battery and charging cable. Do not overcharge or short-circuit the battery. Discontinue use if the battery shows signs of damage or swelling.
- Propeller Safety: Keep hands, face, and loose clothing away from rotating propellers. Always turn off the drone before handling propellers.
- Water Exposure: Do not expose the drone or remote control to water or moisture.
- Modifications: Do not modify the drone or its components. Unauthorized modifications may void the warranty and compromise safety.
3. Package Contents
Verify that all items listed below are included in your package:
- DotCom Hx 750 Drone Quadcopter
- Remote Control (Transmitter)
- Rechargeable Drone Battery
- USB Charging Cable
- Spare Propellers (Set of 4)
- User Manual (This document)
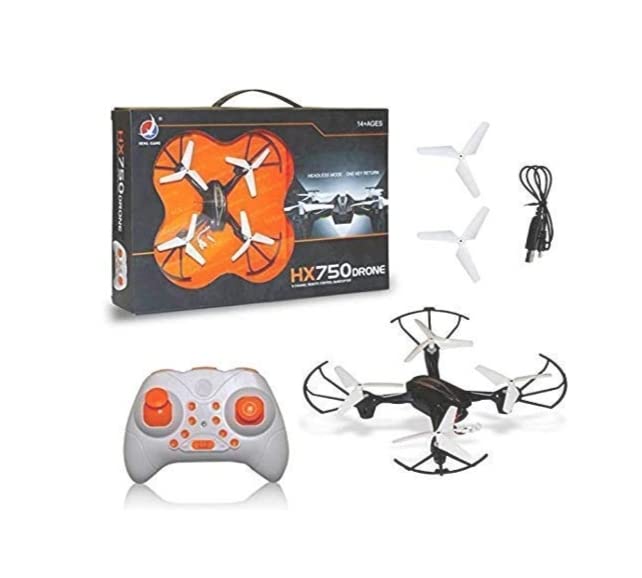
Figure 3.1: Package contents including the drone, remote, spare propellers, and charging cable.
4. Component Identification
Familiarize yourself with the main components of your DotCom Hx 750 drone and its remote control.
4.1 Drone Components
- Propellers: Four rotating blades that provide lift.
- Motor Guards: Protective frames around the propellers.
- Battery Compartment: Located on the underside of the drone.
- LED Indicator Lights: Indicate drone status and orientation.

Figure 4.1: Top view of the Hx 750 Drone.

Figure 4.2: Angled view of the Hx 750 Drone.
4.2 Remote Control Components
- Left Joystick: Controls throttle (up/down) and yaw (rotate left/right).
- Right Joystick: Controls pitch (forward/backward) and roll (left/right).
- Trim Buttons: For fine-tuning drone stability.
- Power Button: Turns the remote control on/off.
- Special Feature Buttons: For 360° roll and headless mode activation.
5. Setup
5.1 Charging the Drone Battery
- Connect the drone battery to the USB charging cable.
- Plug the USB cable into a USB power adapter (not included) or a computer's USB port.
- The indicator light on the USB cable will show charging status (e.g., red light for charging, off when fully charged).
- Charging typically takes approximately 60-90 minutes. Do not leave unattended during charging.
5.2 Installing Drone Battery
- Ensure the drone is powered off.
- Locate the battery compartment on the underside of the drone.
- Carefully insert the fully charged battery into the compartment.
- Connect the battery connector to the drone's power port.
- Close the battery compartment cover securely.
5.3 Installing Remote Control Batteries
The remote control requires 3 AA batteries (included).
- Open the battery cover on the back of the remote control.
- Insert 3 AA batteries, ensuring correct polarity (+/-).
- Close the battery cover securely.
5.4 Propeller Installation/Replacement
Each propeller is marked with an 'A' or 'B'. Match the propeller type to the corresponding motor shaft on the drone. Incorrect installation will prevent proper flight.
- Identify the 'A' and 'B' markings on the propellers and drone motor arms.
- Gently push the correct propeller onto its motor shaft until it is secure.
- Ensure propellers spin freely without obstruction.
6. Operating Instructions
6.1 Pairing the Drone and Remote Control
- Place the drone on a flat, level surface.
- Turn on the drone by pressing its power button. The LED lights will flash.
- Turn on the remote control.
- Push the left joystick (throttle) all the way up, then all the way down. The drone's LED lights will stop flashing and remain solid, indicating successful pairing.
6.2 Gyroscope Calibration
For stable flight, calibrate the gyroscope before each flight.
- After pairing, ensure the drone is still on a flat, level surface.
- Push both joysticks down and to the right simultaneously for a few seconds.
- The drone's LED lights will flash rapidly and then become solid, indicating successful calibration.
6.3 Basic Flight Controls
- Take-off/Landing: Gently push the left joystick up to take off. Pull it down slowly to land.
- Ascend/Descend: Push the left joystick up to ascend, pull down to descend.
- Forward/Backward: Push the right joystick up to fly forward, pull down to fly backward.
- Turn Left/Right (Yaw): Push the left joystick left to rotate left, right to rotate right.
- Fly Left/Right (Roll): Push the right joystick left to fly left, right to fly right.
6.4 Special Features
- 360° Roll-Over: Press the 360° roll button on the remote, then push the right joystick in the desired direction (forward, backward, left, or right) to perform a flip. Ensure sufficient altitude before attempting.
- Headless Mode: Press the Headless Mode button. In this mode, the drone's orientation is relative to the pilot, regardless of the drone's front direction. Press again to exit.
- Speed Adjustment: The drone has multiple speed modes (e.g., low, medium, high). Press the speed button to cycle through the modes. This is useful for beginners to start with lower speeds.
7. Maintenance
7.1 Cleaning
Wipe the drone and remote control with a soft, dry cloth. Do not use water or chemical cleaners.
7.2 Propeller Replacement
If a propeller is damaged, replace it with a spare propeller of the correct type (A or B). Refer to Section 5.4 for installation instructions.
7.3 Battery Care
- Store batteries in a cool, dry place.
- Do not store fully charged or completely depleted batteries for extended periods. Charge to approximately 50% for long-term storage.
- Remove batteries from the remote control if not in use for an extended period.
8. Troubleshooting
| Problem | Possible Cause | Solution |
|---|---|---|
| Drone does not respond to remote. | Not paired; low battery in remote or drone. | Re-pair the drone (Section 6.1); replace remote batteries; charge drone battery. |
| Drone flies erratically or drifts. | Gyroscope not calibrated; damaged propeller; uneven surface during calibration. | Calibrate gyroscope on a flat surface (Section 6.2); replace damaged propellers (Section 7.2). |
| Drone does not take off. | Low drone battery; propellers installed incorrectly. | Charge drone battery; check propeller installation (Section 5.4). |
| Short flight time. | Battery not fully charged; aging battery. | Ensure battery is fully charged; consider replacing the battery if it's old. |
9. Specifications
| Brand | DotCom |
| Model Name | Hx 750 |
| Special Features | 360 Degree Flip, Gyroscopic Stabilization, Lightweight, Rechargeable, Speed Adjustment |
| Age Range (Description) | Kid (Recommended 14+ with supervision) |
| Color | Black |
| Item Weight | 100 Grams |
| Battery Capacity | 220 Milliamp Hours (Drone) |
| Control Type | Remote Control |
| Maximum Range | 30 meters |
| Battery Cell Composition | Lithium (Drone) |
| Remote Control Batteries | 3 AA batteries (included) |
| Product Dimensions (LxWxH) | 21 x 21 x 5 Centimeters |
10. Warranty and Support
For warranty information or technical support, please refer to the contact details provided with your purchase documentation or visit the official DotCom website. Keep your proof of purchase for warranty claims.
Note: This manual is for informational purposes only. Product specifications and features may be subject to change without prior notice.


