1. Important Safety Information
Please read and understand all instructions before beginning installation. Failure to follow these instructions may result in electric shock, fire, or personal injury.
- This product is UL certified, ensuring superior quality and safety standards.
- Ensure the power supply is disconnected at the circuit breaker before installation or servicing.
- All wiring must be in accordance with national and local electrical codes. If you are unfamiliar with wiring, consult a qualified electrician.
- The fan is designed for indoor use only.
- The fan operates on 120V AC power.
- Mounting must be done to a structurally sound ceiling joist or outlet box capable of supporting the fan's weight (approximately 8 kg).
2. Package Contents
Verify that all components are present and undamaged before proceeding with installation.
- Ceiling Fan Motor Housing (High-Quality Steel)
- 3 x ABS Fan Blades (Black Finish, 26 inches each)
- Opaline Glass Lampshade with Integrated 15W LED Light Panel
- Downrod (4.5 inches length, 0.75 inches diameter)
- Mounting Bracket
- Remote Control with Wall Mount Holder
- Receiver for Remote Control
- Hardware Pack (screws, washers, wire nuts)
- 54-inch Lead Wires (for longer downrod installations, not included)
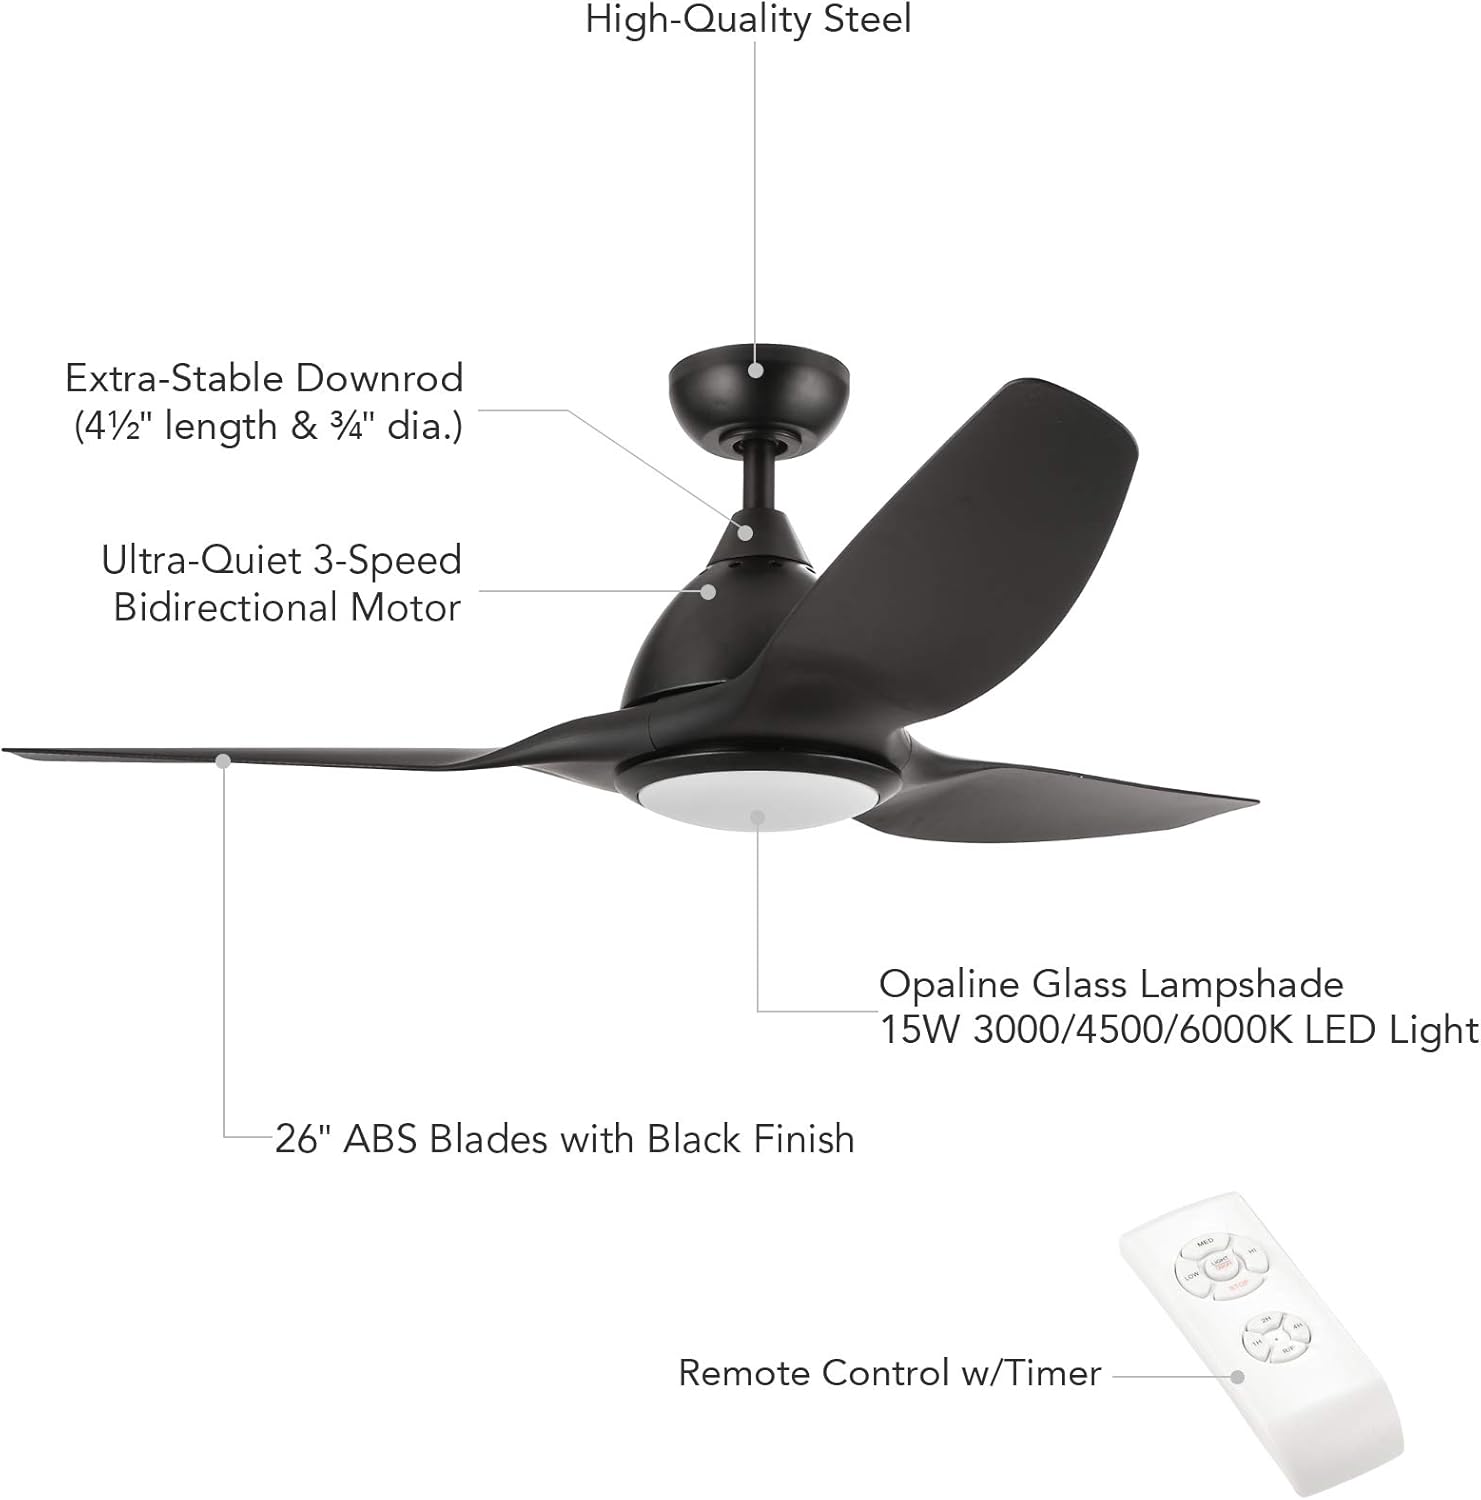
Figure 2.1: Exploded view of CO-Z Ceiling Fan components. This image illustrates the main parts such as the motor, blades, downrod, light kit, and remote control, aiding in identification during assembly.
3. Setup and Installation
This section provides general guidance for installing your CO-Z ceiling fan. Professional installation is recommended if you are not experienced with electrical wiring.
3.1 Pre-Installation Steps
- Turn off Power: Locate the circuit breaker for the fan's intended location and turn off the power. Verify power is off using a voltage tester.
- Prepare Mounting Location: Ensure the existing electrical box is securely mounted to a ceiling joist and can support the fan's weight.
- Unpack Components: Carefully remove all parts from the packaging and lay them out on a clean, soft surface to prevent scratches.
3.2 Assembly and Mounting
- Attach Mounting Bracket: Secure the mounting bracket to the ceiling electrical box using the provided screws.
- Assemble Downrod: Insert the downrod through the canopy and connect it to the fan motor housing. Ensure all screws are tightened securely. The 0.75-inch diameter downrod is designed for stability.
- Hang Fan Assembly: Carefully lift the fan assembly and hang it on the mounting bracket.
- Wire Connections: Connect the fan's electrical wires to the household wiring according to the wiring diagram in your specific installation guide. This typically involves connecting live, neutral, and ground wires.
- Install Remote Receiver: The remote control receiver must be wired between the fan and the household wiring. Carefully place the receiver inside the canopy or junction box, ensuring wires are not pinched.
- Attach Fan Blades: Securely attach the three ABS fan blades to the motor housing.
- Install Light Kit: Connect the LED light panel wires and attach the opaline glass lampshade to the fan motor housing.
- Secure Canopy: Raise the canopy to cover the mounting bracket and wiring, securing it with the provided screws.
Note on Wiring: Some users have noted that the remote receiver can be challenging to fit into standard junction boxes. Plan your wire management carefully to ensure a secure and tidy installation.
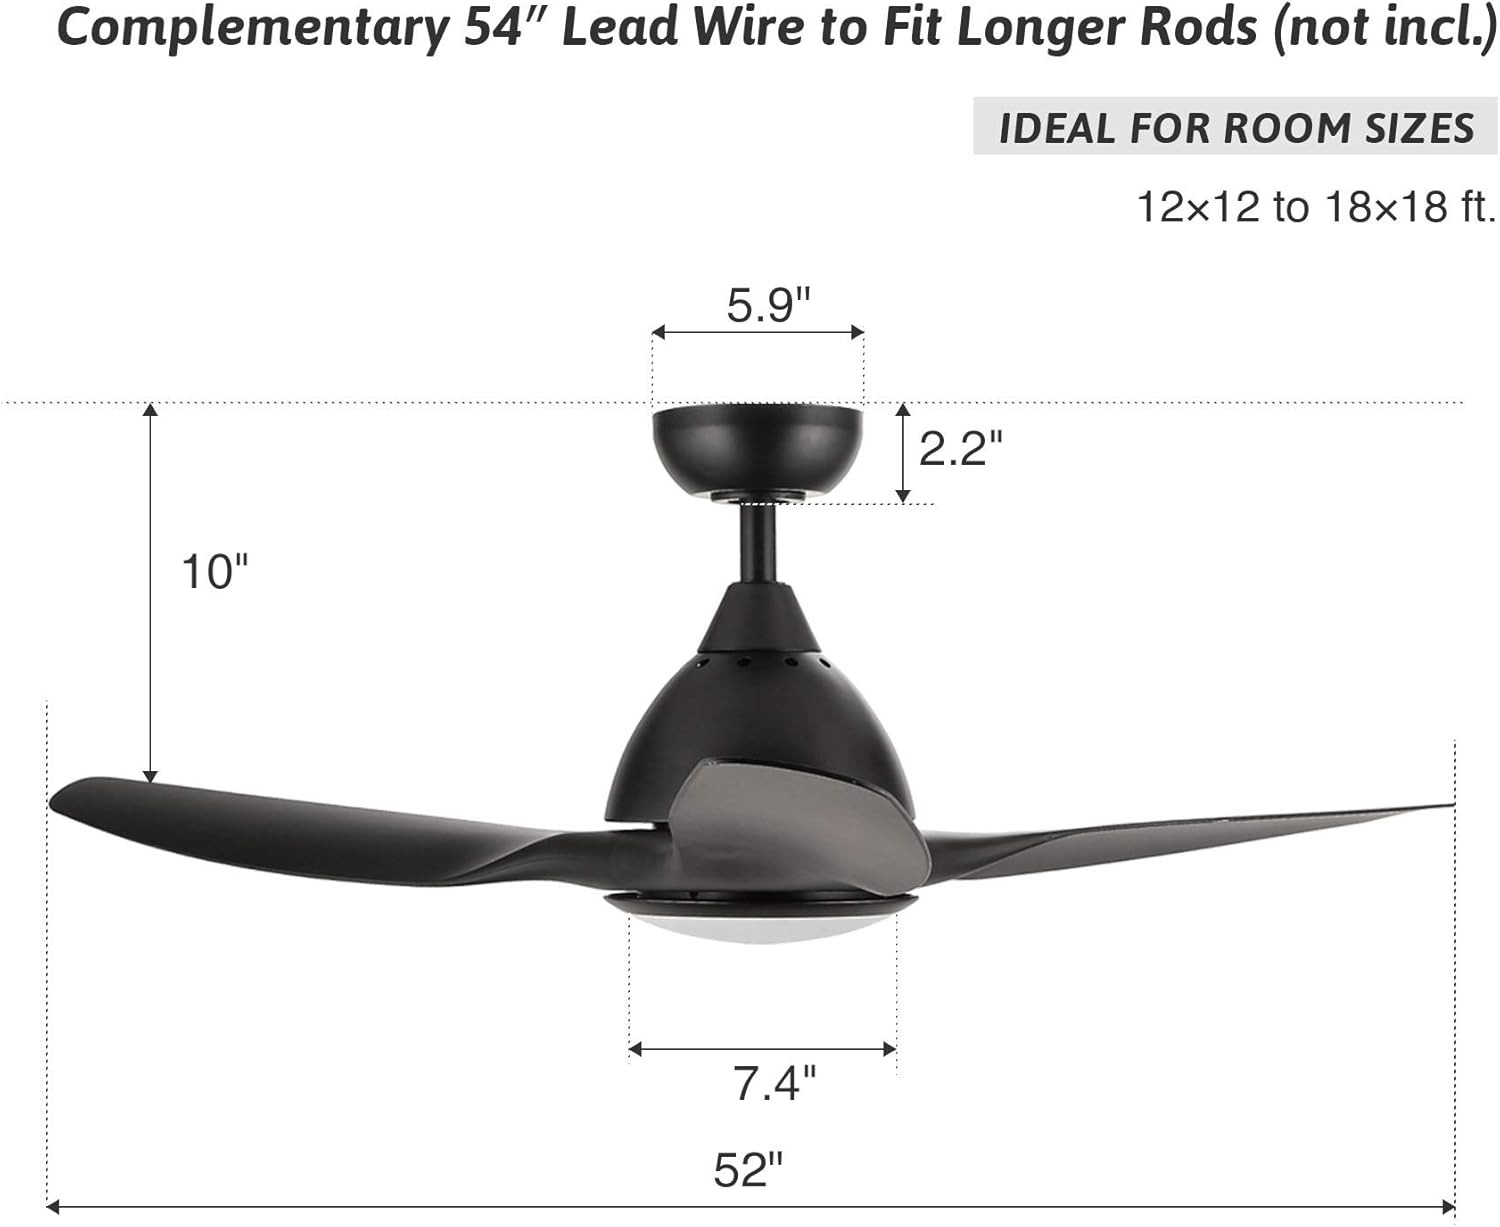
Figure 3.1: CO-Z Ceiling Fan Dimensions. This image provides key measurements such as the 52-inch overall diameter, 10-inch total height, and individual component sizes, useful for planning installation space.
4. Operating Instructions
Your CO-Z ceiling fan is controlled by the included remote control, offering convenience and versatility.
4.1 Remote Control Functions
- Fan ON/OFF: Press the fan button to turn the fan on or off.
- Fan Speed: Select from 3 speed options: Low, Medium, High.
- Light ON/OFF: Press the light button to turn the LED light on or off.
- Fan Direction (Reversible): Use the remote to switch the fan's rotation direction. This feature helps optimize air circulation for different seasons.
- Timer Function: Set the fan to operate for a specific duration (1, 2, or 4 hours) before automatically turning off.
- Color Temperature Selection: Cycle through the available LED light color temperatures (3000K Warm White, 4500K Natural White, 6000K Cool White).
The remote control has an effective range of approximately 10 feet.
4.2 Seasonal Operation (Reversible Fan Direction)
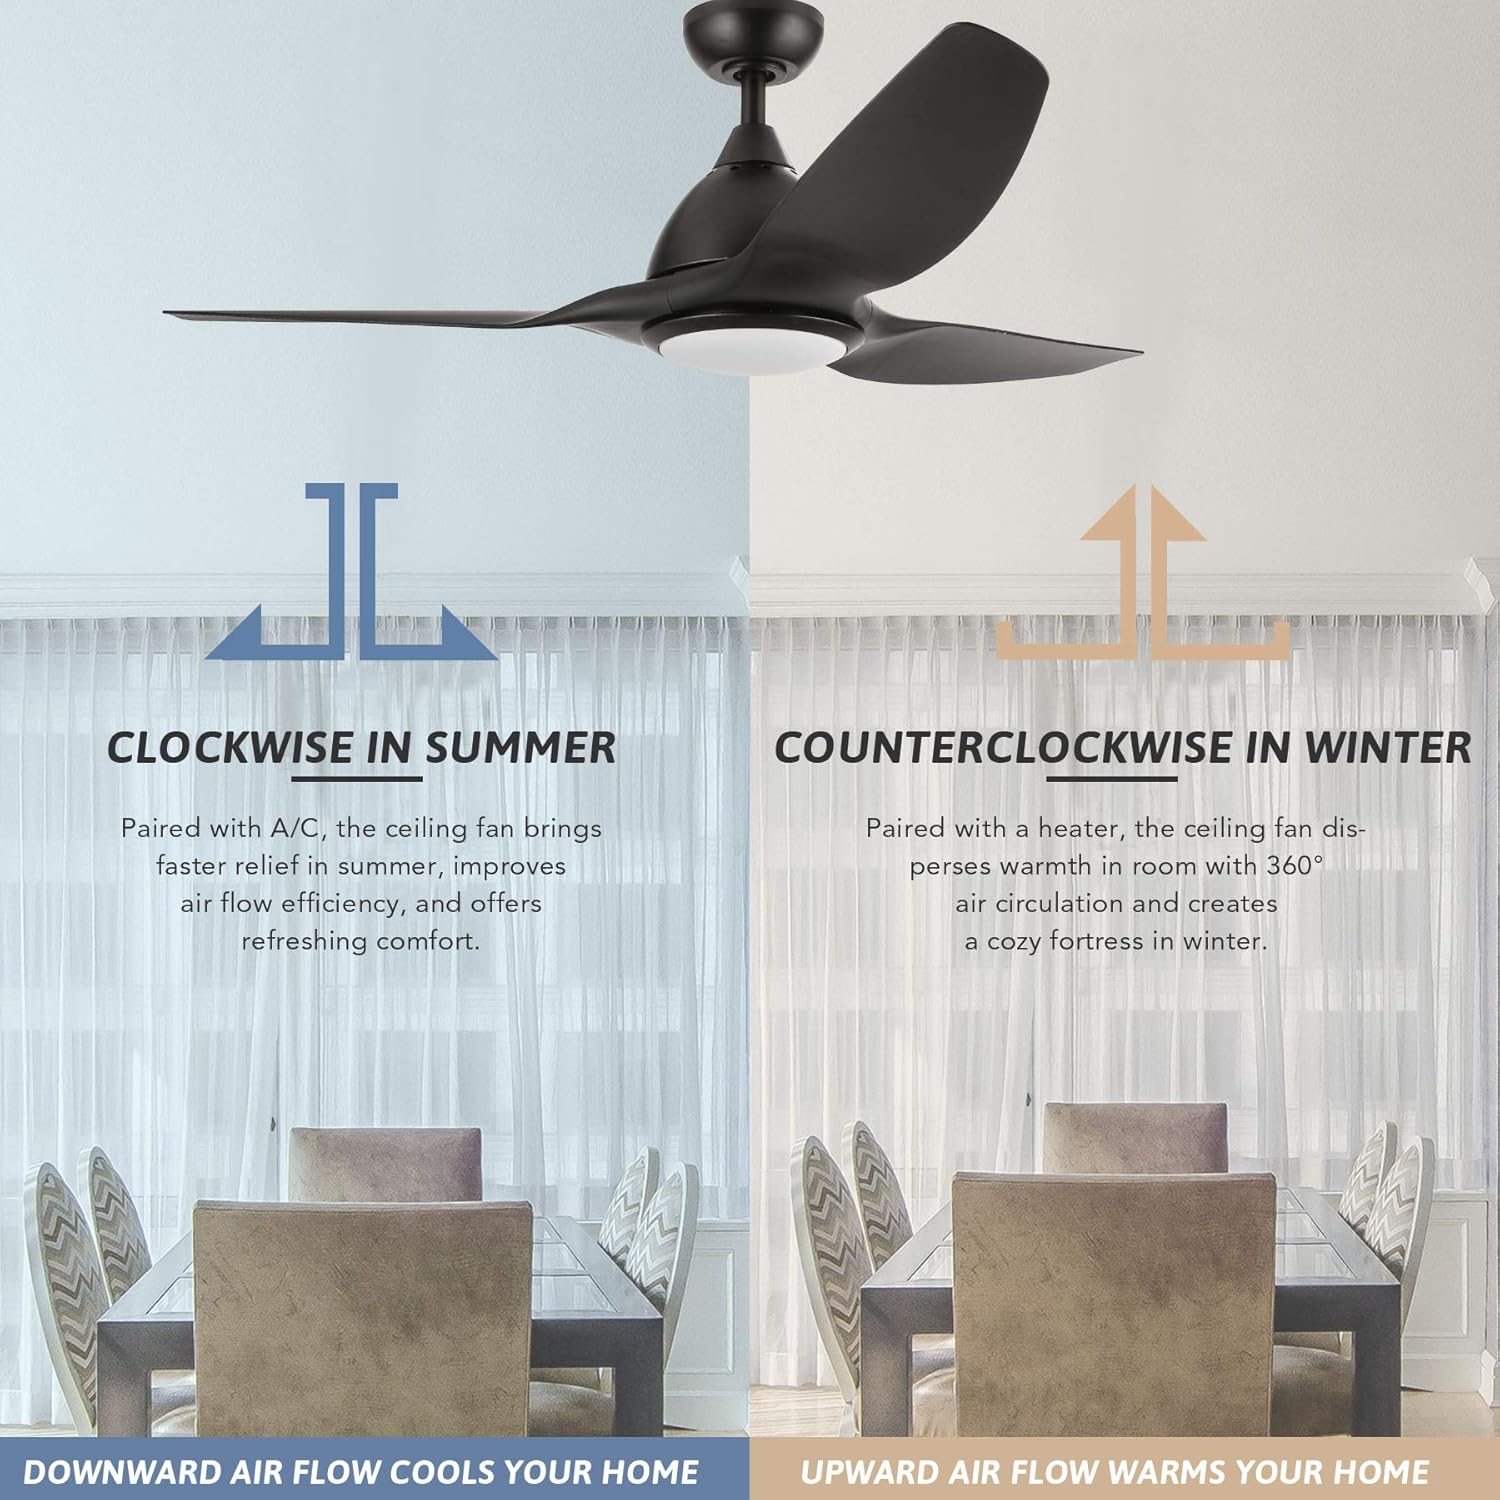
Figure 4.1: Seasonal Fan Direction. This image explains how to use the reversible fan function: clockwise rotation for downward airflow in summer to create a cooling effect, and counter-clockwise rotation for upward airflow in winter to redistribute warm air.
- Summer Mode (Clockwise Rotation): The fan blades rotate clockwise, pushing air downwards. This creates a cooling breeze, enhancing the effect of air conditioning.
- Winter Mode (Counter-Clockwise Rotation): The fan blades rotate counter-clockwise, drawing air upwards. This helps to circulate warm air that rises to the ceiling, distributing it throughout the room and improving heating efficiency.
4.3 LED Light Color Temperature

Figure 4.2: Color Temperature Selection. This image demonstrates the visual difference between the three available light settings: 3000K (Warm White), 4500K (Natural White), and 6000K (Cool White), allowing users to choose their preferred ambiance.
The integrated LED light panel offers three distinct color temperatures to suit your preference and room ambiance:
- 3000K (Warm White): Provides a cozy, inviting glow.
- 4500K (Natural White): Offers a balanced, neutral light suitable for most tasks.
- 6000K (Cool White): Delivers a bright, crisp light, ideal for focused activities.
Note: The LED light is not dimmable. It operates at a fixed brightness for each color temperature setting.
5. Maintenance
Regular maintenance ensures optimal performance and longevity of your ceiling fan.
- Cleaning: Periodically wipe the fan blades and motor housing with a soft, damp cloth. Do not use abrasive cleaners or solvents, as these can damage the finish.
- Tighten Fasteners: Check all screws and fasteners on the fan and mounting bracket annually to ensure they are secure. Loose connections can cause noise or wobbling.
- LED Light Replacement: The integrated LED light panel is designed for long-term use and is generally not user-replaceable. If the LED light fails, please contact customer support for assistance.
6. Troubleshooting
This section addresses common issues you might encounter with your ceiling fan.
| Problem | Possible Cause | Solution |
|---|---|---|
| Fan does not start | No power to the fan; Loose wire connections; Remote control battery dead or not paired. | Check circuit breaker; Ensure all wire connections are secure; Replace remote battery or re-pair remote with receiver (refer to specific pairing instructions in the full manual). |
| Fan wobbles | Loose fan blades or mounting hardware; Unbalanced blades. | Ensure all blade screws and mounting screws are tight; Use a blade balancing kit (not included) if necessary. |
| Excessive noise | Loose screws; Motor not seated correctly; Blades hitting an obstruction. | Check and tighten all screws; Ensure the motor housing is properly secured; Verify no obstructions are in the fan's path. |
| Light does not work | Loose wire connection to light kit; Faulty LED panel. | Check light kit wiring; If LED panel is faulty, contact customer support for replacement options. |
| Remote control not responding | Dead battery; Receiver not paired or faulty. | Replace remote battery; Re-pair remote with receiver (consult full manual for pairing steps); If issue persists, contact support. |
7. Specifications
| Model Number | CFN-1010-NW-CA-3 |
| Fan Diameter | 52 inches |
| Number of Blades | 3 |
| Blade Material | ABS |
| Motor Type | 70W Carbon Steel AC Motor |
| Fan Speeds | 3 (Low, Medium, High) |
| Fan Direction | Reversible (Bidirectional) |
| Light Type | Integrated 15W LED Panel |
| Color Temperatures | 3000K (Warm White), 4500K (Natural White), 6000K (Cool White) |
| Dimmable Light | No |
| Control Method | Remote Control (10 ft. effective range) |
| Timer Settings | 1, 2, 4 hours |
| Mounting Type | Downrod Mount |
| Voltage | 120V AC |
| Certification | UL Listed |
| Material | Acrylonitrile Butadiene Styrene, Stainless Steel |
| Item Weight | 8 kg |
| Recommended Room Size | 12x12 ft to 18x18 ft |
8. Warranty and Support
8.1 Warranty Information
This CO-Z ceiling fan is backed by a 1-year warranty from the date of purchase. This warranty covers manufacturing defects and ensures a free exchange if the product is found to be defective. Please retain your proof of purchase for warranty claims.
8.2 Customer Support
For technical assistance, troubleshooting beyond this manual, or warranty claims, please contact CO-Z customer support. Refer to the contact information provided with your purchase or visit the official CO-Z website for support details.


