
AEG FEE93810PM
AEG FAVORIT FEE93810PM Dishwasher User Manual
Model: FEE93810PM | Brand: AEG
1. Introduction
Welcome to the user manual for your new AEG FAVORIT FEE93810PM Built-in Dishwasher. This manual provides essential information for the safe and efficient operation, installation, and maintenance of your appliance. Please read it thoroughly before using the dishwasher for the first time and keep it for future reference.
1.1 Safety Information
Always observe the following safety precautions:
- Ensure the appliance is correctly installed by a qualified professional before use.
- Do not allow children to play with or operate the dishwasher.
- Use only detergents and rinse aids specifically designed for automatic dishwashers.
- Never open the door during operation, especially during the hot wash or drying cycle, as hot water or steam may escape.
- In case of malfunction, switch off the appliance and disconnect it from the power supply before attempting any troubleshooting.
2. Product Overview
The AEG FAVORIT FEE93810PM is a 60cm built-in front-open dishwasher designed for optimal cleaning performance and user convenience.

Figure 2.1: Front view of the AEG FAVORIT FEE93810PM Built-in Dishwasher.
2.1 Key Features
- ComfortLift: An innovative feature that allows the lower basket to gently lift up to a comfortable height for easier loading and unloading.
- Satellite Spray Arm: Unique spray arm design that constantly changes the angle of the water flow, ensuring water reaches every corner of the dishwasher for thorough cleaning.
- Removable Cutlery Tray: A dedicated tray for cutlery, providing flexible loading options and excellent cleaning results for utensils.
- SoftSpikes and SoftGrips: Specialized holders in the baskets designed to securely hold delicate items like wine glasses, preventing damage during the wash cycle.
- Easy Touch Panel: Intuitive control panel for simple program selection and operation.
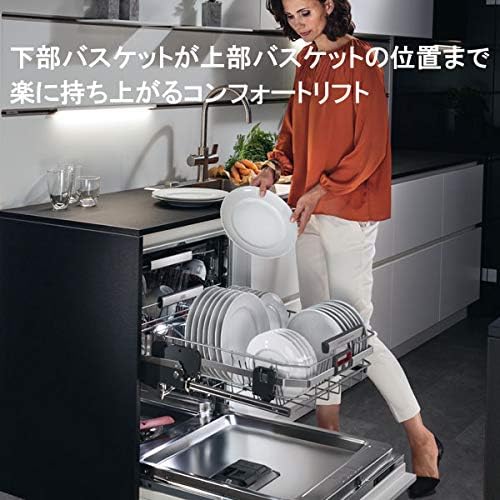
Figure 2.2: The ComfortLift feature allows the lower basket to be raised for ergonomic loading.

Figure 2.3: The Satellite Spray Arm ensures comprehensive water coverage for superior cleaning.

Figure 2.4: The dedicated removable cutlery tray for organized and effective cleaning of utensils.

Figure 2.5: SoftSpikes and SoftGrips provide secure placement for delicate glassware.
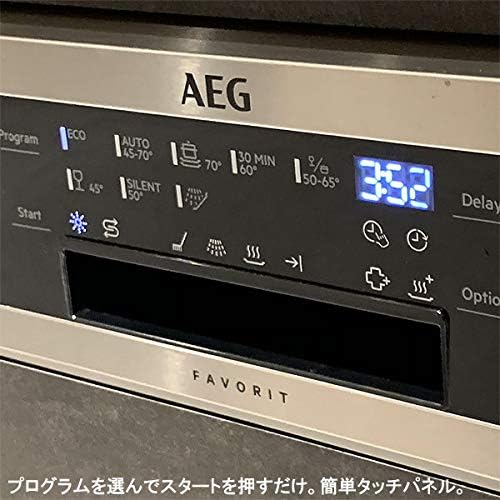
Figure 2.6: The easy-to-use touch control panel for program selection.
3. Setup and Installation
This appliance is a built-in model and requires professional installation. Please ensure that installation is carried out by a qualified technician in accordance with local regulations and the provided installation instructions.
3.1 Before First Use
- After installation, ensure all packing materials are removed from inside the dishwasher.
- Check that the water supply and drain hoses are correctly connected and free from kinks.
- Add dishwasher salt (if required by your water hardness) and rinse aid to their respective dispensers. Refer to the specific sections for details.
- Run an empty wash cycle (e.g., a short program) to clean the interior before loading dishes.
4. Operating Instructions
4.1 Loading the Dishwasher
- Scrape off large food particles from dishes before loading.
- Place larger items in the lower basket, ensuring they do not block the spray arms.
- Load glasses, cups, and smaller items in the upper basket.
- Arrange cutlery in the cutlery tray, separating items to ensure thorough cleaning.
- Ensure all items are stable and cannot tip over during the wash cycle.

Figure 4.1: Properly loaded lower basket, ensuring spray arm clearance.
4.2 Adding Detergent and Rinse Aid
Open the detergent dispenser and add the recommended amount of dishwasher detergent. Close the dispenser lid firmly. Check the rinse aid indicator and refill if necessary.
4.3 Program Selection and Start
- Close the dishwasher door.
- Press the Power button to turn on the appliance.
- Use the program selection buttons on the touch panel to choose the desired wash program (e.g., ECO, Auto, Intensive, Quick).
- Press the Start button to begin the cycle.
The display will show the remaining time for the selected program.
5. Maintenance and Cleaning
Regular maintenance ensures optimal performance and longevity of your dishwasher.
5.1 Cleaning the Filters
The filter system prevents larger food particles from reaching the pump. Clean the filters regularly (e.g., once a week or as needed):
- Twist the cylindrical filter counter-clockwise and lift it out.
- Remove the fine filter and the coarse filter.
- Rinse all filters under running water to remove any food residue. Use a brush if necessary.
- Reassemble the filters in reverse order, ensuring they are securely in place.
5.2 Cleaning the Spray Arms
Periodically check the spray arm nozzles for blockages. If clogged, remove the spray arms and clear the holes with a thin object like a toothpick.
5.3 Exterior and Interior Cleaning
- Wipe the exterior surfaces with a soft, damp cloth. Do not use abrasive cleaners.
- Clean the door seal regularly with a damp cloth to remove food particles.
- Run a dishwasher cleaning cycle with a specialized dishwasher cleaner every few months to remove grease and limescale buildup.
6. Troubleshooting
Before contacting service, check the following common issues and solutions:
| Problem | Possible Cause | Solution |
|---|---|---|
| Dishwasher does not start | Door not closed properly; Power supply issue; Program not selected. | Ensure door is latched; Check power cord and circuit breaker; Select a program and press Start. |
| Dishes are not clean | Incorrect loading; Clogged spray arms/filters; Insufficient detergent; Wrong program. | Reload dishes correctly; Clean filters and spray arms; Use correct amount of detergent; Select appropriate program. |
| Water remains in the tub | Clogged drain filter; Kinked drain hose; Drain pump issue. | Clean drain filter; Check drain hose for kinks; Contact service if pump is faulty. |
| Excessive foam | Too much detergent; Using hand dish soap. | Reduce detergent amount; Only use automatic dishwasher detergent. |
7. Specifications
| Feature | Detail |
|---|---|
| Brand | AEG |
| Model | FAVORIT FEE93810PM |
| Installation Type | Built-in |
| Form Factor | Built-in |
| Control Panel Type | Touch |
| Operating Frequency | 60 Hz |
| First Available Date | 2024/12/10 |
8. Warranty and Support
8.1 Warranty Information
Your AEG FAVORIT FEE93810PM Dishwasher comes with a manufacturer's warranty. Please refer to the separate warranty card or contact your retailer for specific terms and conditions, including warranty period and coverage details.
8.2 Customer Support
For technical assistance, spare parts, or service requests, please contact AEG customer support or your authorized service center. Have your model number (FEE93810PM) and serial number ready when contacting support.
You can find contact information on the AEG official website or in the documentation provided with your appliance.
Related documentsFEE93810PM


Ask a question about this manual
Ask about setup, troubleshooting, compatibility, parts, safety, or missing instructions. Manuals+ will review the question and use this page’s manual context to help answer it.