
1. Introduction
This manual provides comprehensive guidance for the UltraPro 18 inch Hardwired Under Cabinet Light, Model 45367. This LED light fixture is designed to provide efficient and versatile lighting for various indoor spaces, including kitchens, bedrooms, closets, home offices, and pantries. Key features include three selectable color temperatures (2700K Warm White, 4000K Cool White, 5000K Daylight) and dimmable functionality when used with a compatible in-wall dimmer. The fixture is hardwired for a clean, integrated installation.

Figure 1.1: UltraPro 18 inch Hardwired Under Cabinet Light (Model 45367) and its packaging.
2. Safety Information
WARNING: Risk of Electric Shock. Disconnect power at the circuit breaker or fuse box before installation or servicing. Failure to do so may result in serious injury or death.
- Ensure the mounting location is dry and capable of supporting the fixture's weight.
- Do not install the LED light fixture while it is plugged into an outlet.
- If you are not comfortable installing the fixture, contact a qualified electrician.
- All wiring connections must be secure and properly insulated.
- This fixture is designed for indoor use only.
3. Package Contents
Verify that all components are present before beginning installation:
- 1x UltraPro 18 inch Hardwired Under Cabinet Light Fixture
- Mounting Hardware (screws)
- Strain Relief Assembly

Figure 3.1: Included components: (A) Light fixture, (B) Light mounting screws, (C) Strain relief assembly.
4. Tools Required
The following tools are recommended for installation:
- Screwdriver (Phillips head)
- Drill with appropriate drill bits (1/16 inch for soft wood, 3/32 inch for hard wood)
- Pliers
- Wire strippers
- Voltage tester
5. Installation
5.1 Preparation
- Turn off power: Locate the circuit breaker or fuse box controlling the area where the light will be installed and turn off the power. Verify power is off using a voltage tester.
- Remove diffuser: Gently pull the rear edge of the lens diffuser towards the front and upward to remove it.
- Separate housing: Remove the screws on the top of the fixture's cover. Firmly push forward on the bottom front of the housing to unlatch it from the catch points, revealing the hardware kit inside.
- Install strain relief: Choose a suitable knockout location on the fixture for your wiring. Remove the nut and lock washer from the strain relief assembly and insert the threaded end into the chosen knockout. Secure by tightening the nut and lock washer, using pliers if needed.
5.2 Mounting the Fixture
- Mark pilot holes: Hold the base of the fixture in the desired mounting location as a template. Mark the locations for the pilot holes.
- Drill pilot holes: Use the appropriate drill bit (1/16 inch for soft wood, 3/32 inch for hard wood) to pre-drill holes in the marked spots.
- Install mounting screws: Insert the mounting screws into the pilot holes, leaving the screw heads protruding about 1/8 inch beyond the surface.
- Secure fixture base: Line up the screws with the keyhole tabs on the fixture base. Fasten the fixture by sliding it into place and tightening the screws.

Figure 5.1: Direct wire installation features knockouts on all sides for flexible wiring and push-in connectors for secure connections.
5.3 Wiring Connections
This fixture uses push-in connectors for secure and easy wiring. Ensure all connections are tight and no bare wires are exposed.
- Connect hot wire: Carefully connect the hot (typically black) AC supply wire to the hot wire of the fixture using a provided quick connector.
- Connect neutral wire: Carefully connect the neutral (typically white) AC supply wire to the neutral wire of the fixture using a provided quick connector.
- Connect ground wire: Carefully connect the ground (typically green or bare copper) AC supply wire to the ground wire of the fixture using a provided quick connector. If your electrical system lacks a grounding wire, consult a qualified electrician before proceeding.
- Test connections: Gently pull on each wire to ensure the connections are tight and secure.
Video 5.1: Official UltraPro installation guide demonstrating disassembly, mounting, and wiring connections for the Direct Wire LED Light Fixture.
5.4 Final Assembly
- Reattach housing: Ensure no bare wires are exposed. Reattach the cover housing to the fixture base.
- Secure housing: Secure the screws and washers while double-checking that all connections are sealed properly inside the fixture.
- Reinsert lens: Reinsert the lens diffuser by aligning it and gently pushing it into place.
- Restore power: Restore power at the circuit breaker or fuse box.
6. Operation
The UltraPro Under Cabinet Light offers versatile lighting options:
- On/Off Switch: The fixture includes a toggle switch for basic power control.
- Color Temperature Selection: A separate switch allows you to select between three color temperatures:
- 2700K (Warm White): Provides a soft, inviting glow.
- 4000K (Cool White): Offers a bright, neutral light.
- 5000K (Daylight): Delivers a crisp, energetic light, ideal for task lighting.
- Dimmable Functionality: This fixture is compatible with in-wall LED dimmers, allowing you to adjust the brightness to your preference. Ensure you use a dimmer specifically designed for LED lighting.

Figure 6.1: Demonstration of selectable white light settings (5000K, 4000K, 2700K) in a kitchen environment.
7. Maintenance
To ensure optimal performance and longevity of your UltraPro Under Cabinet Light, follow these simple maintenance guidelines:
- Cleaning: Disconnect power before cleaning. Use a soft, dry cloth to wipe the fixture. Avoid abrasive cleaners, solvents, or harsh chemicals, as these can damage the finish or electrical components.
- LEDs: The integrated LED lights are designed for a long lifespan and are not user-replaceable.
- Inspection: Periodically inspect the wiring and mounting for any signs of wear or damage. If any issues are found, disconnect power and consult a qualified electrician.
8. Troubleshooting
If your UltraPro Under Cabinet Light is not functioning as expected, refer to the following common issues and solutions:
| Problem | Possible Cause | Solution |
|---|---|---|
| Light does not turn on. | No power to the fixture. | Check circuit breaker or fuse. Ensure wall switch (if applicable) is ON. Verify all wiring connections are secure. |
| Light flickers or dims unexpectedly. | Loose wiring connection; Incompatible dimmer switch. | Check all wiring connections. If using a dimmer, ensure it is an LED-compatible dimmer. |
| Incorrect color temperature. | Color temperature switch set incorrectly. | Adjust the color temperature switch on the fixture to the desired setting. |
| Light is not bright enough. | Dimmer setting too low; Color temperature choice. | Adjust dimmer to a higher setting. Some color temperatures may appear brighter than others. |
9. Specifications
- Brand: UltraPro
- Model Name: WSBS Hardwired Under Counter Fixture
- Model Number: 45367
- Size: 18 inch
- Product Dimensions: 18.9"L x 3.15"W x 1.5"H
- Item Weight: 1.44 pounds
- Power Source: Hardwired
- Voltage: 120 Volts
- Wattage: 9 watts
- Light Source Type: LED
- Brightness: 717 Lumens
- Efficiency: 45 lumens/watt
- Color Temperature: 2700K (Warm White), 4000K (Cool White), 5000K (Daylight)
- Control Method: Push Button, Wall Switch (for dimming)
- Material: Plastic
- Finish Type: Painted
- Indoor/Outdoor Usage: Indoor
- UPC: 030878453677
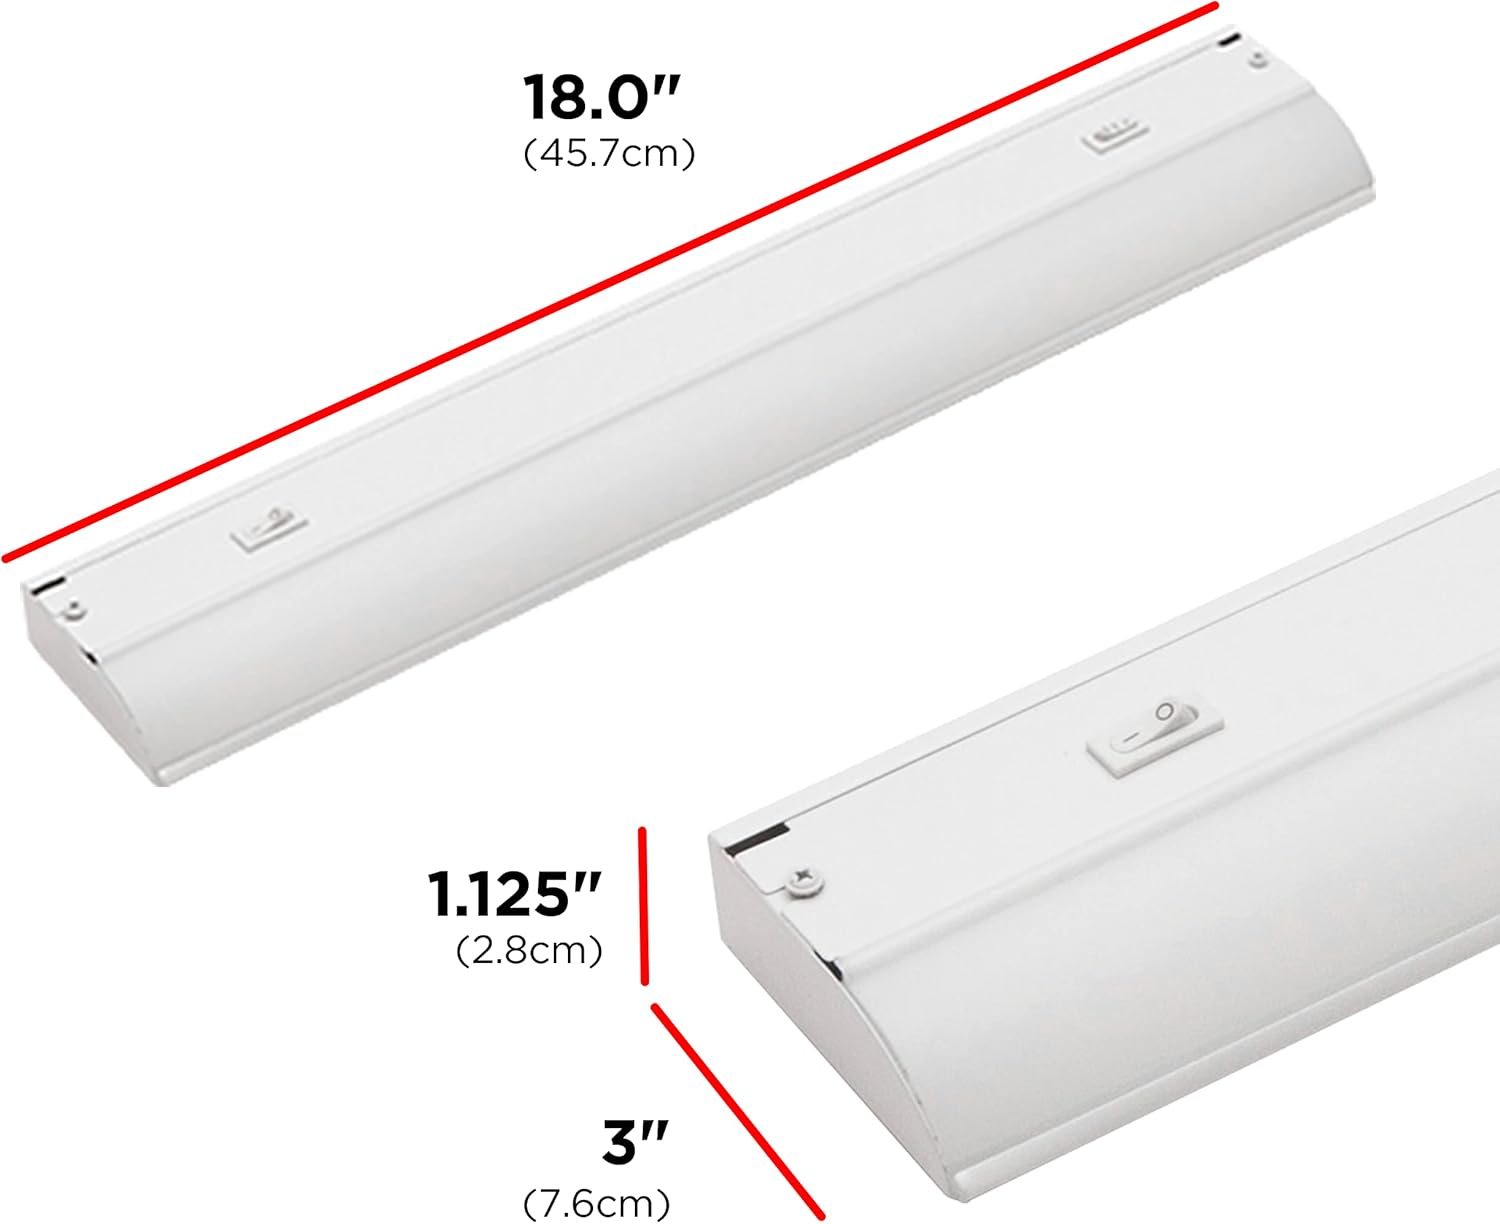
Figure 9.1: Product dimensions: 18.0 inches (45.7 cm) in length, 1.125 inches (2.8 cm) in height, and 3 inches (7.6 cm) in depth.
10. Warranty and Support
This UltraPro product is backed by a Limited Lifetime Warranty. For detailed warranty information or technical support, please refer to the manufacturer's official website or contact their customer service. Keep your purchase receipt as proof of purchase for warranty claims.


