
1. Introduction
This manual provides detailed instructions for the installation, operation, and maintenance of your Yaeccc CTC-M668 3200W 4-Channel Car Amplifier. Please read this manual thoroughly before installation and use to ensure proper function and safety. This amplifier is designed to enhance your vehicle's audio system by providing powerful and clear sound output to your speakers.

Image 1.1: Front view of the Yaeccc CTC-M668 3200W 4-Channel Car Amplifier.
2. Safety Information
- Always disconnect the vehicle's battery negative terminal before starting any electrical work.
- Ensure proper grounding of the amplifier to the vehicle chassis.
- Use appropriate gauge wiring for power, ground, and speaker connections to prevent overheating and damage.
- Install the amplifier in a location that allows for adequate ventilation to prevent overheating.
- Avoid installing the amplifier in areas exposed to moisture or direct sunlight.
- If you are unsure about any installation steps, consult a professional car audio installer.
3. Package Contents
Verify that all items are present in the package:
- 1 x Yaeccc CTC-M668 4-Channel Car Amplifier
- 1 x Screw Set for mounting
- 1 x Inline Fuse Holder (may be pre-installed or separate)

Image 3.1: Illustration of amplifier dimensions, high-level input concept, and package contents.
The amplifier features a low-profile design, with dimensions of approximately 32cm x 22cm x 6cm (12.6 x 8.7 x 2.4 inches), allowing for flexible installation options, including under-seat placement.
4. Product Overview
Familiarize yourself with the various connections and controls on the amplifier.

Image 4.1: Detailed view of the front and back panels, highlighting controls and terminals.
Front Panel Controls:
- Power On LED: Indicates when the amplifier is powered on.
- Protection LED: Illuminates if the amplifier enters protection mode due to overheating, short circuit, or low voltage.
- Input Gain Control: Adjusts the input sensitivity to match the output of your head unit.
- High Impedance Input: RCA inputs for connecting audio signals from your head unit.
- Crossover Controls (HPF/LPF/FULL): High-Pass Filter, Low-Pass Filter, and Full Range settings for frequency management.
- Bass Boost: Adjusts the bass level.
Back Panel Terminals:
- Power Supply Terminal: Connections for +12V (Battery), GND (Ground), and REM (Remote Turn-On).
- Power Fuse: Protects the amplifier from overcurrent.
- Speaker Terminals: Connections for front and rear speakers (Left and Right channels).
5. Setup and Installation
5.1 Mounting the Amplifier
Choose a mounting location that is dry, well-ventilated, and protected from direct sunlight or excessive heat. Ensure there is enough space around the amplifier for air circulation. Secure the amplifier using the provided screws.

Image 5.1: The amplifier's compact dimensions facilitate under-seat installation.
5.2 Wiring Connections
Before making any connections, disconnect the negative terminal of your vehicle's battery.
- Power Connection (+12V): Connect a power cable (minimum 8-gauge recommended) from the vehicle's positive battery terminal to the +12V terminal on the amplifier. Install an inline fuse holder (with an appropriate fuse, typically 30A-40A) as close to the battery as possible.
- Ground Connection (GND): Connect a ground cable (same gauge as power cable) from the GND terminal on the amplifier to a clean, unpainted metal surface on the vehicle chassis. Ensure a secure, low-resistance connection.
- Remote Turn-On Connection (REM): Connect a remote turn-on wire (typically 18-gauge) from your head unit's remote output to the REM terminal on the amplifier. This wire turns the amplifier on and off with your head unit.
- RCA Audio Input: Connect RCA cables from your head unit's RCA outputs (Front L/R, Rear L/R) to the corresponding High Impedance Input RCA jacks on the amplifier.
- Speaker Connections: Connect your speakers to the Speaker Terminals on the amplifier. Ensure correct polarity (+ to + and - to -) for each speaker. This amplifier supports 4-channel output. For bridging, refer to specific wiring diagrams for your speaker configuration.
Important: This amplifier is designed for mid-range speakers and tweeters. While it can provide signal output for subwoofers via its RCA output, it is generally not recommended for directly powering large subwoofers in bridged mode due to potential overheating and performance limitations. For dedicated subwoofer power, a separate monoblock amplifier is typically used.
6. Operation
6.1 Initial Power-Up
After all connections are made and verified, reconnect the vehicle's battery negative terminal. Turn on your head unit. The Power On LED on the amplifier should illuminate.
6.2 Adjusting Controls
- Input Gain: Start with the gain control set to minimum. Play a familiar piece of music at a moderate volume on your head unit. Slowly increase the amplifier's gain control until you hear distortion, then back it off slightly. This matches the amplifier's input sensitivity to your head unit's output.
- Crossover (HPF/LPF/FULL):
- HPF (High-Pass Filter): Use for full-range speakers to block low frequencies, preventing distortion and improving clarity. Adjust the frequency knob to the desired cutoff point (e.g., 80Hz-120Hz).
- LPF (Low-Pass Filter): Use for subwoofers (if connected via RCA output to a separate mono amp) to block high frequencies, allowing only bass to pass. Adjust the frequency knob to the desired cutoff point (e.g., 80Hz-120Hz).
- FULL: Allows the full frequency range to pass through. Use for full-range speakers if no filtering is desired or if filtering is handled by the head unit.
- Bass Boost: Use sparingly. Excessive bass boost can lead to distortion and potential speaker damage. Adjust to your preference.
7. Maintenance
- Keep the amplifier clean and free from dust and debris. Use a soft, dry cloth for cleaning.
- Ensure adequate ventilation around the amplifier at all times. Do not block cooling fins.
- Periodically check all wiring connections for tightness and corrosion.
- If the fuse blows, replace it only with a fuse of the same type and rating.
8. Troubleshooting
If you experience issues with your amplifier, refer to the following troubleshooting steps:
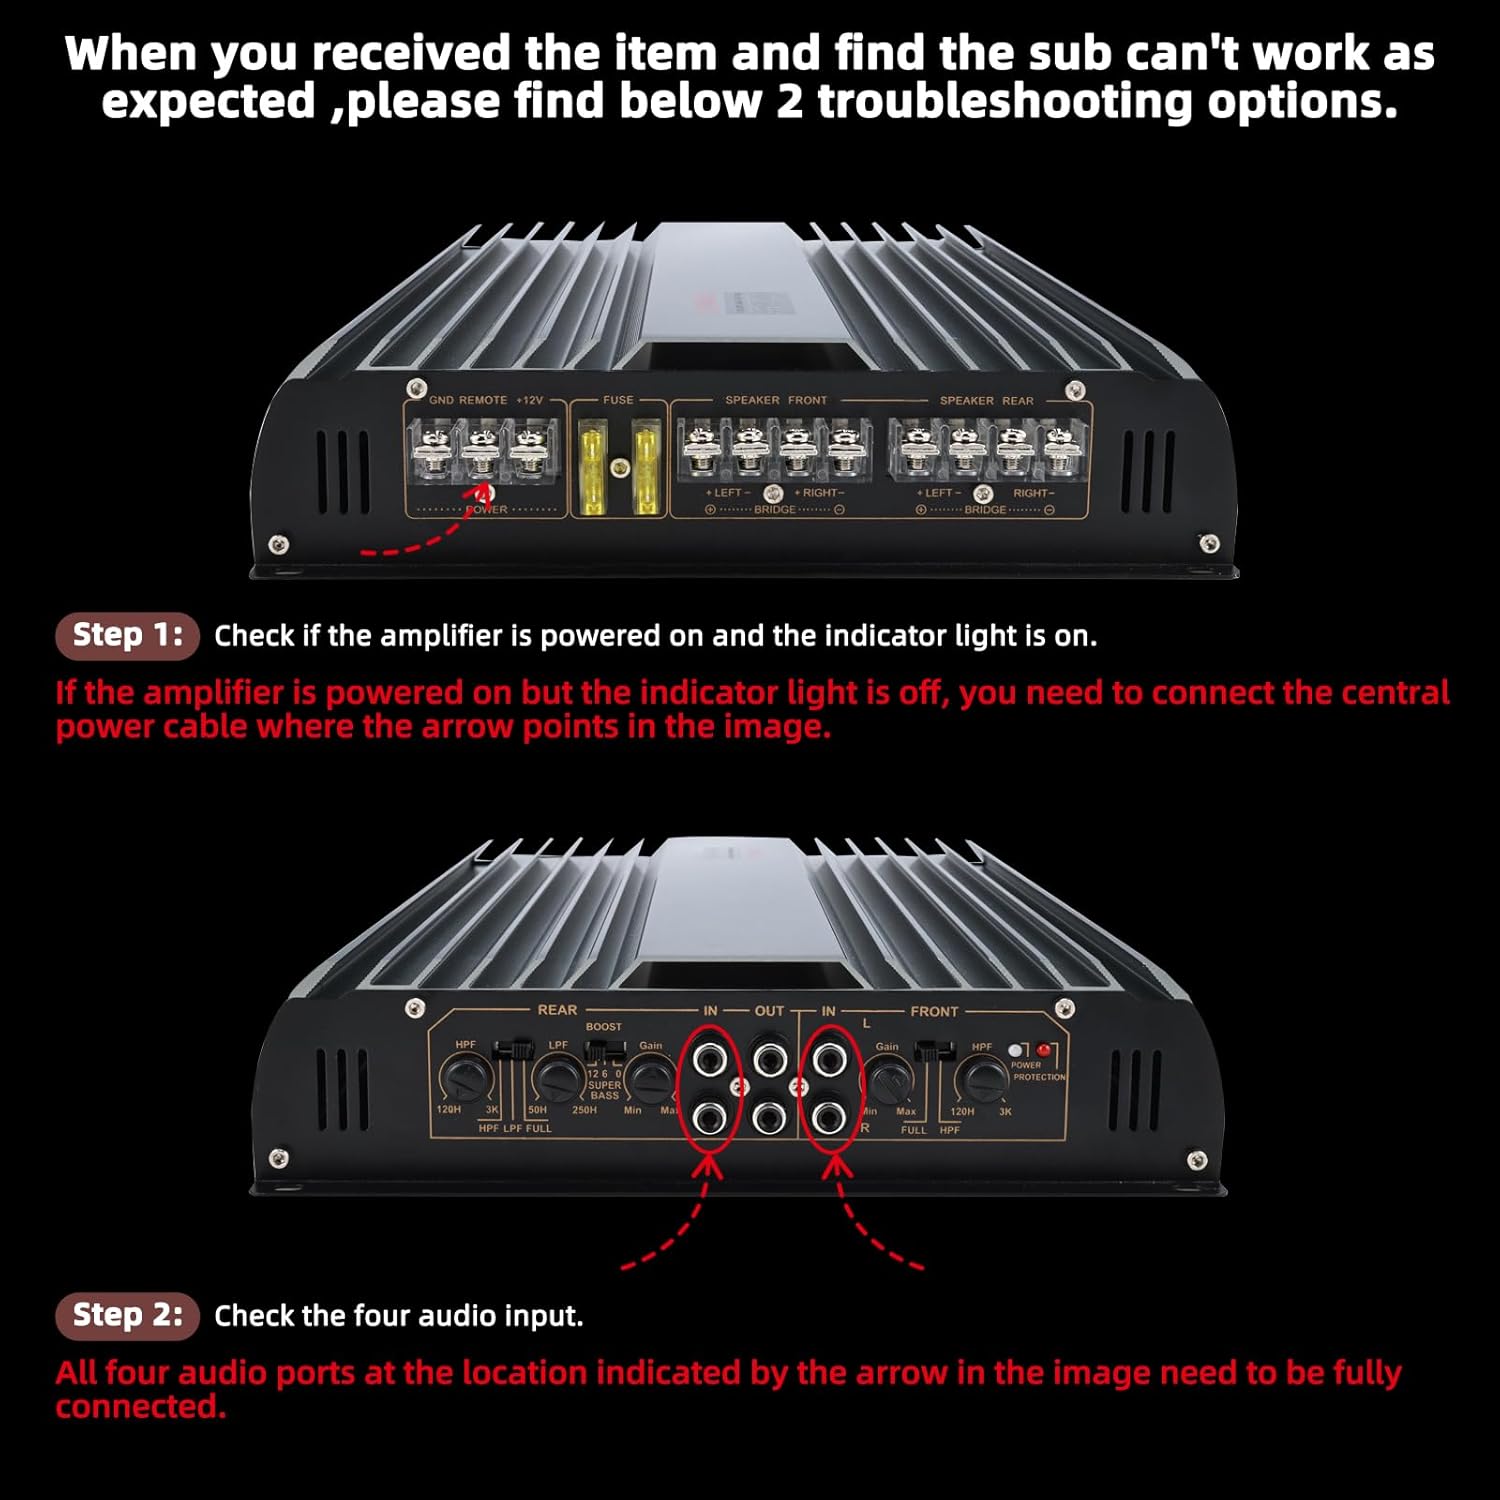
Image 8.1: Visual guide for checking power and audio input connections.
| Problem | Possible Cause | Solution |
|---|---|---|
| No Power / Amplifier Not Turning On |
|
|
| No Sound Output |
|
|
| Distorted Sound |
|
|
| Amplifier Overheating |
|
|
9. Specifications
| Feature | Specification |
|---|---|
| Model | CTC-M668 |
| Channels | 4-Channel |
| Peak Power Output | 3200 Watts |
| Operating Voltage | 12 Volts DC |
| Dimensions (L x W x H) | Approx. 32 cm x 22 cm x 6 cm (12.6 x 8.7 x 2.4 inches) |
| Mounting Type | Surface Mount |
| Input Type | RCA (Low Level) |
| Crossover | HPF / LPF / FULL |
| Heat Dissipation | Aluminium alloy drawing process for efficient heat dissipation |
10. Warranty and Support
For warranty information or technical support, please refer to the retailer where you purchased the product or visit the official Yaeccc website. Keep your purchase receipt as proof of purchase for warranty claims.
Manufacturer: Yae First Trading Co.,Itd
Item Model Number: 733810543855