
1. Important Safety Instructions
Read and understand all safety warnings and instructions before operating this earth auger. Failure to follow these instructions may result in serious injury or death.
1.1 General Safety
- Always wear appropriate personal protective equipment (PPE), including safety glasses, hearing protection, heavy-duty gloves, and sturdy footwear.
- Keep bystanders, children, and pets at a safe distance (at least 15 meters) from the operating area.
- Do not operate the auger when fatigued, under the influence of drugs, alcohol, or medication.
- Inspect the work area for underground cables, pipes, or other obstructions before drilling.
1.2 Fuel Safety
- Handle fuel in a well-ventilated area, away from sparks, open flames, or other ignition sources.
- Use a proper fuel container. Do not smoke while fueling.
- Wipe up any spilled fuel immediately.
- Never refuel a hot engine. Allow the engine to cool before adding fuel.
1.3 Operation Safety
- Maintain a firm grip on both handles during operation. Be prepared for sudden movements if the auger encounters an obstruction.
- Do not force the auger into the ground. Allow the auger to do the work.
- If the auger jams, release the throttle immediately and turn off the engine before attempting to clear the obstruction.
- Never operate the auger with damaged or missing guards.
2. Product Overview and Components
The AREBOS Earth Auger is a powerful 3 HP, 2-stroke engine tool designed for drilling holes in soil. It comes with three different auger sizes and a basic tool kit.

Figure 1: Complete AREBOS Earth Auger package, including the engine unit, three auger bits (100mm, 150mm, 200mm), a fuel mixing bottle, and a tool kit.
2.1 Key Features
- Powerful 3 HP 2-Stroke Engine: Provides high torque for efficient drilling.
- Manual Primer Pump: Assists in easy starting of the engine.
- Oil Level Glass: Allows for quick visual inspection of the gearbox oil level.
- Ventilation Valve: Ensures proper fuel tank pressure.
- Interchangeable Augers: Includes 100mm, 150mm, and 200mm diameter auger bits for various hole sizes.
- Robust Construction: Designed for durability and demanding use.

Figure 2: Detailed view of the engine unit, showing the handle with integrated controls and the primer bulb for fuel delivery.
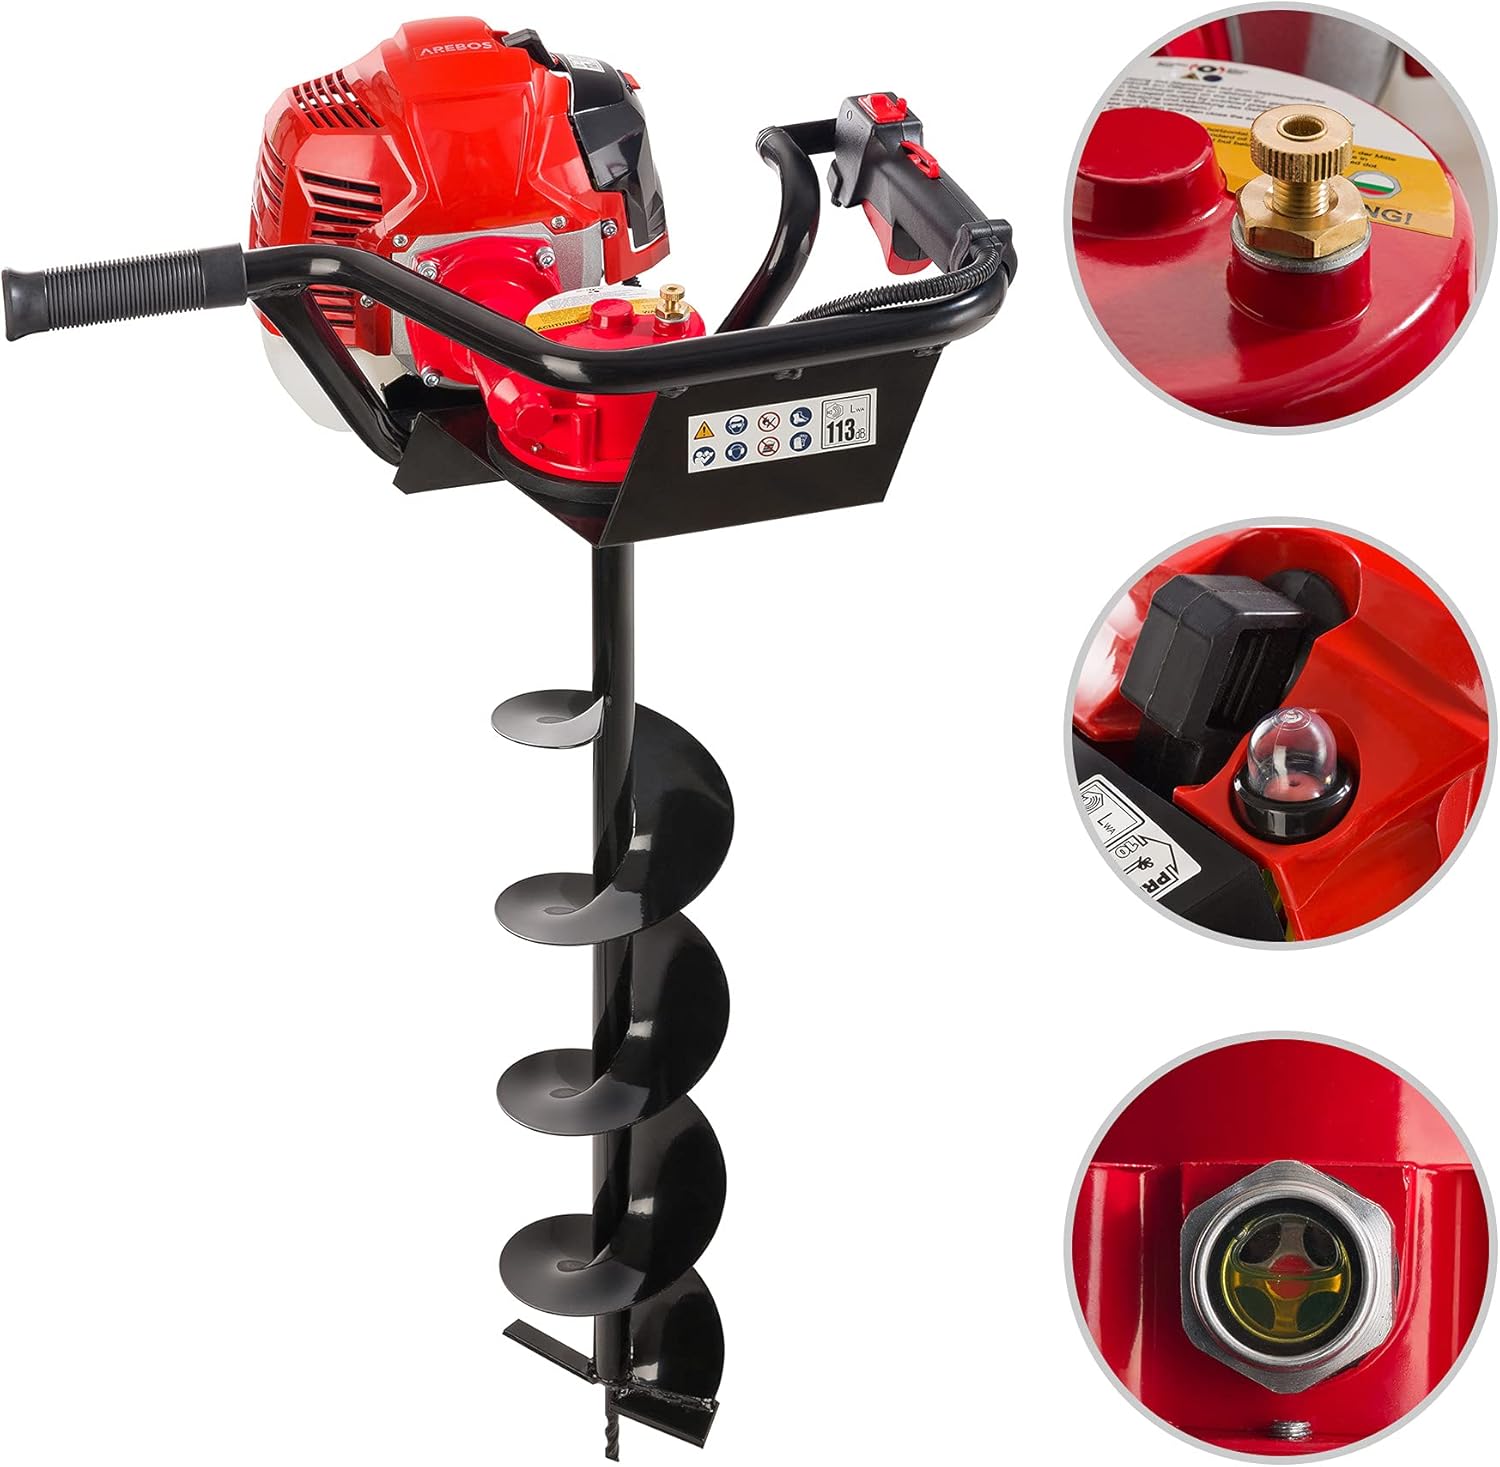
Figure 3: Close-up images highlighting the fuel tank cap, the manual primer bulb, and the oil level indicator glass on the gearbox.
3. Assembly
Follow these steps to assemble your AREBOS Earth Auger.
3.1 Attaching the Handles
- Align the handle assembly with the mounting points on the engine unit.
- Secure the handles using the provided bolts and nuts. Ensure all fasteners are tightened securely.
3.2 Attaching an Auger Bit
- Select the desired auger bit (100mm, 150mm, or 200mm).
- Insert the auger shaft into the gearbox output shaft.
- Align the holes and insert the locking pin or bolt to secure the auger bit. Ensure the pin is fully engaged and secured with a cotter pin if applicable.

Figure 4: The three included auger bits, illustrating their different diameters (100mm, 150mm, 200mm) and a consistent length of 800mm.
4. Fuel and Oil Mixture
This earth auger uses a 2-stroke engine and requires a specific fuel-to-oil mixture. Using incorrect fuel or mixture ratio will damage the engine and void the warranty.
4.1 Fuel Mixture Ratio
- Mix unleaded gasoline with high-quality 2-stroke engine oil at a ratio of 25:1 (Gasoline:Oil).
- Use the provided mixing bottle to ensure accurate proportions.
- Shake the mixture thoroughly before pouring it into the fuel tank.
4.2 Fueling the Auger
- Ensure the engine is off and cool.
- Move to a well-ventilated outdoor area.
- Unscrew the fuel cap slowly to release any pressure.
- Carefully pour the mixed fuel into the fuel tank (capacity approximately 900 ml).
- Securely replace the fuel cap.
5. Operation
Proper operation ensures efficiency and safety.
5.1 Pre-Operation Checks
- Check fuel level and ensure correct mixture.
- Verify all fasteners are tight, especially the auger bit attachment.
- Inspect the auger bit for damage or wear.
- Ensure the work area is clear of obstructions and bystanders.
5.2 Starting the Engine
- Place the auger on a flat, stable surface.
- Press the primer bulb several times until fuel is visible in the bulb.
- Set the choke lever to the 'CLOSED' position (for cold starts).
- Pull the starter cord firmly and smoothly until the engine attempts to start or runs briefly.
- Once the engine fires, move the choke lever to the 'OPEN' position.
- Pull the starter cord again until the engine starts and runs smoothly.
- Allow the engine to warm up for a few moments before engaging the throttle.
5.3 Drilling Procedure
- Hold the auger firmly with both hands, maintaining a balanced stance.
- Position the auger bit over the desired drilling location.
- Slowly engage the throttle to start the auger rotating.
- Apply gentle downward pressure, allowing the auger to bore into the soil. Do not force it.
- Periodically lift the auger slightly to clear soil from the hole and prevent jamming.
- If the auger encounters a rock or root, release the throttle immediately. Attempt to reposition or clear the obstruction manually after turning off the engine.

Figure 5: The earth auger in operation, demonstrating its capability to drill into soil. Key features like the powerful engine and robust construction are highlighted.
5.4 Stopping the Engine
- Release the throttle lever.
- Press the engine stop switch to turn off the engine.
6. Maintenance
Regular maintenance ensures the longevity and optimal performance of your earth auger.
6.1 Cleaning
- After each use, clean the auger bit and engine unit of dirt, mud, and debris.
- Use a brush or cloth. Avoid using high-pressure water directly on the engine.
6.2 Air Filter
- Check the air filter regularly (every 5-10 hours of operation).
- Clean dirty air filters with warm, soapy water, rinse thoroughly, and allow to dry completely before reinstallation. Replace if damaged.
6.3 Spark Plug
- Inspect the spark plug every 20 hours of operation.
- Clean any carbon deposits and adjust the gap if necessary. Replace if worn or fouled.
6.4 Gearbox Oil
- Check the gearbox oil level periodically using the oil level glass.
- Top up with appropriate gearbox oil if the level is low. Refer to the manufacturer's recommendations for oil type.
6.5 Storage
- For long-term storage, drain the fuel tank completely or run the engine until it runs out of fuel.
- Clean the auger thoroughly and store it in a dry, well-ventilated area, away from direct sunlight and extreme temperatures.
7. Troubleshooting
This section addresses common issues you might encounter.
| Problem | Possible Cause | Solution |
|---|---|---|
| Engine does not start | No fuel or incorrect fuel mixture Choke in wrong position Fouled spark plug Primer bulb not pressed | Check fuel level and mixture Adjust choke (CLOSED for cold, OPEN for warm) Clean or replace spark plug Press primer bulb until fuel is visible |
| Loss of power during operation | Dirty air filter Incorrect fuel mixture Overheating | Clean air filter Verify fuel-to-oil ratio Allow engine to cool down |
| Auger jams frequently | Excessive downward pressure Obstruction (rock, root) Dull auger bit | Reduce pressure, allow auger to work Clear obstruction after turning off engine Sharpen or replace auger bit |
8. Technical Specifications
| Specification | Value |
|---|---|
| Model | B07VSGN5X3 |
| Engine Type | 2-Stroke |
| Engine Power | 3 HP (approx. 2.2 kW) |
| Fuel Tank Capacity | 900 Millilitres |
| Fuel Mixture Ratio | 25:1 (Gasoline:2-Stroke Oil) |
| Auger Diameters Included | 100 mm, 150 mm, 200 mm |
| Auger Length | 800 mm (for all included augers) |
| Item Weight | 9.5 Kilograms |
| Manufacturer | Canbolat Vertriebs GmbH |