1. Introduction
This manual provides detailed instructions for the installation, operation, and maintenance of your TMEZON 8-Channel 3MP Wireless Security Camera System. Please read this manual thoroughly before using the product to ensure proper setup and functionality. Keep this manual for future reference.

Image 1.1: TMEZON 8-Channel NVR and 4 Wireless Cameras
2. Package Contents
Verify that all items listed below are included in your package:
- 1 x 8-Channel Wireless NVR (Network Video Recorder)
- 4 x 3MP Wireless IP Cameras
- 1 x 1TB Hard Disk Drive (pre-installed in NVR)
- 1 x NVR Power Adapter
- 4 x Camera Power Adapters
- 1 x USB Mouse
- 1 x Ethernet Cable
- 1 x User Manual (this document)
3. Safety Information
Please observe the following safety precautions:
- Use only the power adapters provided with the system.
- Ensure proper ventilation for the NVR to prevent overheating.
- Do not expose the NVR or cameras to extreme temperatures, humidity, or dust.
- Avoid placing the NVR near strong magnetic fields.
- Installation should be performed by qualified personnel if working at heights or with electrical wiring.
- The cameras are IP66 weather-resistant, suitable for outdoor use, but avoid direct submersion in water.
4. System Setup
4.1 NVR Connection
- Connect the USB mouse to a USB port on the NVR.
- Connect a monitor or TV to the NVR using an HDMI or VGA cable.
- Connect the NVR to your router using the provided Ethernet cable for internet access and remote viewing.
- Connect the NVR power adapter to the NVR and then to a power outlet. The NVR will power on automatically.

Image 4.1: NVR Rear Panel Connections
4.2 Camera Installation and Pairing
The cameras are designed for wireless connection and auto-pair with the NVR. Ensure cameras are within range of the NVR for optimal signal strength.
- Mount the cameras in desired locations, ensuring a clear line of sight to the area you wish to monitor.
- Connect each camera to its respective power adapter and plug into a power outlet.
- The cameras will automatically attempt to connect to the NVR. Once connected, their video feeds will appear on the monitor.

Image 4.2: Wireless Connection Range Guidelines
4.3 Mobile App Setup (Remote Access)
To access your system remotely, download the free mobile application:
- Download the IP Pro app from the App Store (for iOS devices) or Google Play (for Android devices).
- Register an account within the app.
- Follow the in-app instructions to add your NVR device. This typically involves scanning a QR code on the NVR or manually entering its ID.

Image 4.3: Remote Access Setup via Mobile App
5. System Operation
5.1 Live View
After successful setup, the NVR will display live video feeds from all connected cameras on the monitor. You can switch between single-camera view and multi-camera grid view using the NVR interface.
5.2 Recording
The system supports continuous recording, scheduled recording, and motion-triggered recording. Access the NVR's main menu (right-click with mouse) to configure recording settings. The pre-installed 1TB HDD provides ample storage.
5.3 Playback
To review recorded footage, navigate to the 'Playback' option in the NVR menu. Select the date and time to view recordings. You can also access playback via the mobile app.
5.4 Audio Monitoring
Each camera is equipped with a built-in microphone, allowing for audio recording and live audio monitoring. Ensure audio settings are enabled in the NVR or app interface to utilize this feature.

Image 5.1: Camera with Audio Recording Capability
5.5 Night Vision
The cameras feature infrared night vision, providing clear black and white video footage in low-light or no-light conditions.
5.6 Email Alerts
Configure email alerts in the NVR settings to receive notifications on your mobile device or email address when motion is detected. This feature requires the NVR to be connected to the internet.

Image 5.2: Instant Email Alert Notification
6. Maintenance
6.1 Cleaning
Regularly clean the camera lenses with a soft, dry cloth to ensure clear image quality. Do not use harsh chemicals or abrasive materials.
6.2 Firmware Updates
Periodically check the manufacturer's website for firmware updates for your NVR and cameras. Updating firmware can improve performance and add new features. Follow the instructions provided with the update carefully.
6.3 Hard Drive Management
The 1TB hard drive will automatically overwrite the oldest recordings when full. You can configure recording retention settings in the NVR menu.
7. Troubleshooting
| Problem | Possible Cause | Solution |
|---|---|---|
| No image on monitor | NVR not powered on; monitor not connected; camera not powered or paired. | Check NVR power, monitor cable, camera power, and ensure cameras are paired. |
| No recording | Recording settings incorrect; HDD full or faulty. | Verify recording schedule and settings. Check HDD status in NVR menu. |
| Remote access not working | NVR not connected to internet; incorrect app settings; firewall issues. | Ensure NVR is connected to router. Check app device ID and network settings. Consult router manual for port forwarding if necessary. |
| Poor video quality | Dirty lens; poor camera placement; wireless interference. | Clean camera lens. Adjust camera position. Reduce distance between camera and NVR or minimize obstacles. |
8. Specifications
- Model: HM-WF8413BA-01/EU
- Brand: TMEZON
- NVR Channels: 8-Channel
- Camera Resolution: 3MP (supports 1080p, 960p video capture)
- Storage Capacity: 1 TB HDD (pre-installed)
- Connectivity: Wireless (Wi-Fi), Wired (Ethernet)
- Special Features: App Control, Weather-resistant (IP66), Night Vision, Audio Recording
- Power Source: Cable (AC adapters included)
- Operating System (App): Android, iOS
- Product Dimensions: 39 x 18 x 30 cm
- Product Weight: 3.77 kg

Image 8.1: Camera Application Versatility
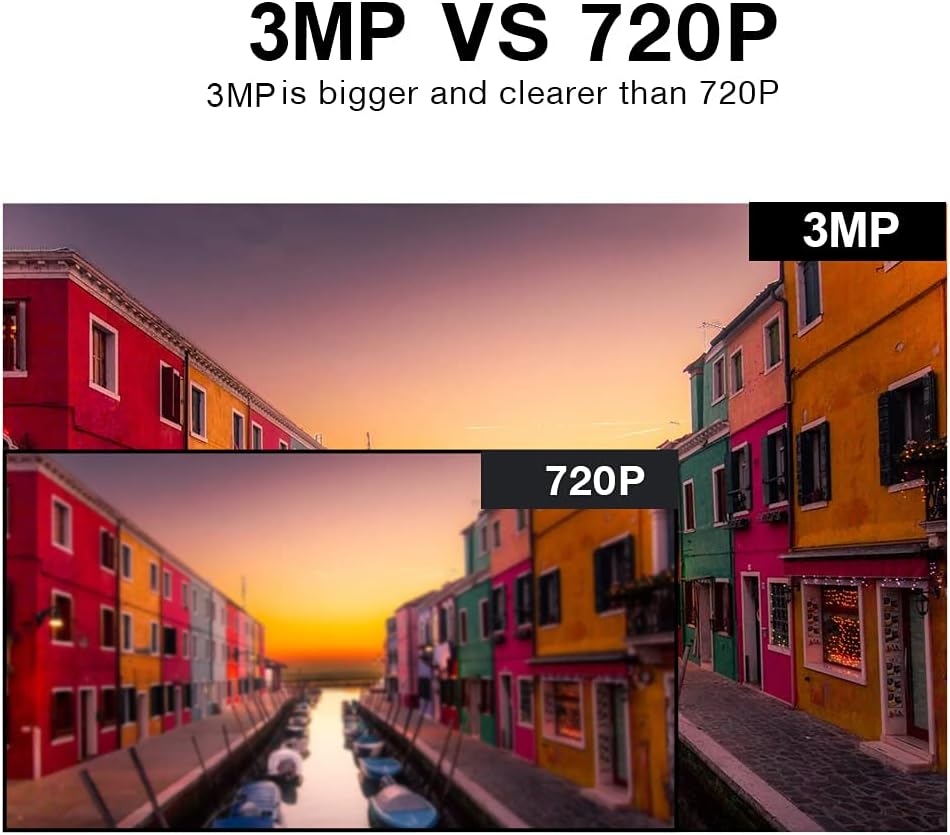
Image 8.2: 3MP vs 720P Resolution Comparison
9. Warranty and Support
TMEZON products typically come with a limited warranty. Please refer to the warranty card included with your product or visit the official TMEZON website for detailed warranty terms and conditions.
For technical support, troubleshooting assistance, or warranty claims, please contact TMEZON customer service through their official website or the contact information provided in your product packaging. When contacting support, please have your product model number (HM-WF8413BA-01/EU) and purchase details ready.


