
1. Important Safety Instructions
Please read all instructions carefully before using the appliance. Keep this manual for future reference.
- Always ensure the appliance is unplugged from the power outlet before assembly, disassembly, or cleaning.
- Do not immerse the motor unit, cord, or plug in water or any other liquid.
- This appliance is not intended for use by persons (including children) with reduced physical, sensory, or mental capabilities, or lack of experience and knowledge, unless they have been given supervision or instruction concerning use of the appliance by a person responsible for their safety.
- Children should be supervised to ensure that they do not play with the appliance.
- Avoid contact with moving parts. Keep hands, hair, clothing, as well as spatulas and other utensils away from beaters during operation to reduce the risk of injury to persons and/or damage to the mixer.
- Do not operate any appliance with a damaged cord or plug, or after the appliance malfunctions or has been dropped or damaged in any manner.
- The use of attachments not recommended or sold by the manufacturer may cause fire, electric shock, or injury.
- Do not use the appliance outdoors.
- Do not let the cord hang over the edge of a table or counter, or touch hot surfaces.
- Always operate the appliance on a flat, stable surface.
- Ensure the appliance is switched off before changing accessories or approaching parts that move in use.
2. Product Overview and Components
The Continental Edison Multifunction Stand Mixer is a versatile kitchen appliance designed for various food preparation tasks. It features a powerful 1000W motor and comes with a range of accessories to assist with mixing, blending, grinding, and pasta making.

Image: The main unit of the Continental Edison Multifunction Stand Mixer shown with its various attachments, including the mixing bowl, blender, meat grinder, whisk, dough hook, beater, and pasta dies.
Included Components:
- Main Motor Unit (1000W)
- Stainless Steel Mixing Bowl (5 L capacity)
- Blender with Lid (1.5 L capacity)
- Whisk Attachment
- Dough Hook Attachment
- Beater/Mixer Attachment
- Meat Grinder Attachment
- Sausage Accessories
- 4 Pasta Dies
- Anti-Splash Lid for Mixing Bowl
- Accessory Storage Pusher
- Cookie Accessory
3. Setup and Assembly
Before first use, clean all parts that will come into contact with food as described in the 'Maintenance and Cleaning' section.
3.1 Assembling the Stand Mixer
- Place the main motor unit on a clean, dry, and stable surface.
- Lift the mixer head by pressing the release button.
- Place the stainless steel mixing bowl into its base, turning it clockwise until it locks securely.
- Attach the desired accessory (whisk, dough hook, or beater) by pushing it upwards into the accessory shaft and turning it slightly until it clicks into place.
- Lower the mixer head until it locks into position.
- If using, place the anti-splash lid over the mixing bowl.

Image: The main unit of the stand mixer with the mixing bowl attached, ready for an accessory to be inserted.
3.2 Assembling the Blender
- Ensure the blender base is securely attached to the blender jar.
- Remove the cover from the top attachment port on the mixer head.
- Insert the blender jar into the top attachment port and turn it clockwise until it locks.
- Place the blender lid securely on the jar.
3.3 Assembling the Meat Grinder / Pasta Maker
- Remove the cover from the front attachment port on the mixer head.
- Insert the meat grinder assembly into the front attachment port and turn it clockwise until it locks.
- Attach the desired grinding plate or pasta die.
- Secure the locking ring.
4. Operating Instructions
Always ensure the appliance is correctly assembled and securely locked before operation.
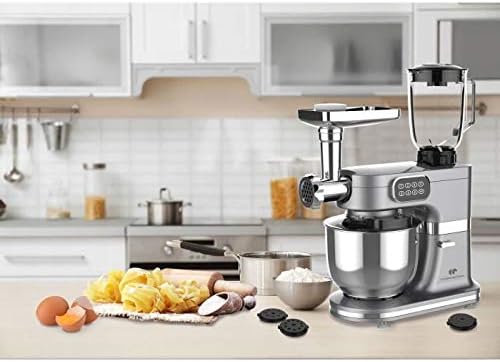
Image: The stand mixer set up in a kitchen environment, ready for use with various ingredients nearby.
4.1 General Operation
- Ensure the appliance is plugged into a 230V, 50Hz power outlet.
- Add ingredients to the mixing bowl or blender jar. Do not overfill.
- Select the desired speed using the speed control dial. The mixer offers 6 speed settings. Start with a low speed and gradually increase as needed.
- Allow the appliance to operate until the desired consistency is achieved.
- Once finished, turn the speed dial to '0' (off) and unplug the appliance from the power outlet.
4.2 Using the Whisk Attachment
Ideal for whipping cream, egg whites, and light batters.
4.3 Using the Dough Hook Attachment
Suitable for kneading heavy doughs like bread or pizza dough. Use lower speeds for kneading.
4.4 Using the Beater/Mixer Attachment
Best for mixing cakes, cookies, frostings, and mashed potatoes.
4.5 Using the Blender
Use for smoothies, soups, and sauces. Ensure the lid is securely in place before operating.
4.6 Using the Meat Grinder / Pasta Maker
Prepare meat by cutting it into small pieces before grinding. For pasta, ensure the dough is of the correct consistency. Use the accessory storage pusher to feed ingredients safely.
5. Maintenance and Cleaning
Regular cleaning ensures optimal performance and extends the life of your appliance. Always unplug the mixer before cleaning.
5.1 Cleaning the Main Motor Unit
- Wipe the exterior of the motor unit with a damp cloth.
- Do not use abrasive cleaners or scourers.
- Never immerse the motor unit in water or any other liquid.
5.2 Cleaning Attachments and Bowls
- The stainless steel mixing bowl, blender jar, whisk, dough hook, beater, meat grinder components (excluding the main grinder body if it contains electrical parts), sausage accessories, pasta dies, anti-splash lid, and cookie accessory are dishwasher safe.
- Alternatively, wash these parts in warm, soapy water, rinse thoroughly, and dry immediately.
- Ensure all parts are completely dry before storing.
6. Troubleshooting
If you encounter issues with your stand mixer, please refer to the following common problems and solutions:
| Problem | Possible Cause | Solution |
|---|---|---|
| Appliance does not turn on. | Not plugged in; power outlet fault; appliance not assembled correctly. | Check power cord connection; test outlet with another appliance; ensure mixer head is locked down and attachments are secure. |
| Motor stops during operation. | Overload protection activated; motor overheating. | Turn off and unplug the appliance. Reduce the load (e.g., remove some dough). Let it cool down for 30 minutes before restarting. |
| Attachments not mixing properly. | Attachment not correctly installed; wrong attachment for task; insufficient ingredients. | Ensure attachment is fully engaged. Use appropriate attachment for the recipe. Ensure there are enough ingredients for the attachment to reach. |
| Loud noise or vibration. | Appliance not on a stable surface; attachment not properly secured; excessive load. | Place on a flat, stable surface. Check all attachments are securely locked. Reduce the amount of ingredients. |
If the problem persists after trying these solutions, please contact customer support.
7. Technical Specifications
- Brand: Continental Edison
- Model Name: Robot Pâtissier Multifonctions
- Power: 1000 Watts
- Voltage: 230 Volts
- Frequency: 50 Hz
- Number of Speeds: 6
- Mixing Bowl Capacity: 5 Liters
- Blender Capacity: 1.5 Liters
- Cord Length: 1 meter
- Material: Stainless Steel (bowl), Metal (blade)
- Special Feature: Multifunction
- Care Instructions: Dishwasher safe parts
- Included Components: Whisk, Dough Hook, Beater, Meat Grinder, Sausage Accessories, 4 Pasta Dies, Blender with Lid, Anti-Splash Lid, Accessory Storage Pusher, Cookie Accessory