
1. Product Overview
The Hicarer High Torque Clock Movement Mechanism is designed for repairing, replacing, or creating wall clocks. It features a silent scanning design for quiet operation and is suitable for various clock styles. This kit includes the necessary components to assemble a functional clock mechanism with long clock hands.
2. Package Contents
Please verify that all the following components are included in your package:
- 1 x Quartz Clock Movement
- 1 x Close Nut
- 1 x Minute Hand (approx. 452 mm / 17.8 inches from center to tip)
- 1 x Hour Hand (approx. 331 mm / 13 inches from center to tip)
- 1 x Plastic Washer
- 1 x Brass Washer
- 1 x Brass Nut
- 1 x Metal Hook

Image: All components included in the Hicarer High Torque Clock Movement Mechanism kit.
3. Specifications
| Feature | Detail |
|---|---|
| Movement Type | High Torque Quartz Movement (Silent Scanning) |
| Hour Hand Length (center to tip) | Approx. 331 mm / 13 inches |
| Minute Hand Length (center to tip) | Approx. 452 mm / 17.8 inches |
| Total Shaft Length | 22 mm / 0.87 inches |
| Thread Length | 9.7 mm / 0.38 inches |
| Suitable Clock Panel Thickness | 9 - 13 mm / 0.35 - 0.50 inches |
| Power Source | 1 x AA Battery (not included) |

Image: Detailed dimensions of the clock movement and hands.
4. Installation Instructions
Follow these steps to install the clock movement and hands:
- Place the plastic washer over the shaft of the clock movement.
- Insert the shaft through the hole in your clock surface/dial.
- If applicable, insert the shaft through the clock face.
- Place the dial plate brass washer over the shaft.
- Attach the dial fixing brass hex nut and tighten it securely.
- Attach the hour hand onto the shaft and press lightly to secure it.
- Attach the minute hand onto the shaft.
- Press the second hand (if included) into place.
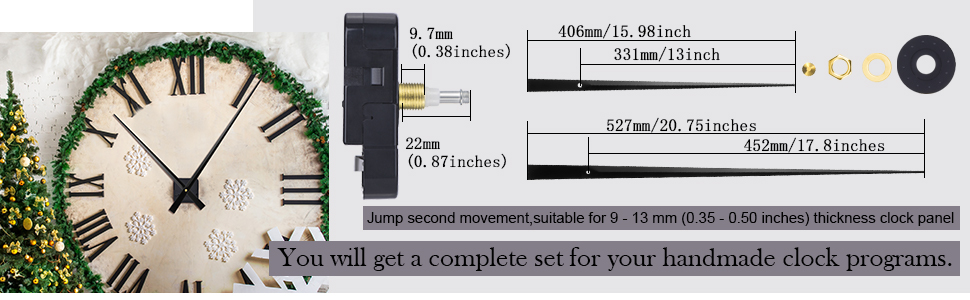
Image: Installation diagram for the clock movement and hands.
Important Note: The clock hands are made of aluminum and can bend easily. Handle them with care during installation to avoid damage. Ensure the hour and minute hands are parallel to each other after installation to prevent them from touching and interfering with timekeeping.
5. Operation
After installation, insert one fresh AA battery (not included) into the battery compartment on the back of the clock movement. To set the time, use the adjustment knob located on the back of the clock movement. Rotate the knob until the hands display the correct time. Do not attempt to move the hands directly by hand, as this may damage the mechanism.
6. Maintenance and Care
- Battery Replacement: Replace the AA battery annually or when the clock begins to lose time.
- Cleaning: Wipe the clock movement and hands with a soft, dry cloth. Avoid using liquid cleaners or abrasive materials.
- Handling: As the clock hands are made of aluminum, avoid applying excessive pressure or bending them.
- Environment: Keep the clock in a dry environment, away from extreme temperatures and direct sunlight.
7. Troubleshooting
| Problem | Possible Cause / Solution |
|---|---|
| Clock not running or losing time |
|
| Loud ticking sound | This movement features a silent scanning design. If ticking is heard, ensure all components are securely fastened and not rubbing. |
| Hands are bent | The aluminum hands can bend. Carefully straighten them if possible, or consider replacement if severely damaged. Handle with care during installation. |
8. Warranty and Support
For any questions, concerns, or support regarding your Hicarer High Torque Clock Movement Mechanism, please refer to the retailer's return policy or contact the seller directly through the platform where the purchase was made. Keep your purchase receipt for reference.