1. Product Overview
This manual provides instructions for the VSDISPLAY 8.4-inch 4-Wire Resistive Touch Panel and its accompanying USB Controller. This product is designed to add touch functionality to compatible 8.4-inch 800x600 LCD panels. Please note that this package includes the touch panel and controller only, and does not include an LCD display panel.

Figure 1: Complete VSDISPLAY 8.4-inch 4-Wire Resistive Touch Panel Kit

Figure 2: Front view of the 8.4-inch 4-Wire Resistive Touch Panel
2. Package Contents
Verify that all items listed below are included in your package:
- 1 × 8.4-inch 4-Wire Resistive Touch Panel (Model: VS084TP-A1)
- 1 × 4-Wire USB Controller Card
- 1 × USB Cable
- 1 × Converter Cable
3. Setup Instructions
3.1 Connecting the Touch Panel to the Controller
- Carefully align the Flexible Printed Circuit (FPC) connector of the 4-Wire Resistive Touch Panel with the corresponding FPC slot on the 4-Wire USB Controller Card.
- Gently insert the FPC into the controller's slot, ensuring it is fully seated and secured.

Figure 3: Top view of the 4-Wire USB Controller Card
3.2 Connecting the USB Controller to a Computer
- Connect the provided USB Cable to the USB port on the 4-Wire USB Controller Card.
- Connect the other end of the USB Cable to an available USB port on your computer or host device.
- The system should automatically detect the USB controller. Most modern operating systems (Windows, Linux, macOS) will install generic HID (Human Interface Device) drivers automatically, making the device plug-and-play.

Figure 4: USB Controller Card with USB cable connected
4. Operating Instructions
4.1 Basic Touch Functionality
Once connected and recognized by your operating system, the touch panel will function as a standard input device. You can interact with the connected LCD display (not included) by touching the surface of the resistive touch panel.
4.2 Calibration
Resistive touch panels may require calibration to ensure accurate touch point detection, especially after initial setup or if the display resolution changes. Calibration tools are typically provided by your operating system or can be found through third-party software. Refer to your operating system's documentation for specific calibration procedures.
5. Maintenance
5.1 Cleaning the Touch Panel
- Use a soft, lint-free cloth (e.g., microfiber cloth) to gently wipe the surface of the touch panel.
- For stubborn smudges, lightly dampen the cloth with water or a mild, non-abrasive screen cleaner. Avoid spraying liquids directly onto the panel.
- Do not use harsh chemicals, abrasive cleaners, or solvents, as these can damage the touch panel surface.
5.2 Storage
When not in use, store the touch panel and controller in a dry, dust-free environment, away from direct sunlight and extreme temperatures.
6. Troubleshooting
- No Touch Response:
- Ensure all cables (FPC and USB) are securely connected.
- Verify the USB controller is receiving power (some controllers have an indicator LED).
- Try connecting to a different USB port on your computer.
- Restart your computer.
- Inaccurate Touch or Jumpy Cursor:
- Perform a touch screen calibration through your operating system settings.
- Ensure the touch panel surface is clean and free from obstructions.
- Device Not Recognized by Operating System:
- Check the USB cable for damage and try a different cable if available.
- Connect to a different USB port.
- Verify that your operating system is up to date.
7. Technical Specifications
7.1 USB Controller Specifications
- Dimension Size: 71mm x 20mm x 10mm
- Power Requirements: D.C.+5V (100mA typical, 50mV peak to peak maximum ripple and noise)
- Operating Temperature: 0 to 50°C
- Storage Temperature: -40 to 80°C
- Relative Humidity: 95% at 60°C (non-condensing)
- Interface: USB 1.1 & 2.0
- Resolution: 2048 × 2048 resolution
- Report Rate (USB Model): Max. 160 points/sec
- Response Time: Max. 20 ms
- Attached Cable: 6' shielded cable with USB-A connector for USB port
- Regulatory Approvals: FCC-B, CE
- EMI: Unaffected by environmental EMI
- Panel Resistance (4-wire resistive model): 200 ~ 900 ohm
- MTBF: 200,000 hrs
7.2 Touch Panel Specifications
- Dimension Size: 187mm x 141mm
- Display Area: 172mm x 129.5mm
- FPC Connector: 4pin 0.5mm pitch bottom contact
- Standing Screen Display Size: 8.4 Inches
- Aspect Ratio: 4:3
- Screen Surface Description: Glossy

Figure 5: Dimensions of the 8.4-inch 4-Wire Resistive Touch Panel
7.3 Pin Assignment and Detailed Drawing
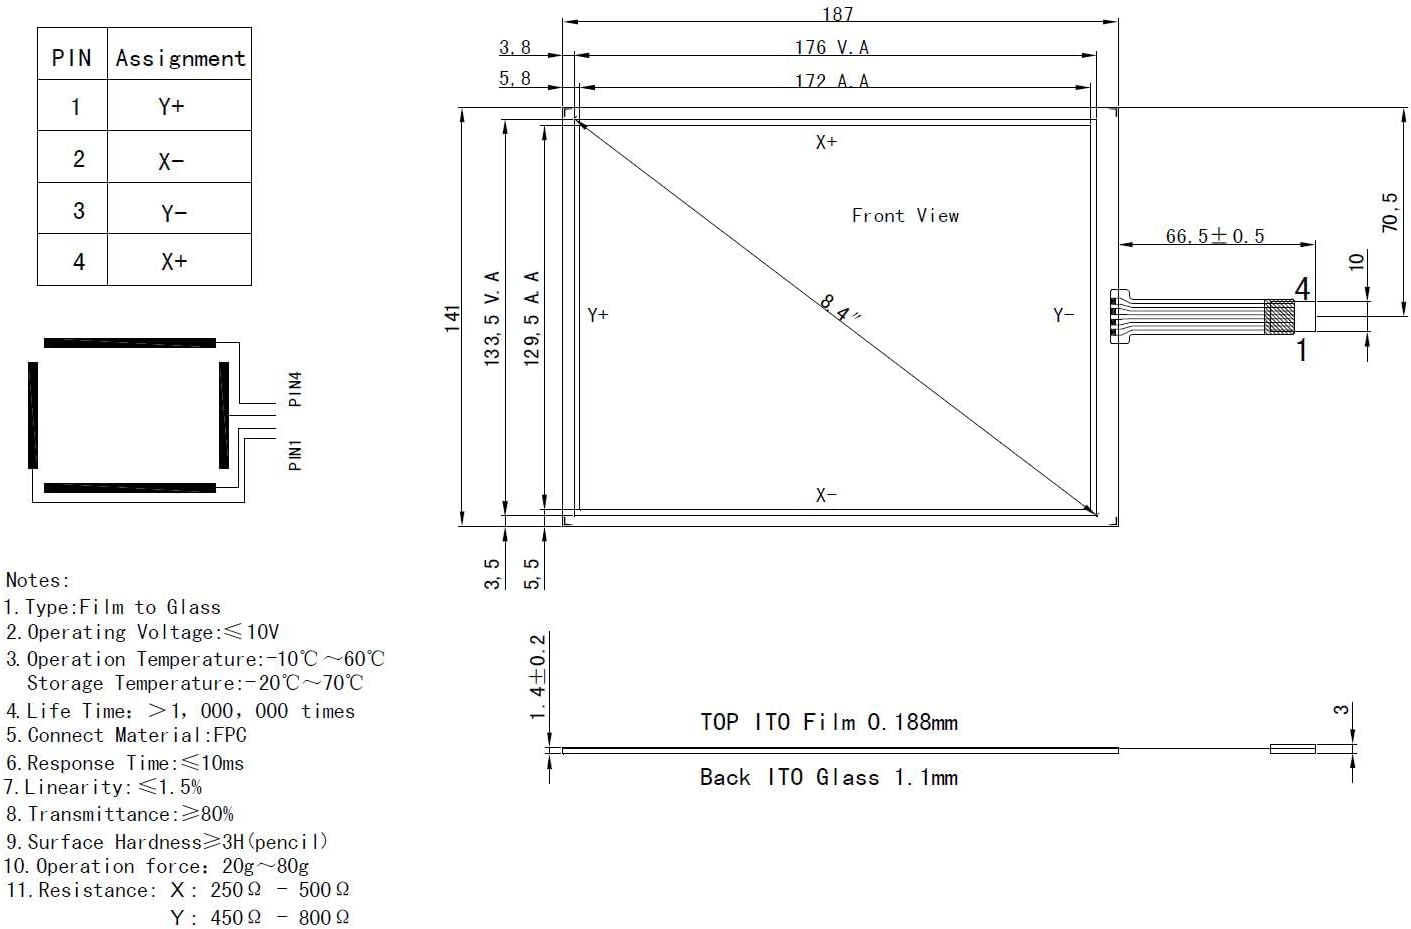
Figure 6: Technical drawing with pin assignments and notes for the touch panel
Pin Assignment:
- PIN1: Y-
- PIN2: X-
- PIN3: Y+
- PIN4: X+
Additional Notes from Drawing:
- Type: Film to Glass
- Operating Voltage: ≤10V
- Operation Temperature: -10°C ~ 60°C
- Storage Temperature: -20°C ~ 70°C
- Life Time: >1,000,000 times
- Connect Material: FPC
- Response Time: ≤10ms
- Linearity: ≤1.5%
- Transmittance: ≥80%
- Surface Hardness: ≥3H (pencil)
- Operation Force: 20g ~ 80g
- Resistance: X: 250 Ω ~ 500 Ω, Y: 450 Ω ~ 800 Ω
8. Warranty and Support
Specific warranty information for this product is not provided in the available product details. For support inquiries, please refer to the vendor or retailer from whom the product was purchased. Ensure you retain your proof of purchase for any potential warranty claims or technical assistance.


