
Lightbiz M500
Lightbiz 78 LED Closet Light Instruction Manual
Model: M500 | Brand: Lightbiz
Introduction
Thank you for choosing the Lightbiz 78 LED Closet Light. This rechargeable, dimmable, motion sensor wireless light is designed to provide convenient illumination for various indoor spaces such as cabinets, wardrobes, kitchens, and more. This manual provides essential information for the safe and efficient operation of your device.
Package Contents
Please check the package to ensure all items are present:
- 1 x Lightbiz 78-LED Motion Sensor Light
- 1 x Adhesive Strip with Magnetic backing
- 1 x USB Charging Cable
- 1 x User Manual
Specifications
| Brand | Lightbiz |
| Model Name | M500 |
| Light Source Type | LED (78 LEDs) |
| Brightness | 150 - 250 Lumens (Adjustable) |
| Color Temperature | 11000 Kelvin (Pure White) |
| Power Source | Battery Powered (3200mAh Lithium Ion) |
| Voltage | 5 Volts |
| Wattage | 4 Watts |
| Special Features | Motion Sensor, Dimmable |
| Control Method | Touch, Push Button, Dimmer Knob |
| Material | Acrylonitrile Butadiene Styrene, Aluminum, Plastic |
| Product Dimensions | 16.5"L x 1.5"W x 0.3"H |
| Installation Type | Self-Adhesive or Built-in Magnets |
| Indoor/Outdoor Usage | Indoor |
| Water Resistance Level | Not Water Resistant |
Setup and Installation
The Lightbiz 78 LED Closet Light offers two convenient installation methods:
Method 1: Magnetic Adhesion (for ironwork surfaces)
- Ensure the ironwork surface is clean and dry.
- The light has built-in strong magnets. Simply place the light directly onto any ironwork surface.

Figure 1: Magnetic installation on an ironwork surface like a refrigerator.
Method 2: Adhesive Magnetic Strip (for non-ironwork surfaces)
- Clean the desired installation surface thoroughly to ensure it is free of dust and grease.
- Peel off the protective film from one side of the provided adhesive magnetic strip.
- Firmly press the adhesive side of the strip onto the clean surface. Hold for a few seconds to ensure strong adhesion.
- Once the magnetic strip is securely attached, the LED light can be magnetically attached to the strip. This allows for easy removal for charging.
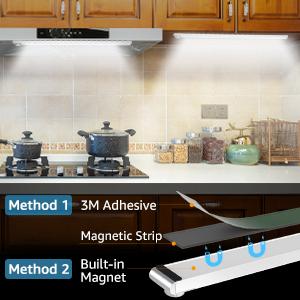
Figure 2: Installation methods using built-in magnets or the adhesive magnetic strip.
Important Note:
- Avoid placing two lights too close to each other in auto-mode, as they may interfere with each other's motion detection.
- For optimal adhesion, ensure the surface is smooth and non-porous.
Operating Modes and Brightness Adjustment
The Lightbiz 78 LED Closet Light features a multi-function button and a dimmer knob for versatile operation.
Power ON/OFF and Mode Selection
- Power ON/OFF: Press and hold the multi-function button for 3 seconds to turn the light ON or OFF.
- Cycle Modes: Double-click the multi-function button to cycle through the available modes:
- Mode 1 (Green Indicator): Motion & Light Sensor Mode - The light will automatically turn on when motion is detected in dark conditions. Ideal for night light use.
- Mode 2 (Blue Indicator): Only Motion Sensor Mode - The light will automatically turn on when motion is detected, regardless of ambient light conditions (dark or daytime). Suitable for stairs or areas needing light during the day.
- Mode 3 (Red Indicator): Always On Mode - The light will stay on continuously. Useful as a flashlight or for constant illumination.
- Battery Status: Single press the multi-function button to check the battery status.
Figure 3: Multi-function button controls and operating modes.
Brightness Adjustment (Stepless Dimming)
- Rotate the dimmer knob on the side of the light to adjust the brightness from 150 Lumens to 250 Lumens.
- Turn the knob clockwise to increase brightness and counter-clockwise to decrease brightness.
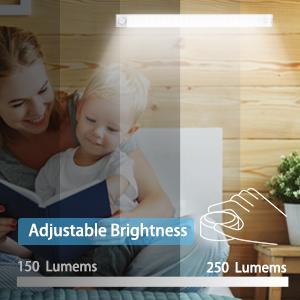
Figure 4: Stepless dimming adjustment using the rotating knob.
Charging Instructions
The Lightbiz 78 LED Closet Light is equipped with a large 3200mAh rechargeable Lithium Ion battery.
- Connect the provided USB cable to the charging port on the light.
- Connect the other end of the USB cable to any standard USB power source (e.g., USB wall adapter, power bank, computer USB port).
- During charging, the red power indicator lights will flicker.
- Once fully charged, all four red power indicator lights will remain solid.
- A single full charge can continuously last about 6 hours in Always-On Mode (at 150 Lumens).
- When the last indicator light flickers, it's time to recharge the light.

Figure 5: Charging the light via USB.
Video 1: Product overview and charging demonstration.
Maintenance
- To clean the light, wipe it with a soft, dry cloth. Do not use abrasive cleaners or solvents.
- Avoid exposing the light to water or high humidity, as it is not water resistant.
- Store the light in a cool, dry place when not in use for extended periods.
Troubleshooting
| Problem | Solution |
|---|---|
| Light does not turn on. |
|
| Motion sensor is not working. |
|
| Light turns on/off unexpectedly. |
|
| Light does not dim. |
|
Warranty and Support
Lightbiz provides a Lifetime Warranty for this product. If you encounter any product quality issues, please contact Lightbiz customer support via email for a free replacement after confirmation.
For further assistance or inquiries, please refer to the contact information provided with your purchase or visit the official Lightbiz store on Amazon: Lightbiz Store
Ask a question about this manual
Ask about setup, troubleshooting, compatibility, parts, safety, or missing instructions. Manuals+ will review the question and use this page’s manual context to help answer it.