1. Introduction
This manual provides detailed instructions for the proper use, setup, operation, and maintenance of your Clockwise Tools DITR-0105N Digital Indicator. This precision instrument is designed for accurate dimensional measurement in various applications, including machining, metalworking, and quality control. Please read this manual thoroughly before operating the device to ensure optimal performance and longevity.
2. Safety Information
- Handle the digital indicator with care to avoid damage to the precision components.
- Do not expose the device to extreme temperatures, humidity, or direct sunlight.
- Avoid dropping the instrument or subjecting it to strong impacts.
- Keep the device clean and free from dust, oil, and other contaminants.
- Store the indicator in its protective case when not in use.
3. Product Overview
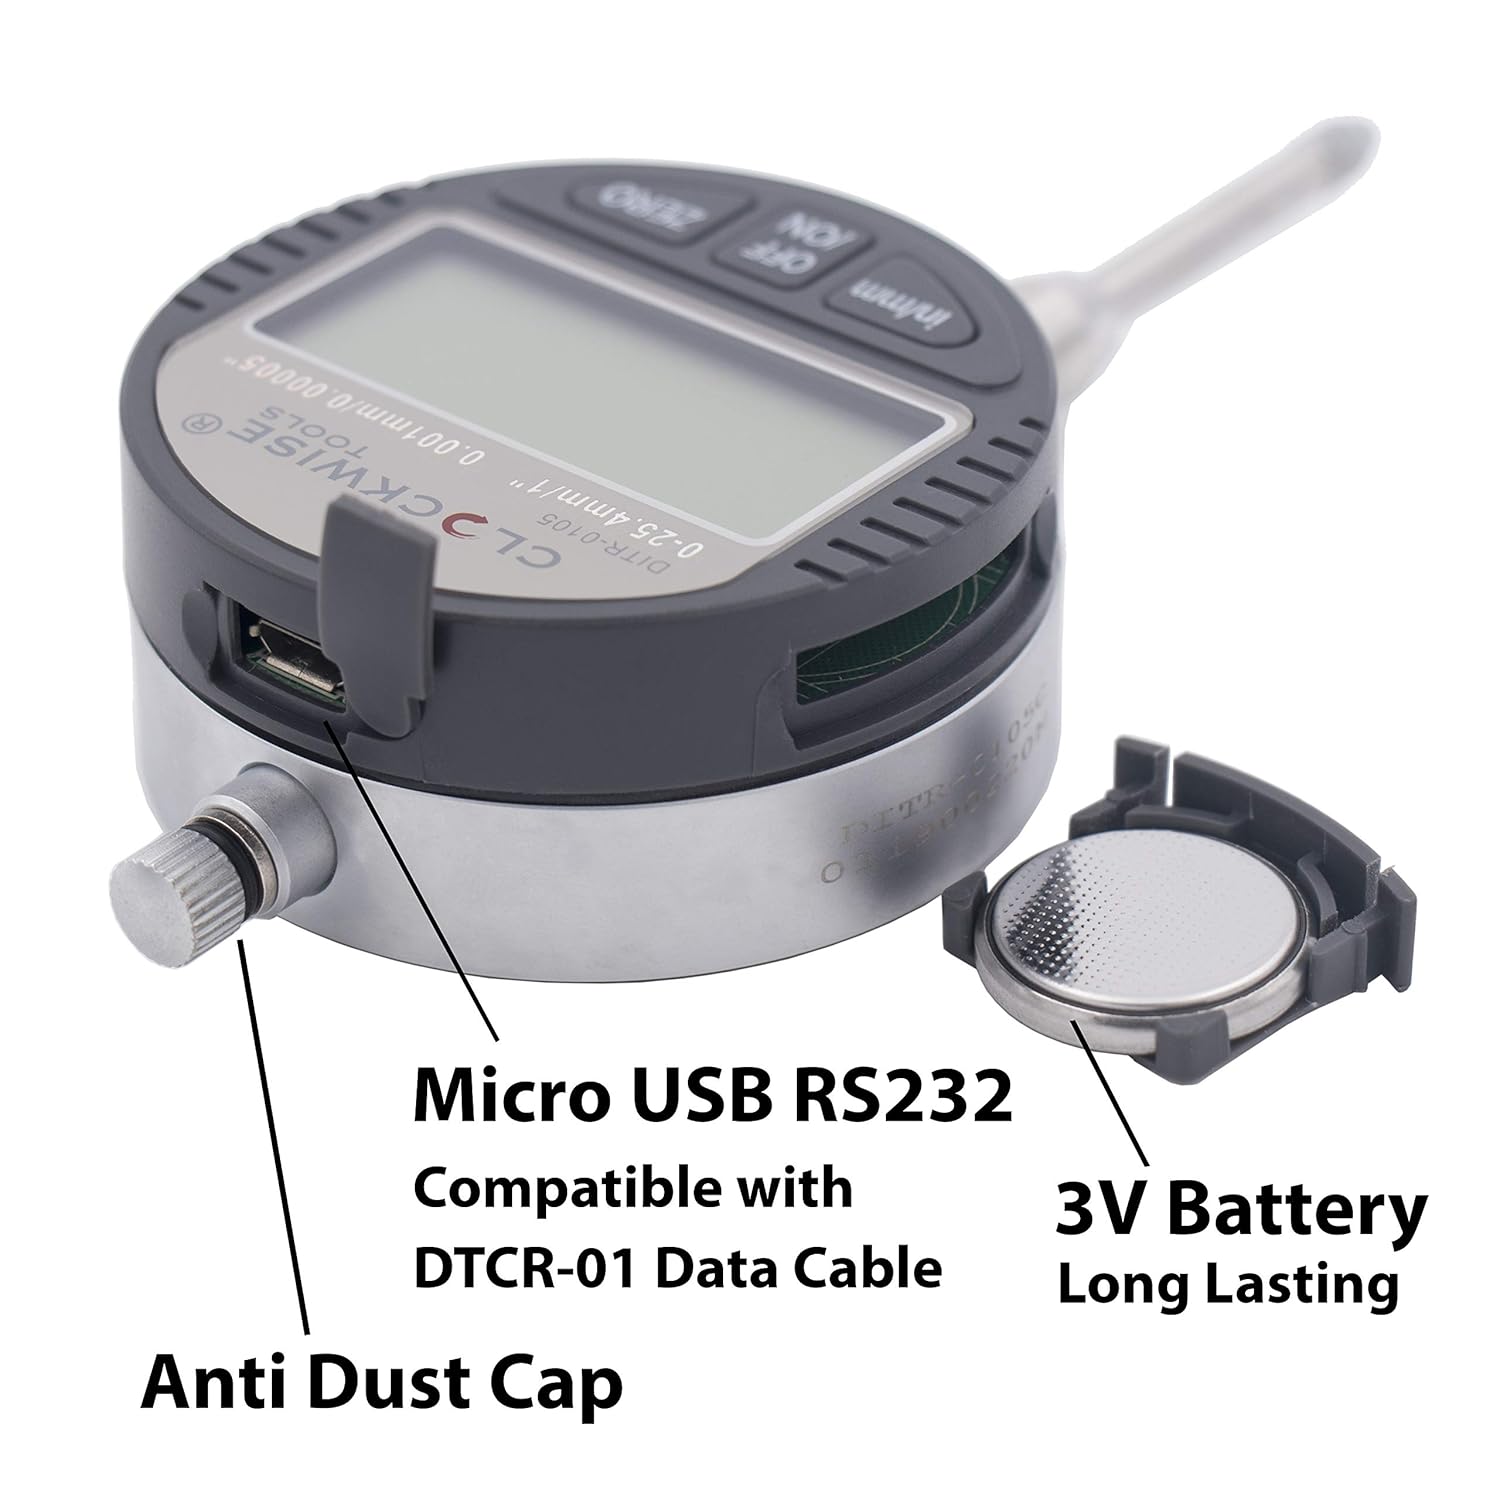
The Clockwise Tools DITR-0105N Digital Indicator features a large LCD display, dual unit conversion, and a robust design for reliable measurements.
Key Features:
- Dual Unit Conversion: Supports both inch and metric readings.
- Extra-Large LCD Display: 1.6" x 0.7" high-contrast screen for easy readability.
- High Precision & Accuracy: 0-1" (25.4mm) measuring range, 0.00005" (0.001mm) resolution, and ±0.0002" (0.005mm) accuracy.
- Versatile Mounting: Includes flat back and lug back options (6.5mm hole size), 3/8" stem diameter, and UNF 4-48 threaded tip.
- RS232 Data Transfer: Equipped with a port for seamless measurement logging (requires Clockwise Tools DTCR-01 cable, sold separately).
Components:
- LCD Display
- Inch/mm Button
- OFF/ON Button
- ZERO Button
- Measuring Spindle/Contact Point
- Mounting Stem
- Data Output Port (Micro USB RS232 compatible)
- Battery Compartment

4. Setup
4.1 Battery Installation
The DITR-0105N requires two CR2032 batteries (included). To install or replace batteries:
- Locate the battery compartment cover on the back of the indicator.
- Use a small screwdriver or coin to gently open the cover.
- Insert the two CR2032 batteries with the positive (+) side facing up.
- Close the battery compartment cover securely.

4.2 Mounting the Indicator
The indicator can be mounted using its 3/8" stem or via the included lug back attachment.
- Stem Mounting: Insert the 3/8" diameter stem into a compatible fixture or stand and secure it.
- Lug Back Mounting: Attach the lug back plate to the indicator's rear using the provided screws. Then, mount the lug back to a fixture using its 6.5mm hole.

5. Operation
5.1 Power On/Off
- Press the OFF/ON button to turn the indicator on.
- Press and hold the OFF/ON button to turn the indicator off. The device does not have an auto-off feature.
5.2 Zeroing the Display
To set a reference point (zero) for your measurements:
- Position the measuring spindle at the desired reference point.
- Press the ZERO button. The display will show '0.0000' (or '0.000' in metric), and all subsequent measurements will be relative to this point.
5.3 Inch/Metric Conversion
To switch between inch and millimeter units:
- Press the inch/mm button. The display will toggle between inch (in) and millimeter (mm) readings.

5.4 Data Transfer (RS232)
The DITR-0105N is equipped with an RS232 data transfer port for connecting to a PC for measurement logging. This functionality requires the separate purchase of the Clockwise Tools DTCR-01 data cable.
- Connect the DTCR-01 data cable to the indicator's data port and to your computer.
- Follow the instructions provided with the DTCR-01 cable for software installation and data acquisition.
- Note: The data port is Micro USB RS232 compatible, but it is NOT a standard USB port for direct PC connection without the specific DTCR-01 cable.

6. Maintenance
6.1 Cleaning
- Wipe the indicator's body with a soft, dry cloth.
- For stubborn dirt, use a cloth lightly dampened with mild soap and water, then dry thoroughly.
- Do not use harsh chemicals, solvents, or abrasive cleaners, as these can damage the display or finish.
- Keep the measuring spindle and contact point clean and free of debris to ensure accurate readings.
6.2 Storage
- Store the digital indicator in its original protective case when not in use.
- Ensure the storage environment is dry, clean, and free from extreme temperatures or humidity.
- Remove batteries if the device will not be used for an extended period to prevent leakage.

7. Troubleshooting
- Display Not Working: Check battery installation. Ensure batteries are correctly oriented and have sufficient charge. Replace batteries if necessary.
- Inaccurate Readings: Clean the measuring spindle and contact point. Ensure the indicator is securely mounted and stable. Re-zero the display. Verify the workpiece is clean and properly positioned.
- Buttons Unresponsive: Ensure the device is powered on. If issues persist after checking batteries, contact customer support.
- Data Transfer Issues: Verify the DTCR-01 cable is correctly connected to both the indicator and the PC. Ensure the correct software/drivers are installed on the PC. Consult the DTCR-01 cable manual for specific troubleshooting steps.
8. Specifications
| Feature | Specification |
|---|---|
| Measuring Range | 0-1 inch (0-25.4 mm) |
| Resolution | 0.00005 inch (0.001 mm) |
| Accuracy | ±0.0002 inch (±0.005 mm) |
| Stem Diameter | 3/8 inch |
| Contact Point Thread | UNF 4-48 |
| Display | Extra-Large LCD (1.6" x 0.7") |
| Power Source | 2 x CR2032 3V Lithium Batteries (included) |
| Data Output | RS232 (Micro USB compatible, requires DTCR-01 cable) |
| Material | Metal |
| Item Model Number | DITR-0105N |
| Package Dimensions | 6.13 x 4.38 x 1.63 inches |
| Item Weight | 4.4 ounces |
9. Warranty and Support
Clockwise Tools products are manufactured to high-quality standards. For warranty information or technical support, please refer to the warranty card included with your product or visit the official Clockwise Tools website. Please have your model number (DITR-0105N) and purchase information ready when contacting support.