
1. Introduction
Thank you for choosing the Soundmaster Eliteline IR300SI Internet DAB+ FM Radio. This device offers a wide range of audio entertainment options, including Internet Radio, DAB+ digital radio, FM radio, Bluetooth connectivity, and USB playback. It also features Amazon Alexa compatibility for voice control and can be managed via the UNDOK app. This manual provides essential information for setting up, operating, and maintaining your radio.
2. Safety Information
- Read all instructions carefully before use and retain them for future reference.
- Do not expose the device to rain, moisture, or extreme temperatures.
- Ensure proper ventilation; do not block any ventilation openings.
- Use only the power adapter supplied with the unit.
- Do not attempt to open or repair the unit yourself. Refer all servicing to qualified personnel.
- Keep the device away from strong magnetic fields.
3. Package Contents
Please check that all items are present:
- Soundmaster Eliteline IR300SI Internet DAB+ FM Radio
- Power Adapter
- Remote Control
- User Manual (this document)
- Installation material (e.g., antenna, if separate)
4. Product Overview
Familiarize yourself with the various parts and controls of your Soundmaster IR300SI radio.

Figure 4.1: Front angled view of the Soundmaster IR300SI radio, showing the display, speakers, and control buttons.
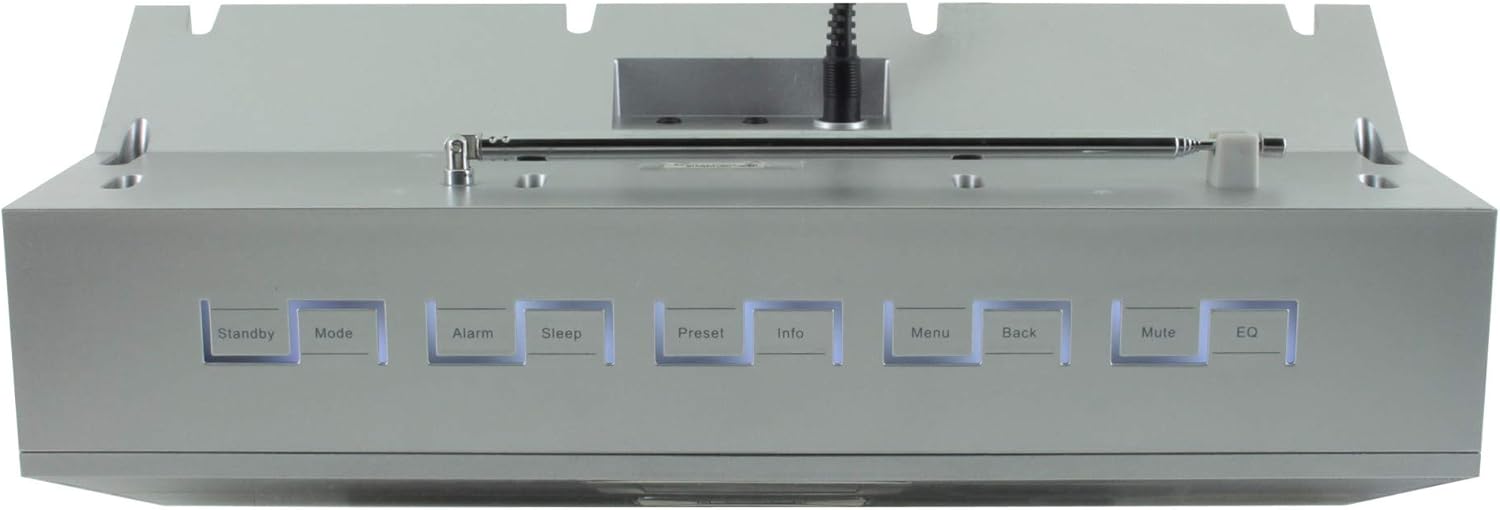
Figure 4.2: Top view of the Soundmaster IR300SI radio, highlighting the control buttons: Standby, Mode, Alarm, Sleep, Preset, Info, Menu, Back, Mute, and EQ.
Front Panel
- 2.4" / 6 cm TFT Color Display: Shows station information, menus, and time.
- Speakers: Stereo sound output.
- Control Dial/Buttons: For navigation and selection.
Top Panel Controls
- Standby: Power on/off.
- Mode: Switch between Internet Radio, DAB+, FM, Bluetooth, USB, AUX.
- Alarm: Set and manage alarms.
- Sleep: Activate sleep timer.
- Preset: Access and save favorite stations.
- Info: Display additional information about the current broadcast.
- Menu: Access system settings and options.
- Back: Return to the previous menu.
- Mute: Mute/unmute audio.
- EQ: Select equalizer presets.
Rear/Side Panel Connections
- Power Input: Connect the supplied power adapter.
- Telescopic Antenna: For DAB+ and FM reception.
- USB Port: For MP3 playback from USB storage devices.
- 3.5mm Aux-In Port: Connect external audio sources.
- Headphone Jack: For private listening.
5. Setup
5.1 Power Connection
- Connect the power adapter to the DC input on the rear of the radio.
- Plug the power adapter into a wall outlet.
- Press the Standby button on the top panel or remote control to turn on the radio.
5.2 Antenna Setup
Extend the telescopic antenna fully for optimal DAB+ and FM radio reception.
5.3 Initial Wi-Fi Network Setup
Upon first power-on, the radio will guide you through the initial setup wizard:
- Select your preferred language using the control dial and confirm.
- The radio will scan for available Wi-Fi networks.
- Select your network from the list.
- Enter your Wi-Fi password using the on-screen keyboard and control dial. Confirm to connect.
- Once connected, the radio will display the main menu.
6. Operating Instructions
Use the Mode button to switch between different audio sources.
6.1 Internet Radio
- Press Mode to select "Internet Radio".
- Navigate through categories (e.g., Location, Genre, Popular) using the control dial.
- Select a station to begin playback.
- To save a station as a preset, press and hold the Preset button, then select a preset number.
6.2 DAB+ Radio
- Press Mode to select "DAB+ Radio".
- The radio will automatically scan for available DAB+ stations.
- Use the control dial to browse and select stations.
- Press and hold Preset to save a station.
6.3 FM Radio
- Press Mode to select "FM Radio".
- The radio will automatically scan for available FM stations.
- Use the control dial to browse and select stations.
- Press and hold Preset to save a station.
6.4 Bluetooth Connectivity
- Press Mode to select "Bluetooth". The radio will enter pairing mode.
- On your mobile device (smartphone, tablet), enable Bluetooth and search for available devices.
- Select "Soundmaster IR300SI" from the list to pair.
- Once connected, you can stream audio from your device to the radio.
6.5 USB Playback
- Insert a USB storage device (formatted as FAT32) containing MP3 files into the USB port.
- Press Mode to select "USB".
- Navigate through folders and select tracks using the control dial.
6.6 AUX Input
- Connect an external audio device (e.g., MP3 player) to the 3.5mm Aux-In port using an audio cable (not supplied).
- Press Mode to select "AUX".
- Control playback from your external device.
6.7 Alarms and Sleep Timer
- Alarms: Press the Alarm button to set up to two alarms. Configure time, source (buzzer, radio), and frequency (daily, weekdays, weekends).
- Sleep Timer: Press the Sleep button to set a countdown timer (e.g., 15, 30, 60 minutes) after which the radio will automatically turn off.
6.8 Equalizer (EQ)
Press the EQ button to cycle through pre-programmed sound settings (e.g., Normal, Jazz, Rock, Classical, Pop, News) to optimize audio output for different content.
6.9 Amazon Alexa and UNDOK App Control
- Amazon Alexa: The radio is compatible with Amazon Alexa. Follow the instructions in the Alexa app to link your Soundmaster IR300SI for voice control functionalities.
- UNDOK App: Download the UNDOK app from your mobile device's app store. Ensure your mobile device and the radio are on the same Wi-Fi network. The app allows you to control the radio, browse stations, and manage settings remotely.
7. Maintenance
7.1 Cleaning
- Always unplug the radio from the power outlet before cleaning.
- Use a soft, dry cloth to wipe the exterior surfaces.
- Do not use abrasive cleaners, waxes, or solvents as they may damage the finish.
7.2 Storage
If you plan to store the radio for an extended period, unplug it from the power source and store it in a cool, dry place, away from direct sunlight and extreme temperatures.
8. Troubleshooting
If you encounter issues, refer to the following common problems and solutions:
| Problem | Possible Cause | Solution |
|---|---|---|
| No power | Power adapter not connected or faulty outlet. | Check power connections. Try a different outlet. |
| No sound | Volume too low, muted, or incorrect source selected. | Increase volume. Press Mute. Ensure correct mode (Internet Radio, DAB+, etc.) is selected. |
| Cannot connect to Wi-Fi | Incorrect password, weak signal, or router issue. | Verify password. Move radio closer to router. Restart router. |
| Poor DAB+/FM reception | Antenna not extended or poor signal area. | Fully extend the telescopic antenna. Reposition the radio. |
| Bluetooth pairing fails | Radio not in pairing mode, or device too far. | Ensure radio is in Bluetooth mode. Move devices closer. Restart Bluetooth on both devices. |
9. Specifications
| Feature | Specification |
|---|---|
| Model Name | IR300SI |
| Brand | Soundmaster |
| Connectivity Technology | Bluetooth, USB, Wi-Fi |
| Special Features | Integrated Clock, Internet Radio, DAB+, FM, Bluetooth, USB MP3 Playback, AUX-In, Headphone Jack, 2 Alarms with Weekend Function, Sleep Timer, Equalizer, Amazon Alexa Compatible, UNDOK App Control, Network Music Player (DLNA) |
| Audio Output Mode | Stereo |
| Maximum Speaker Output Power | 2 x 10 Watts RMS |
| Display | 2.4" / 6 cm TFT Color Display |
| Control Method | Remote Control, UNDOK App, On-device Buttons |
| Power Source | AC Powered (100 Volts input) |
| Product Dimensions (L x W x H) | 17 x 18 x 15 cm |
| Item Weight | 2.3 Kilograms |
| Color | Silver |
| Compatible Devices | Personal Computer, Television, Tablet, Smartphone, Laptop |
| Mounting Type | Tabletop |
10. Warranty and Support
The Soundmaster Eliteline IR300SI comes with a spare parts availability period of 1 year from the date of purchase. For technical support, warranty claims, or further assistance, please contact your retailer or the Soundmaster customer service department. Refer to the contact information provided with your purchase documentation.


