
Escape RA930
Escape RA930 Jumbo Display AM/FM Digital Alarm Clock with AUX
User Manual
1. Introduction
This manual provides detailed instructions for the setup, operation, and maintenance of your Escape RA930 Jumbo Display AM/FM Digital Alarm Clock with AUX. Please read this manual thoroughly before using the product to ensure proper function and to prevent damage.
2. Safety Information
Observe the following safety precautions to prevent electric shock, fire, or injury:
- Do not expose this appliance to rain or moisture.
- Do not place objects filled with liquids, such as vases, on the appliance.
- Ensure proper ventilation; do not block any ventilation openings.
- Protect the power cord from being walked on or pinched.
- Unplug the appliance during lightning storms or when unused for long periods.
- Refer all servicing to qualified service personnel.
3. Package Contents
Verify that all items are present in the package:
- Escape RA930 Digital Alarm Clock
- AC Power Adapter
- User Manual (this document)
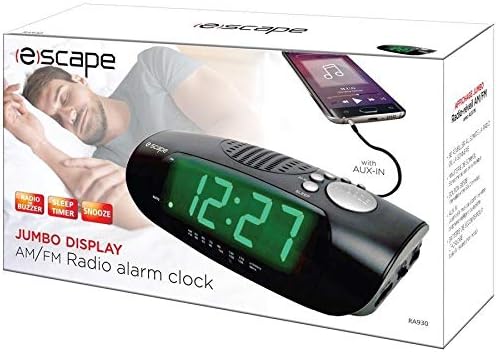
Image: The Escape RA930 alarm clock shown within its retail box, indicating typical package contents.
4. Product Overview
Familiarize yourself with the various components and controls of your alarm clock.

Image: The Escape RA930 alarm clock displaying the time, with a smartphone connected to its AUX-IN port, illustrating its functionality.
Front Panel:
- Jumbo Green LED Display: Shows time, alarm status, and radio frequency.
- Speaker: For audio output from radio or AUX-IN.
- Control Buttons: (e.g., Time Set, Alarm Set, Snooze, Sleep, Radio/Band, Volume, Tuning) - Specific button labels may vary slightly.
Rear/Side Panel:
- AC Power Input: For connecting the power adapter.
- AUX-IN Jack: For connecting external audio devices.
- Battery Compartment: For 9V battery backup.
- Dimmer Switch: Adjusts display brightness.
5. Setup
5.1 Power Connection
- Plug the AC power adapter into the AC power input jack on the back of the alarm clock.
- Plug the other end of the adapter into a standard wall outlet. The display will light up.
5.2 Battery Backup (9V Battery Not Included)
Installing a 9V battery provides backup power to maintain time and alarm settings during a power outage. The display will not illuminate during battery backup mode.
- Open the battery compartment cover on the bottom or rear of the unit.
- Insert one 9V battery, observing the correct polarity (+ and -).
- Close the battery compartment cover securely.
5.3 Setting the Time
- Press and hold the TIME SET button. The hour digits will begin to flash.
- While the hour digits are flashing, press the HOUR button repeatedly to set the correct hour. Pay attention to the AM/PM indicator if present.
- Press the MINUTE button repeatedly to set the correct minute.
- Release the TIME SET button to save the time.
6. Operating Instructions
6.1 Setting the Alarm
You can set the alarm to wake you with either the radio or a buzzer.
- Press and hold the ALARM SET button. The alarm hour digits will flash.
- Press the HOUR button to set the desired alarm hour.
- Press the MINUTE button to set the desired alarm minute.
- Press the ALARM SET button again to confirm the alarm time.
- To select the alarm source (Radio or Buzzer), press the ALARM MODE button (or similar) repeatedly until the desired icon (radio wave or bell) appears on the display.
- To activate/deactivate the alarm, press the ALARM ON/OFF button (or similar). An alarm indicator will appear on the display when active.
6.2 Radio Operation (AM/FM)
- Press the RADIO ON/OFF button to turn on the radio.
- Press the BAND button to switch between AM and FM bands.
- Use the TUNING buttons (or +/-) to manually tune to your desired station.
- Adjust the volume using the VOLUME control.
- To turn off the radio, press the RADIO ON/OFF button again.
6.3 AUX-IN Function
Connect your smartphone, MP3 player, or other audio device to the alarm clock using a 3.5mm audio cable (not included).
- Connect one end of a 3.5mm audio cable to the AUX-IN jack on the alarm clock.
- Connect the other end to the headphone jack or AUX output of your external audio device.
- Press the MODE or AUX button on the alarm clock to switch to AUX-IN mode.
- Play audio from your connected device. Adjust volume using both the alarm clock's volume control and your external device's volume.
6.4 Sleep Timer
The sleep timer allows you to fall asleep to the radio, which will automatically turn off after a set period.
- While the radio is playing, press the SLEEP button. The display will show the default sleep time (e.g., 90 minutes).
- Press the SLEEP button repeatedly to cycle through available sleep times (e.g., 90, 60, 30, 15 minutes, OFF).
- The radio will automatically turn off after the selected time.
6.5 Snooze Function
When the alarm sounds, press the large SNOOZE button to temporarily silence the alarm for 5 to 10 minutes (interval may vary by model). The alarm will sound again after the snooze period.
6.6 Display Dimmer
Use the DIMMER switch (usually located on the side or rear) to adjust the brightness of the LED display to your preference.
7. Maintenance
Cleaning the Unit:
- Unplug the alarm clock from the power outlet before cleaning.
- Use a soft, dry cloth to wipe the exterior surfaces.
- Do not use abrasive cleaners, waxes, or solvents as they may damage the finish.
8. Troubleshooting
| Problem | Possible Cause | Solution |
|---|---|---|
| No power/Display off | Power cord not connected; Power outage. | Ensure AC adapter is securely plugged in. Check wall outlet. If power outage, battery backup will maintain settings (display will be off). |
| Alarm does not sound | Alarm not set; Alarm volume too low; Alarm deactivated. | Verify alarm time and activation. Ensure alarm mode (radio/buzzer) is selected. Increase radio volume if alarm source is radio. |
| Poor radio reception | Antenna not extended; Interference. | Extend the FM wire antenna fully. Reposition the unit for better reception. Avoid placing near other electronic devices. |
| AUX-IN not working | Incorrect mode; Cable issue; Device volume low. | Ensure the alarm clock is in AUX-IN mode. Check audio cable connection. Increase volume on both the alarm clock and the external device. |
9. Specifications
- Brand: Escape
- Model: RA930
- Display: 1.2" Green LED
- Radio: AM/FM Digital Tuner
- Audio Input: AUX-IN (3.5mm)
- Power Source: AC Power (Electrical Operation)
- Battery Backup: 9V Battery (not included)
- Features: Jumbo Display, Alarm Clock, Snooze, Sleep Timer, Dimmer Switch
- Mounting Type: Tabletop
10. Warranty and Support
For warranty information or technical support, please refer to the documentation provided at the time of purchase or contact your retailer. Keep your purchase receipt as proof of purchase.
Ask a question about this manual
Ask about setup, troubleshooting, compatibility, parts, safety, or missing instructions. Manuals+ will review the question and use this page’s manual context to help answer it.