
Hztyyier 9523
Angle Grinder Flange User Manual
Model: 9523 | Brand: Hztyyier
1. Introduction
This manual provides essential information for the proper installation, operation, and maintenance of your Hztyyier Angle Grinder Flange set. This component is designed as a repair and replacement part specifically for the 9523 angle grinder motor rotor. It ensures secure fastening of grinding wheels and other accessories to your angle grinder.
2. Safety Information
Always prioritize safety when working with power tools and their components. Failure to follow these instructions may result in injury or damage to equipment.
- Always disconnect the angle grinder from the power source before installing, removing, or inspecting any components.
- Wear appropriate personal protective equipment (PPE), including safety glasses, gloves, and hearing protection.
- Ensure the flange set is clean and free from debris before installation.
- Verify that the flange set is compatible with your specific angle grinder model (9523) and the accessory you intend to use.
- Do not overtighten or undertighten the flange. Refer to your angle grinder's manual for specific torque recommendations.
- Inspect the flanges for wear, damage, or deformation before each use. Replace immediately if any damage is observed.
3. Product Overview
The Hztyyier Angle Grinder Flange set consists of two primary components: an inner flange and an outer flange. These work in conjunction to securely hold grinding wheels, cutting discs, and other accessories onto the angle grinder's spindle.

Image 3.1: The complete Angle Grinder Flange set, showing both the inner and outer components.
- Inner Flange: This component typically has a threaded center hole and a flat or slightly recessed surface. It mounts directly onto the angle grinder's spindle.
- Outer Flange: This component is designed to fit over the accessory (e.g., grinding wheel) and secure it against the inner flange. It is tightened using a spanner wrench.

Image 3.2: Top view of the inner flange, showing the threaded center.

Image 3.3: Top view of the outer flange, designed to secure the accessory.
4. Specifications
The following specifications apply to the Hztyyier Angle Grinder Flange set:
| Attribute | Value |
|---|---|
| Brand | Hztyyier |
| Material | Metal |
| Color | Silver |
| Item Weight | 1.44 ounces (approx. 0.09 Pounds) |
| Product Dimensions | 2.17 x 1.38 x 0.71 inches |
| Compatible Model | 9523 Angle Grinder Motor Rotor |
| Arbor/Shaft Fit | 3/8 inch |

Image 4.1: Dimensional diagram of the inner and outer flanges.
5. Setup and Installation
Follow these steps to properly install the flange set on your 9523 angle grinder:
- Ensure Power is Off: Before beginning, always unplug your angle grinder from the power outlet to prevent accidental startup.
- Prepare the Spindle: Ensure the angle grinder's spindle is clean and free of any debris or old flange residue.
- Install Inner Flange: Thread the inner flange onto the angle grinder's spindle. Ensure it is seated correctly and tightened by hand until snug.
- Mount the Accessory: Place your desired grinding wheel, cutting disc, or other compatible accessory onto the spindle, ensuring it sits flush against the inner flange.
- Install Outer Flange: Place the outer flange over the accessory, aligning its keyways (if present) with the spindle's flats.
- Tighten Securely: Use the appropriate spanner wrench (usually provided with your angle grinder) to tighten the outer flange. Ensure the accessory is held firmly in place without excessive force that could damage the flange or accessory.
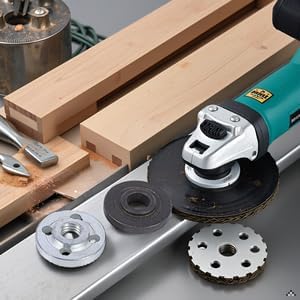
Image 5.1: Angle grinder with flange and disc components ready for assembly.
6. Operating Instructions
The angle grinder flange set functions as a critical fastening component. Once installed, its primary role is to securely hold the grinding or cutting accessory in place during operation. Proper installation, as described in Section 5, is crucial for safe and effective use. Always ensure the accessory is centered and firmly clamped between the inner and outer flanges before powering on the angle grinder.
7. Maintenance
Regular maintenance of your flange set will extend its lifespan and ensure safe operation:
- Cleaning: After each use, clean the flanges to remove any dust, debris, or metal particles. A dry cloth or soft brush is usually sufficient.
- Inspection: Periodically inspect both the inner and outer flanges for signs of wear, cracks, deformation, or stripped threads. Pay close attention to the contact surfaces and the threaded areas.
- Storage: Store the flanges in a clean, dry place away from corrosive materials and extreme temperatures.
- Replacement: If any damage or significant wear is detected, replace the flange set immediately. Do not attempt to repair damaged flanges.
8. Troubleshooting
Here are some common issues and their potential solutions:
| Problem | Possible Cause | Solution |
|---|---|---|
| Flange does not fit on spindle. | Incorrect model/size; debris on spindle threads. | Verify compatibility with 9523 model; clean spindle threads. |
| Accessory wobbles or is not secure. | Flanges not tightened properly; worn flanges; incorrect accessory size. | Retighten flanges; inspect for wear and replace if necessary; ensure accessory is compatible. |
| Difficulty removing flange. | Overtightened; rust/corrosion. | Use spanner wrench with appropriate leverage; apply penetrating oil if rusted (ensure to clean thoroughly before next use). |
9. Warranty and Support
Hztyyier products are manufactured to high-quality standards. For any manufacturing defects or issues, please contact your retailer or the Hztyyier customer support team. Keep your purchase receipt as proof of purchase. This product is a replacement component and its warranty is typically covered under the terms of the original angle grinder or the retailer's accessory policy.
For further assistance, please refer to the contact information provided by your point of purchase or visit the official Hztyyier website.
Ask a question about this manual
Ask about setup, troubleshooting, compatibility, parts, safety, or missing instructions. Manuals+ will review the question and use this page’s manual context to help answer it.