
1. Introduction
This manual provides detailed instructions for the installation, operation, and maintenance of the PELCO PE-EVO05LID Evolution 05 Mini 5MP Network Mini Dome Camera. This camera is designed for indoor surveillance, offering a 5-megapixel resolution and a fisheye lens for a wide field of view. Please read this manual thoroughly before using the product to ensure proper setup and functionality.
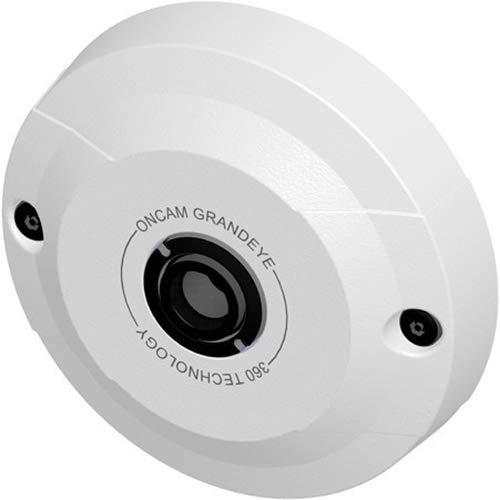
Figure 1: PELCO PE-EVO05LID Evolution 05 Mini 5MP Network Mini Dome Camera. This image shows the compact dome design of the camera, typically mounted on a ceiling.
2. Safety Information
- Ensure all electrical connections comply with local codes and regulations.
- Use only the specified power source (Power over Ethernet - PoE).
- Do not expose the camera to water or excessive moisture. This camera is IP40 rated for indoor use only.
- Avoid placing the camera in areas with extreme temperatures or high humidity.
- Do not attempt to disassemble or modify the camera. Refer all servicing to qualified personnel.
- Keep out of reach of children.
3. Package Contents
Verify that all items are present in the package:
- PELCO PE-EVO05LID Evolution 05 Mini 5MP Network Mini Dome Camera
- Mounting hardware (screws, anchors)
- Installation template
- Quick Start Guide
Note: An Ethernet cable for network connection and PoE power is not typically included and must be supplied separately.
4. Product Overview
The PELCO PE-EVO05LID is a compact 5MP network dome camera featuring a fisheye lens for a wide 180 x 168° field of view. Key features include:
- High Resolution: Up to 2592 x 1944 video resolution.
- Wide Dynamic Range (WDR): Electronic WDR for clear images in varying lighting.
- Flexible Storage: Integrated microSD slot supporting up to 128GB for edge recording.
- Power over Ethernet (PoE): Single cable for power and data.
- ONVIF Compliant: Profile S for broad compatibility.
- Motion Detection: Eight configurable regions.
- Privacy Masking: Ten configurable zones.
5. Setup
5.1 Mounting the Camera
- Choose a suitable indoor location for ceiling mount, ensuring a clear view of the desired surveillance area.
- Use the provided installation template to mark drilling points on the ceiling.
- Drill pilot holes and insert wall anchors if necessary.
- Secure the camera base to the ceiling using the provided screws.
- Adjust the camera's orientation as needed before final tightening.
5.2 Wiring and Power
The camera supports Power over Ethernet (PoE), simplifying installation by delivering both power and data through a single Ethernet cable.
- Connect one end of an RJ45 Ethernet cable to the camera's Ethernet port.
- Connect the other end of the Ethernet cable to a PoE-enabled network switch or a PoE injector.
- Ensure the network switch or injector is powered on. The camera will power up automatically.

Figure 2: RJ45 Ethernet Cable. This image displays a standard RJ45 Ethernet cable, used for both data and Power over Ethernet (PoE) connection to the camera.
5.3 Initial Configuration
Upon initial power-up, the camera will acquire an IP address from your network's DHCP server. Refer to the Quick Start Guide for instructions on discovering the camera's IP address and accessing its web interface for detailed configuration.
6. Operating Instructions
6.1 Network Access
Access the camera's web interface by entering its IP address into a web browser. You will be prompted for login credentials. Refer to the Quick Start Guide for default credentials.
6.2 Video Configuration
Within the web interface, navigate to the video settings to adjust:
- Resolution: Select desired resolution up to 2592 x 1944.
- Frame Rate: Adjust frames per second.
- Compression: Choose between H.264 and MJPEG streams to optimize storage and bandwidth.
- Image Enhancements: Configure electronic Wide Dynamic Range (WDR), automatic white balance, brightness, contrast, saturation, and exposure settings.
6.3 Motion Detection
The camera supports eight regions of motion detection. Configure these zones to trigger alerts or recording when movement is detected within specified areas of the camera's field of view.
6.4 Privacy Masking
Ten configurable privacy masking zones are available. Use these to block out sensitive areas from being recorded or viewed, ensuring privacy compliance.
6.5 Edge Recording
Insert a microSD card (up to 128GB) into the camera's integrated slot for local storage of video footage. Configure recording schedules and event-triggered recording via the web interface.
7. Maintenance
7.1 Cleaning
To maintain optimal image quality, periodically clean the camera lens and housing with a soft, dry cloth. Do not use harsh chemicals or abrasive materials.
7.2 Firmware Updates
Check the manufacturer's website for available firmware updates. Regularly updating the firmware ensures optimal performance, security, and access to new features. Follow the provided instructions carefully when performing updates.
8. Troubleshooting
- No Power: Ensure the Ethernet cable is securely connected to both the camera and a PoE-enabled device. Verify the PoE device is powered on.
- No Network Connection: Check the Ethernet cable for damage. Verify network settings and ensure the camera's IP address is correct and not conflicting with other devices.
- Poor Image Quality: Clean the camera lens. Adjust video settings such as resolution, brightness, contrast, and WDR in the web interface. Ensure adequate lighting in the surveillance area.
- Cannot Access Web Interface: Verify the camera's IP address. Ensure your computer is on the same network segment. Try clearing your browser's cache or using a different browser.
- Recording Issues: Check if a microSD card is properly inserted and formatted. Verify recording schedules and motion detection settings.
9. Specifications
| Feature | Specification |
|---|---|
| Model | PE-EVO05LID |
| Resolution | Up to 2592 x 1944 (5 MP) |
| Sensor | 1/2.5" CMOS |
| Lens | Fixed Fisheye Lens, f/2.0 Aperture |
| Field of View | 180 x 168° |
| Minimum Illumination | 0.2 lux |
| Video Compression | H.264, MJPEG |
| Storage | microSD slot, supports up to 128GB |
| Connectivity | RJ45 Ethernet with PoE |
| Protocols | ONVIF Compliant (Profile S) |
| Indoor/Outdoor Use | Indoor |
| IP Rating | IP40 |
| Mount Type | Ceiling Mount |
| Special Features | Motion Sensor, Electronic WDR, Auto White Balance |
10. Warranty and Support
10.1 Warranty Information
This PELCO product is covered by a limited warranty. Please refer to the warranty card included with your product or visit the official Pelco website for detailed warranty terms and conditions. Keep your proof of purchase for warranty claims.
10.2 Technical Support
For technical assistance, troubleshooting, or product inquiries, please contact Pelco customer support. Contact information can be found on the official Pelco website (www.pelco.com) or in the documentation provided with your camera.
