
1. Introduction
The Eton Elite Field Radio is a versatile receiver designed for comprehensive radio reception, including AM (MW), FM, and Shortwave (SW) bands. It features RDS (Radio Data System) for FM, Bluetooth connectivity for audio streaming, digital tuning, and advanced audio controls. This manual provides detailed instructions for the proper setup, operation, and maintenance of your radio.
2. Safety Information
- Power Source: Use only the supplied AC adapter or 4 D-size batteries. Ensure correct battery polarity.
- Water Exposure: Do not expose the radio to rain, moisture, or immerse it in water.
- Ventilation: Ensure adequate ventilation around the unit. Do not block ventilation openings.
- Cleaning: Disconnect power before cleaning. Use a soft, dry cloth. Avoid liquid cleaners.
- Servicing: Do not attempt to service the unit yourself. Refer all servicing to qualified personnel.
3. Package Contents
Verify that all items are present in the package:
- Eton Elite Field Radio (Model NELITEFIELD)
- 7V DC Power Adapter
- User Manual (this document)
Note: 4 D batteries are not included and must be purchased separately.
4. Setup
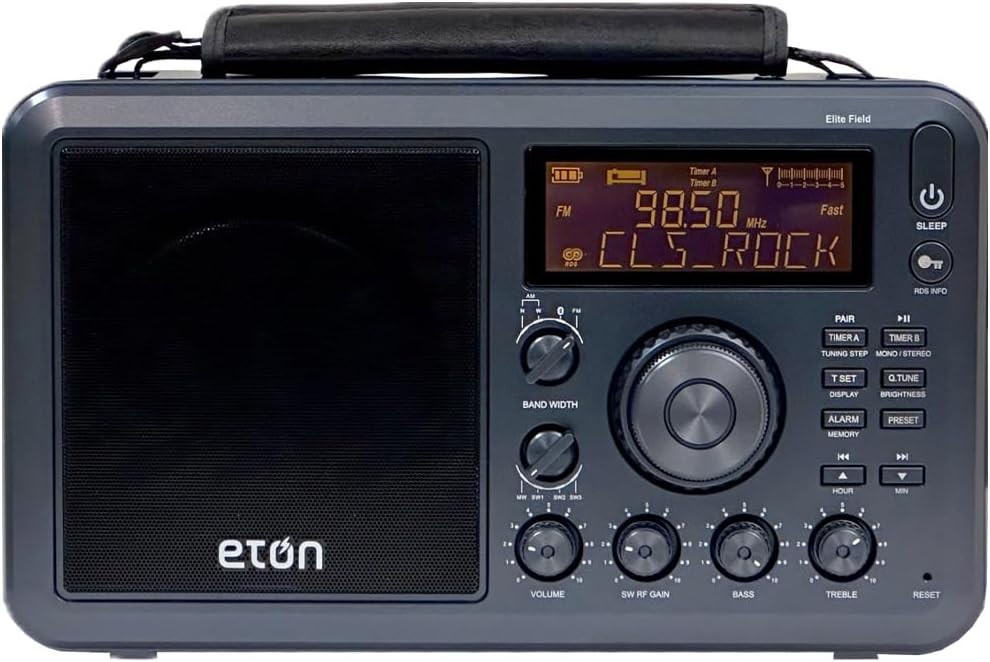
Figure 4.1: Front view of the Eton Elite Field Radio, showing the speaker grille, LCD display, and control knobs.

Figure 4.2: Rear view of the Eton Elite Field Radio, highlighting the external antenna connections and power input.
4.1 Powering the Radio
- AC Power: Connect the supplied 7V DC adapter to the DC jack on the back of the radio. Plug the adapter into a standard wall outlet.
- Battery Power: Open the battery compartment on the back of the radio. Insert 4 D-size batteries, ensuring correct polarity (+/-). Close the compartment securely. The battery strength indicator on the LCD display will show the current battery level.
4.2 Antenna Setup
- FM/SW Antenna: Extend the telescopic antenna fully for optimal FM and Shortwave reception. Adjust its angle for best signal.
- AM Antenna: The radio has a built-in AM antenna. For improved AM reception, rotate the entire radio until the signal is strongest.
- External Antenna: For enhanced reception, especially on Shortwave, connect an external AM/FM/SW antenna to the dedicated jacks on the rear of the radio.
5. Operating Instructions

Figure 5.1: Overview of the radio's controls and display, indicating key functionalities.

Figure 5.2: Detailed list of features and connectivity options available on the radio.
5.1 Basic Operation
- Power On/Off: Press the POWER button (usually located on the top right) to turn the radio on or off. A quick press may require a second press to confirm power off.
- Volume Control: Rotate the VOLUME knob (bottom left) to adjust the audio output level.
5.2 Tuning and Band Selection
- Band Selection: Use the AM/FM/SW switch or button to cycle through the available frequency bands.
- Digital Tuning: Rotate the main tuning knob to scan frequencies. The dial-in-dial design allows for coarse (fast) and fine (slow) tuning.
- Local/DX Switch: Use the LOCAL/DX switch to optimize signal reception. 'Local' is for strong nearby stations, 'DX' (Distance) is for weaker, distant signals.
- RF Gain Control: Adjust the RF GAIN knob to control the sensitivity of the radio receiver, which can help reduce noise for strong signals or boost weak signals.
5.3 RDS (Radio Data System)
When tuned to an FM station broadcasting RDS, the radio's display will show additional information such as the station's call letters, program type, song title, and artist. This information is automatically displayed when available.
5.4 Bluetooth Connectivity
- Pairing: Press the PAIR button to enter Bluetooth pairing mode. The display will indicate that it is searching for devices.
- Connect: On your Bluetooth-enabled device (e.g., smartphone, tablet), search for available devices and select 'Eton Elite Field'. Once connected, you can stream audio wirelessly to the radio.
5.5 Memory Stations
The radio can store up to 50 memory stations for quick access.
- Storing: Tune to the desired station. Press and hold the MEMORY button until the display flashes. Use the tuning knob or arrow buttons to select a memory slot, then press MEMORY again to confirm.
- Recalling: Press the PRESET button, then use the tuning knob or arrow buttons to select the desired stored station.
5.6 Audio Controls
- Treble/Bass Control: Use the TREBLE and BASS knobs to adjust the audio frequency response to your preference.
- Wide/Narrow Bandwidth: The BANDWIDTH switch allows you to select between wide and narrow audio filters. 'Wide' provides richer sound for strong signals, while 'Narrow' can improve clarity and reduce interference for weaker signals.
5.7 Clock and Alarm Functions
- Setting Time: Press the T.SET button to enter time setting mode. Use the HOUR and MIN buttons to adjust the time. Press T.SET again to confirm.
- Alarm: Press the ALARM button to set an alarm time. You can choose between a radio alarm or a buzzer alarm.
- Sleep Timer: Press the SLEEP button to activate the sleep timer, which will automatically turn off the radio after a set period (e.g., 120 minutes).
- Snooze: When the alarm sounds, press the SNOOZE button to temporarily silence it.
- Lock Feature: Use the LOCK button to prevent accidental button presses or alarm activation.
5.8 External Connections
- Headphone Jack: Connect standard 3.5mm headphones for private listening.
- Line-in/Line-out Ports: These ports allow you to connect external audio sources or output the radio's audio to another device.
6. Maintenance
- Cleaning: Wipe the radio's exterior with a soft, dry cloth. Do not use abrasive cleaners or solvents.
- Battery Replacement: If using batteries, replace all 4 D-size batteries when the low battery indicator appears on the display. Remove batteries if the radio will not be used for an extended period.
- Storage: Store the radio in a cool, dry place away from direct sunlight and extreme temperatures.
7. Troubleshooting
| Problem | Possible Cause | Solution |
|---|---|---|
| No power | AC adapter not connected; Batteries depleted or incorrectly inserted. | Ensure AC adapter is securely plugged in; Replace batteries or check polarity. |
| Poor reception | Antenna not extended; Weak signal; Interference. | Extend telescopic antenna; Adjust antenna angle or radio position; Use Local/DX switch; Connect external antenna. |
| No Bluetooth connection | Radio not in pairing mode; Device not discoverable. | Press PAIR button on radio; Ensure Bluetooth is enabled on your device and it is in pairing mode. |
| Alarm does not sound | Alarm not set; Volume too low; Lock feature engaged. | Verify alarm settings; Increase volume; Disengage lock feature. |
8. Specifications
| Feature | Detail |
|---|---|
| Model Number | NELITEFIELD |
| Dimensions (L x W x H) | 12.4 x 6.5 x 3 inches (31.5 x 16.5 x 7.6 cm) |
| Weight | 5.25 pounds (2.38 kg) |
| Radio Bands | AM (MW), FM (with RDS), Shortwave (SW) |
| Connectivity | Bluetooth |
| Tuning | Digital, Dial-in-dial coarse/fine |
| Memory Stations | 50 |
| Audio Controls | Treble, Bass, RF Gain, Wide/Narrow Bandwidth |
| Display | Rich orange LCD |
| Power Source | 7V DC adapter (included) or 4 x D batteries (not included) |
| Included Components | Radio, AC Adapter |
| Special Features | Alarm, Sleep Timer, Lock button, Carrying strap, External antenna connections, Line-in/Line-out, Headphone jack |
9. Warranty and Support
For warranty information and customer support, please refer to the official Eton website or contact their customer service department. Details regarding product registration and warranty claims are typically provided with your purchase documentation.
You can also visit the Eton Brand Store on Amazon for additional product information and support resources.


