
1. Introduction
This manual provides detailed instructions for the installation, operation, and maintenance of the All Balls Racing 26-10050 Carburetor Rebuild Kit. This kit is designed to restore optimal performance to the carburetor of compatible KTM motorcycle models. Please read this manual thoroughly before beginning any work.
1.1. Product Overview
The All Balls Racing 26-10050 Carburetor Rebuild Kit includes essential components required to refurbish a worn or malfunctioning carburetor. It is engineered to meet OEM specifications for fit and function.
1.2. Compatibility
This kit is compatible with the following KTM motorcycle models:
- KTM Adventure 640 (1998-2007)
- KTM Duke 640 (2000-2004)
- KTM Enduro 640 LC4 (2002-2004)
- KTM LC4 640 (1998-2002)
- KTM Supermoto 640 LC4 (2003-2005)
- KTM SXC 400 (2000)
- KTM SXC 625 (2003)
Always verify part fitment for your specific vehicle before installation.
2. Important Safety Information
Working with fuel systems and internal combustion engines can be hazardous. Always exercise caution and follow safety guidelines.
- Ensure the engine is cool before beginning work.
- Disconnect the battery to prevent accidental starting.
- Work in a well-ventilated area to avoid inhaling fuel fumes.
- Wear appropriate personal protective equipment (PPE), including gloves and eye protection.
- Keep fire extinguishers or other fire suppression equipment readily available.
- Dispose of fuel and other hazardous materials according to local regulations.
CALIFORNIA PROPOSITION 65 WARNING: This product may contain chemicals known to the State of California to cause cancer and birth defects or other reproductive harm. For more information, visit www.P65Warnings.ca.gov.
3. What's in the Box
The All Balls Racing 26-10050 Carburetor Rebuild Kit typically includes the following components:
- Gaskets and O-rings
- Float needle and seat
- Jets (main and pilot, specific sizes may vary)
- Air screw and spring
- Other small components necessary for a complete carburetor rebuild.
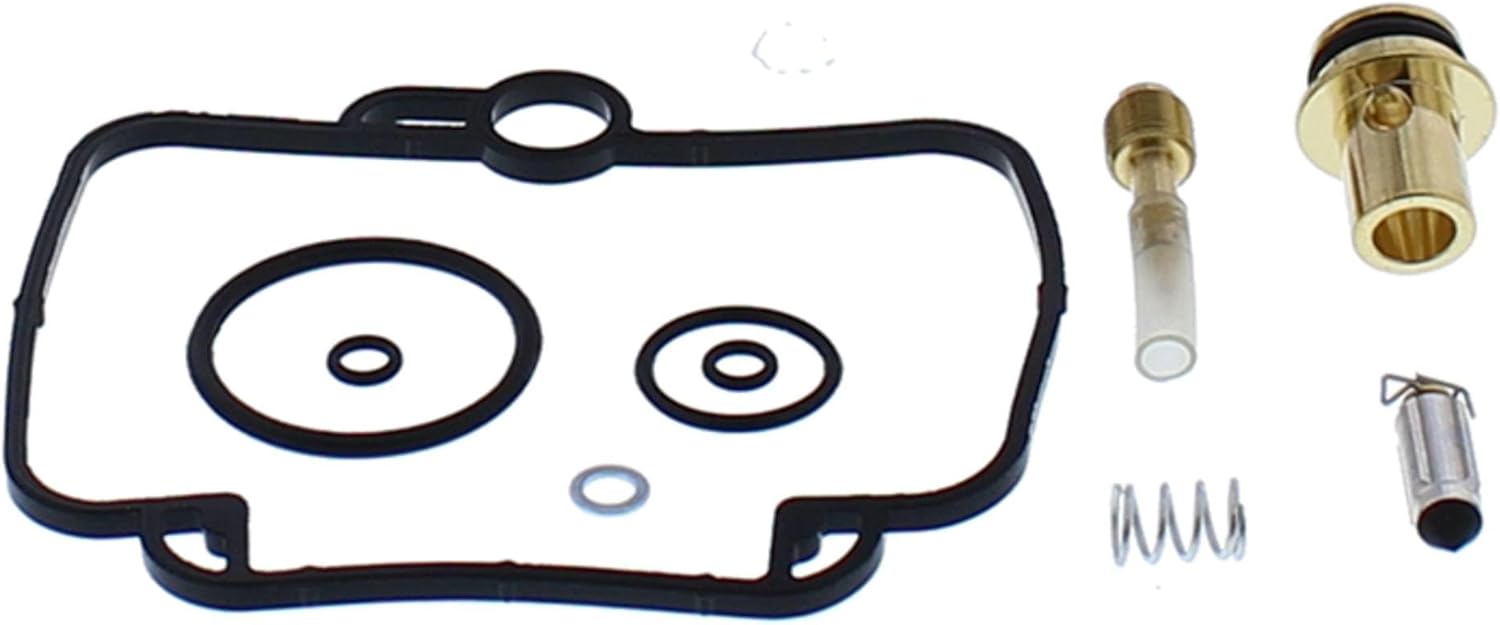
Image 3.1: Contents of the All Balls Racing 26-10050 Carburetor Rebuild Kit, showing various gaskets, O-rings, jets, and other small parts.

Image 3.2: The All Balls Racing 26-10050 Carburetor Rebuild Kit in its retail packaging, displaying the product number and compatibility information.
4. Setup and Preparation
4.1. Required Tools
Before starting, ensure you have the following tools:
- Basic mechanic's tool set (screwdrivers, wrenches, pliers)
- Carburetor cleaner
- Compressed air
- Shop rags or towels
- Parts tray for organizing small components
- Service manual for your specific KTM model (recommended)
4.2. Workspace Preparation
Prepare a clean, well-lit, and organized workspace. Lay down protective coverings to prevent spills and lost parts. Ensure adequate ventilation.
5. Installation Instructions
The following steps outline the general procedure for rebuilding a carburetor using this kit. Refer to your motorcycle's specific service manual for detailed carburetor removal and reinstallation procedures, as these can vary by model.
- Carburetor Removal: Carefully remove the carburetor from the motorcycle. This typically involves disconnecting fuel lines, vacuum lines, throttle cables, and airbox boots.
- Disassembly:
- Drain any remaining fuel from the float bowl.
- Remove the float bowl, float, and float needle.
- Remove the main jet, pilot jet, and needle jet.
- Remove the air screw, idle screw, and any other adjustable components, noting their original settings (e.g., turns out for screws).
- Remove all old gaskets and O-rings.
- Cleaning:
- Thoroughly clean all metal carburetor components with carburetor cleaner. Pay close attention to small passages and orifices.
- Use compressed air to blow out all passages and ensure they are clear of debris. Do not use wire or hard objects that could damage the passages.
- Inspect all components for wear or damage. Replace any parts not included in the kit that show signs of wear.
- Reassembly with New Components:
- Install new O-rings and gaskets from the kit. Ensure they are correctly seated.
- Install the new float needle and seat.
- Install the new main jet, pilot jet, and needle jet. Ensure correct sizes are used as per your motorcycle's specifications or tuning requirements.
- Reinstall the float and float bowl.
- Reinstall the air screw and idle screw, setting them to their original positions or to the factory recommended settings.
- Carburetor Reinstallation: Reinstall the rebuilt carburetor onto the motorcycle, reconnecting all fuel lines, vacuum lines, throttle cables, and airbox boots. Ensure all connections are secure and free of leaks.
6. Initial Operation and Adjustment
6.1. Pre-Start Checks
- Verify all fuel lines are connected and secure.
- Check for any fuel leaks.
- Ensure throttle cables operate smoothly and return correctly.
- Confirm the air filter is properly installed.
6.2. Engine Start-Up
Start the engine and allow it to warm up. Monitor for any unusual noises, smells, or leaks. The engine may require a few minutes to stabilize as the fuel system primes.
6.3. Basic Adjustments
After the engine is warm, you may need to perform basic carburetor adjustments:
- Idle Speed: Adjust the idle speed screw to achieve the manufacturer's recommended RPM.
- Air/Fuel Mixture: Adjust the air screw (pilot screw) for optimal idle and off-idle performance. Turning it in typically leans the mixture, out enriches it. Make small adjustments (1/4 turn at a time) and observe engine response.
For precise tuning, especially after changing jetting, professional carburetor synchronization and tuning may be required.
7. Maintenance
Regular maintenance of your carburetor is crucial for sustained performance and longevity.
- Fuel Quality: Always use fresh, high-quality fuel. Stale or contaminated fuel can lead to carburetor blockages.
- Fuel Filter: Regularly inspect and replace the fuel filter to prevent debris from reaching the carburetor.
- Air Filter: Keep the air filter clean and properly oiled (if applicable) to ensure proper air flow and prevent dirt ingestion.
- Storage: If storing the motorcycle for an extended period, drain the fuel from the carburetor float bowl or use a fuel stabilizer to prevent fuel degradation and gumming.
- Periodic Inspection: Periodically check for fuel leaks, loose connections, and proper throttle operation.
8. Troubleshooting
If you encounter issues after rebuilding your carburetor, consider the following common problems and solutions:
| Problem | Possible Cause | Solution |
|---|---|---|
| Engine will not start or starts with difficulty |
|
|
| Rough idle or stalling |
|
|
| Fuel leaks |
|
|
| Poor acceleration or top-end performance |
|
|
If problems persist, consult a qualified motorcycle mechanic or refer to your motorcycle's official service manual.
9. Specifications
| Feature | Detail |
|---|---|
| Brand | All Balls Racing |
| Model Number | 26-10050 |
| Vehicle Service Type | Dirt Bike |
| Flange Type | Spread Bore |
| Fuel Type | Gasoline |
| Recommended Uses | Motorcycle |
| Item Weight | 0.704 ounces |
| Product Dimensions | 5.6 x 3.65 x 0.8 inches |
| OEM Part Number | 26-10050 |
| UPC | 613310796589 |
10. Warranty and Support
10.1. Warranty Information
All Balls Racing products are manufactured to high standards. For specific warranty details regarding the 26-10050 Carburetor Rebuild Kit, please refer to the official All Balls Racing website or contact their customer service directly. Keep your proof of purchase for any warranty claims.
10.2. Customer Support
For technical assistance, troubleshooting guidance, or questions about your All Balls Racing product, please visit the official All Balls Racing website or contact their customer support department. You can often find FAQs, additional resources, and contact information on their website.
Official Brand Store: All Balls Racing Store on Amazon