Introduction
This manual provides comprehensive instructions for the installation, operation, and maintenance of your VSYSTO Motorcycle Dash Cam. This advanced system features dual HD 1080P cameras, GPS tracking, Tire Pressure Monitoring System (TPMS), WiFi connectivity, and 24-hour parking monitoring to enhance your riding safety and record your journeys.
What's in the Box
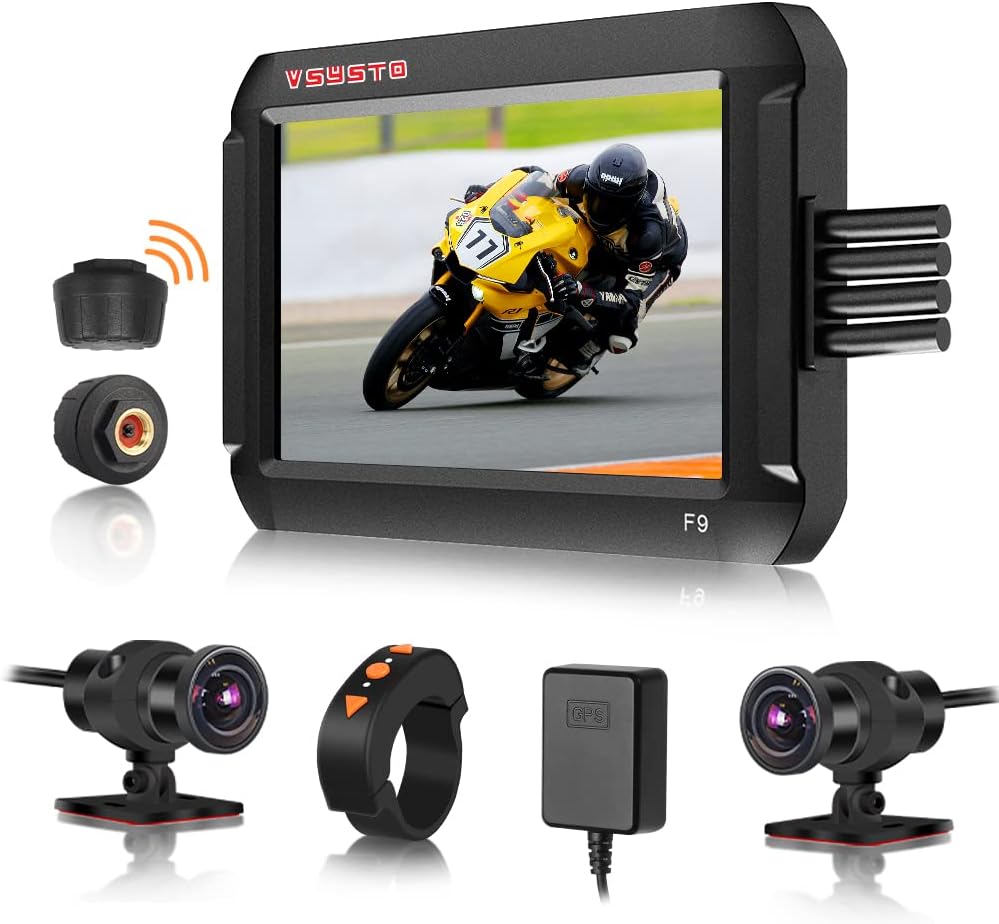
The VSYSTO Motorcycle Dash Cam package includes the following components:
- Host with bracket
- 2 Cameras (Front & Rear)
- GPS Module
- Wired Controller
- Tire Pressure Sensors (TPMS)
- Power Cable
- USB Test Cable
- User Manual
- Screws & Adhesive Tape
Setup and Installation
1. Main Unit Installation
The main unit can be installed in a storage box or under the seat. Ensure the surface is clean before attaching the bracket. The bracket can be adjusted to fit various mounting locations.
Video: Horizontal Holder Installation Guide. This video demonstrates how to attach the bracket to the main unit and secure it in place, typically under the seat or in a storage compartment.
Video: L-shaped bracket for motorcycle recorder installation. This video shows an alternative L-shaped bracket installation method for the main unit.
Video: Flexible camera bracket. This video illustrates the use of a flexible bracket for camera mounting, which may also apply to the main unit in certain configurations.
2. Power Connection (ACC Line)
Connect the power cable to your motorcycle's battery. The black wire connects to the negative pole, and the red wire connects to the positive pole. To ensure proper functionality, identify the ACC (Accessory) line on your motorcycle. This line provides power only when the ignition is on.
Video: How to find ACC port of motorcycle. This video guides you through the process of locating and testing the ACC line on your motorcycle for correct power connection.
3. Camera Installation
Install the front and rear cameras in desired locations, ensuring a clear view. The cameras feature a 150° wide-angle lens for comprehensive coverage. Use the provided adhesive tape and screws for secure mounting.

Image: The dash cam supports switching between positive image, mirror image, and split screen views for the rear camera, offering flexible display options.
Video: Flexible camera bracket. This video demonstrates how to install the camera using a flexible bracket, which can be useful for uneven surfaces.
4. Tire Pressure Sensors (TPMS) Installation
The TPMS sensors monitor your tire pressure and temperature in real-time. Install them on your tire valves as per the instructions below. Ensure they are securely tightened to prevent air leakage.

Image: The TPMS feature provides real-time data on tire pressure and temperature, offering critical safety information.
Video: Tire pressure sensors installation reference. This video provides a step-by-step guide for installing the tire pressure sensors.
5. GPS Module Connection
Connect the GPS module to the main unit. This enables GPS tracking, allowing you to record driving routes, longitude, latitude, altitude, and atmospheric pressure, which can be viewed during video playback using GVPlayer software.

Image: The GPS Tracker allows you to view your travel route and other geographical data when playing back video files in GVPlayer.
Operating Instructions
1. Wired Controller Functions
The wired controller provides convenient access to key functions while riding. It allows you to switch viewing angles, capture images, and cycle through various display data.

Image: The wired controller enables quick capture and flexible viewing angle switching.
Video: 4" Screen Motorcycle dash cam with GPS TPMS Introduction. This video demonstrates the wired controller's functionality and various display modes.
2. Auxiliary Display Mode
Access the auxiliary display mode via the wired controller's down button to view different interfaces, including current vehicle speed, tire pressure and temperature, battery power, altitude, longitude, latitude, atmospheric pressure, short-term memory driving speed, ODO, time, and date.

Image: The Auxiliary Display Mode provides a wealth of real-time driving data at a glance.
3. Mobile App Connectivity (WiFi)
Connect your smartphone to the dash cam via WiFi to view real-time footage, download recorded videos, and manage settings. Search for "WiFi Camera" APP on Google Play or APP store, then install it.

Image: The mobile app allows for convenient data synchronization and real-time video viewing.
Video: How to use the mobile APP to connect VSYSTO recorder WiFi. This video demonstrates the steps to connect your phone to the dash cam's WiFi and use the app.
Note for iPhone Users: If the WiFi connection is not successful, please turn off the Wireless LAN Assistant and allow the WiFi camera app to use the local network on the app settings page. The recorder will stop recording when connected to WiFi, and the remote control cannot be operated. After you disconnect WiFi and exit the APP, the recorder automatically starts recording after 30 seconds.
4. 24-hour Parking Monitoring
When the motorcycle is parked, if it detects a shake or movement, the recorder will automatically turn on and record for 30 seconds before turning off. This feature can be enabled or disabled as needed. Note: This function is not effective with USB power supply or electric vehicle installations. The battery voltage cannot be lower than 11.8V for this feature to work.
5. Loop Recording
The dash cam supports loop recording, which means it continuously records video. When the memory card is full, the oldest unlocked video files are automatically overwritten to make space for new recordings. This ensures you always have the latest footage.
6. WDR Technology
Advanced Wide Dynamic Range (WDR) technology automatically captures more light and adjusts brightness to produce clear, color-accurate video, even in low-light environments or scenes with high contrast. This results in robust and clearer images.
Maintenance
- Cleaning: Regularly clean the camera lenses and main unit screen with a soft, dry cloth to ensure optimal video quality and display clarity. Avoid using abrasive cleaners.
- SD Card Management: It is recommended to format the SD card periodically (e.g., once a month) to maintain optimal recording performance and prevent data corruption. Back up any important footage before formatting. The device supports 8-256GB TF cards.
- Firmware Updates: Check the VSYSTO official website or contact customer support for any available firmware updates. Keeping your device's firmware up-to-date ensures the best performance and access to new features.
- Storage: When not in use for extended periods, store the dash cam in a cool, dry place away from direct sunlight and extreme temperatures.
Troubleshooting
| Problem | Possible Cause | Solution |
|---|---|---|
| Device does not power on. | Loose power connection, battery issue, incorrect ACC line. | Check all power cable connections. Ensure battery voltage is sufficient. Verify ACC line connection as shown in the setup video. |
| Video quality is poor or blurry. | Dirty lens, protective film on lens, low light conditions, incorrect settings. | Clean camera lenses. Remove any protective film. Ensure WDR is enabled for low light. Check video resolution settings. |
| TPMS alarm sounds frequently. | Incorrect pressure threshold, loose sensor, actual tire issue. | Check tire pressure manually. Adjust TPMS alarm thresholds in settings if necessary. Re-tighten sensors. |
| WiFi connection issues. | Incorrect WiFi password, phone settings, interference. | Ensure correct default WiFi password (1234567890). For iPhone, disable Wireless LAN Assistant and allow local network access for the app. Try restarting both devices. |
| SD card error or not recording. | Corrupted card, incompatible card, full card. | Format the SD card through the device settings. Ensure the card is within the supported size (8-256GB) and class. Replace the SD card if issues persist. |
Specifications
| Feature | Detail |
|---|---|
| Model Number | 4.5DVR |
| Display Size | 4-inch Screen |
| Video Resolution | Dual HD 1080P (Front & Rear) |
| Camera Lens | 150° Wide Angle Fisheye Lens, SONYIMX307 COMS Sensor, Six-layer optical glass lens |
| Special Features | GPS Tracker, TPMS, WiFi, WDR Technology, 24-hour Parking Monitoring, G-Sensor, Loop Recording, Auxiliary Display Mode, Temperature Sensor |
| Connectivity | Wi-Fi, Type-C Interface |
| Storage | Supports 8-256GB TF Card |
| Waterproof Rating | IP67 (Cameras) |
| Power Source | Motorcycle Battery (1 A battery included) |
| Item Weight | 3.45 pounds |
Warranty and Support
For detailed warranty information, technical support, or further inquiries, please refer to the official VSYSTO User Manual PDF or visit the VSYSTO Store.
- Official User Manual (PDF): Download PDF Manual
- VSYSTO Store: Visit VSYSTO Store on Amazon
VSYSTO is committed to providing high-quality products and excellent customer service. If you encounter any issues or have questions not covered in this manual, please do not hesitate to contact VSYSTO customer support.


