1. Introduction
Thank you for choosing the Orion Motor Tech 80-Piece SAE and Metric Tap and Die Set. This comprehensive kit is designed for cutting and repairing internal and external threads in various materials. This manual provides essential information for safe operation, proper maintenance, and effective use of your new tool set.

Image 1.1: The Orion Motor Tech 80-Piece Tap and Die Set, featuring separate red and blue storage cases for SAE and Metric components.
2. Safety Information
Always observe the following safety precautions when using this tap and die set to prevent injury and damage to tools or workpieces:
- Wear Personal Protective Equipment (PPE): Always wear safety glasses to protect your eyes from flying chips and debris. Gloves are recommended to protect hands.
- Secure Workpiece: Ensure the material being worked on is securely clamped in a vise or other holding device to prevent movement during operation.
- Use Cutting Fluid: Apply appropriate cutting fluid generously to the tap or die and workpiece. This reduces friction, dissipates heat, and prolongs tool life while improving thread quality.
- Do Not Force Tools: Taps and dies are designed to cut, not to be forced. Excessive force can lead to tool breakage, especially with smaller sizes. If resistance is met, back off and clear chips.
- Clear Chips Regularly: Rotate the tap or die backward periodically (typically a quarter turn) to break and clear metal chips. This prevents binding and ensures a clean cut.
- Maintain Alignment: Ensure the tap or die is perfectly perpendicular to the workpiece surface when starting to cut threads. A misaligned start will result in crooked or damaged threads.
- Inspect Tools: Before each use, inspect taps and dies for damage, dullness, or cracks. Do not use damaged tools.
3. Package Contents
The Orion Motor Tech 80-Piece Tap and Die Set includes the following components:
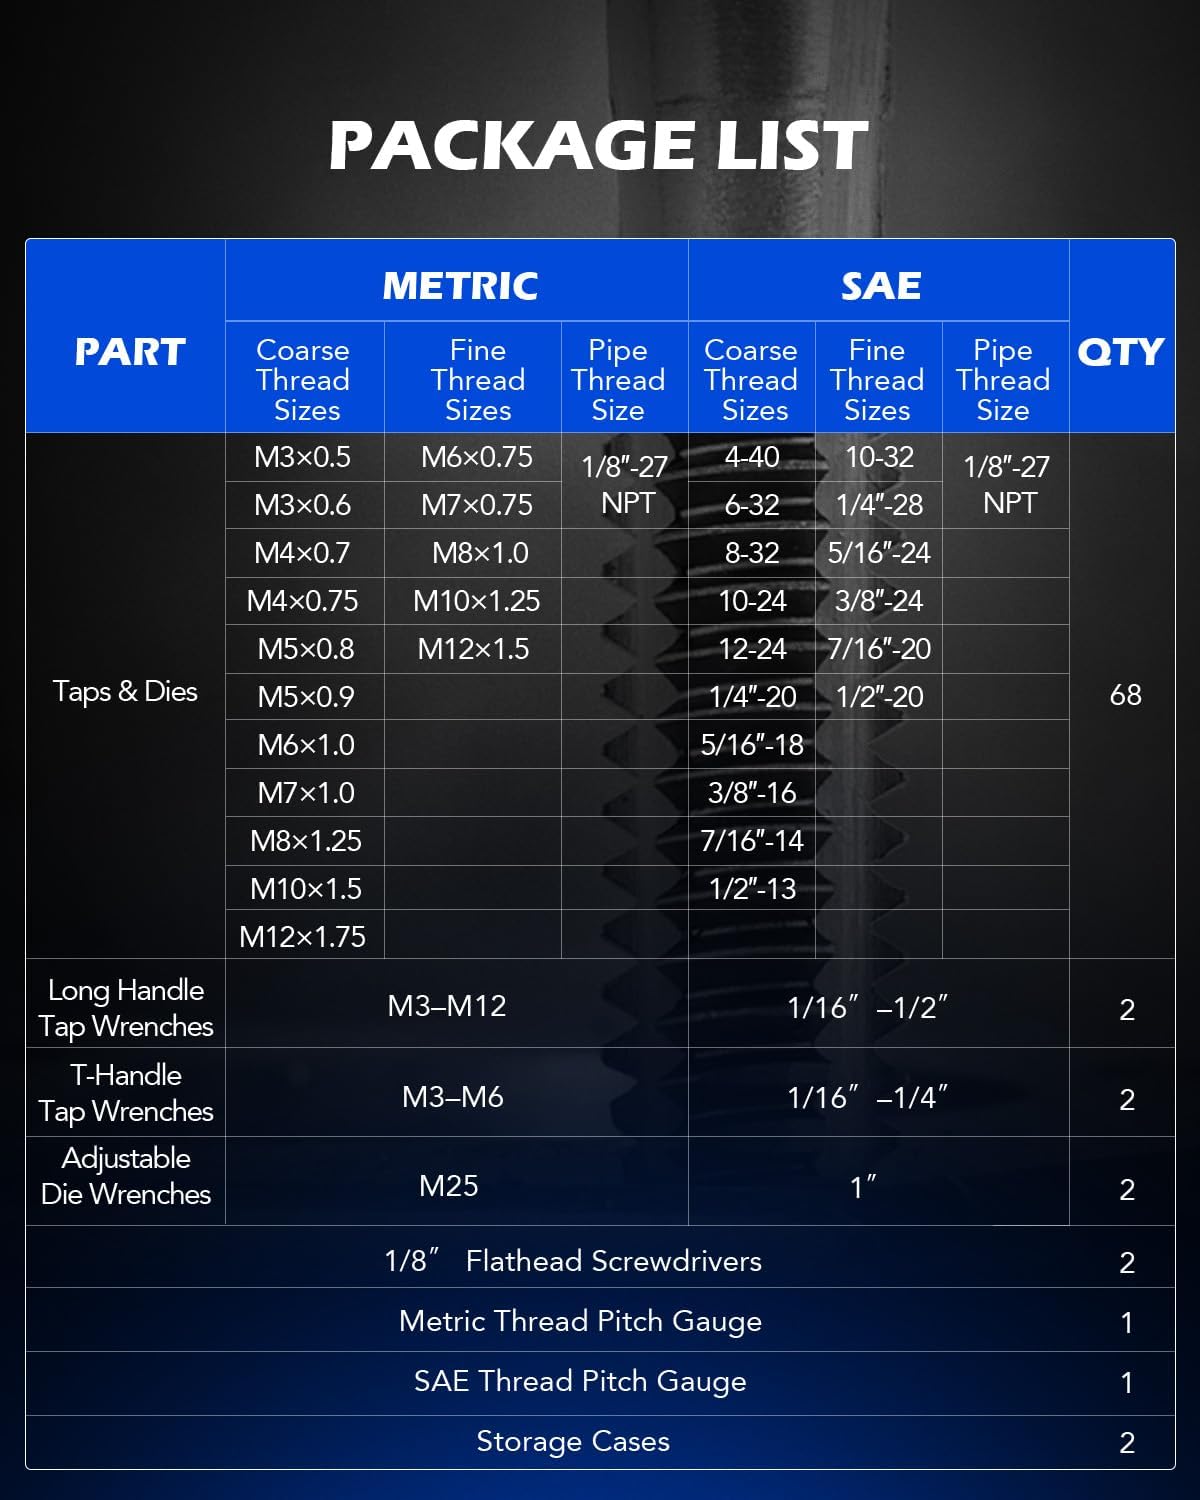
Image 3.1: Detailed package list of the tap and die set, including sizes and quantities.
| Part | Metric | SAE | QTY | ||||
|---|---|---|---|---|---|---|---|
| Coarse Thread Sizes | Fine Thread Sizes | Pipe Thread Size | Coarse Thread Sizes | Fine Thread Sizes | Pipe Thread Size | ||
| Taps & Dies | M3x0.5, M3x0.6, M4x0.7, M4x0.75, M5x0.8, M5x0.9, M6x1.0, M7x1.0, M8x1.25, M10x1.5, M12x1.75 | M6x0.75, M7x0.75, M8x1.0, M10x1.25, M12x1.5 | 1/8"-27 NPT | 4-40, 6-32, 8-32, 10-24, 12-24, 1/4"-20, 5/16"-18, 3/8"-16, 7/16"-14, 1/2"-13 | 10-32, 1/4"-28, 5/16"-24, 3/8"-24, 7/16"-20, 1/2"-20 | 1/8"-27 NPT | 68 |
| Long Handle Tap Wrenches | M3-M12 | 1/16"-1/2" | 2 | ||||
| T-Handle Tap Wrenches | M3-M6 | 1/16"-1/4" | 2 | ||||
| Adjustable Die Wrenches | M25 | 1" | 2 | ||||
| 1/8" Flathead Screwdrivers | 2 | ||||||
| Metric Thread Pitch Gauge | 1 | ||||||
| SAE Thread Pitch Gauge | 1 | ||||||
| Storage Cases | 2 | ||||||
4. Component Identification
Understanding the different components of your tap and die set is crucial for correct usage.
4.1 Taps
Taps are used to cut or repair internal threads (e.g., in a nut or a drilled hole). They feature deep flutes for chip removal and taper shanks for secure connection to a tap wrench.

Image 4.1: Taps and dies are constructed from durable GCR15 steel for strength and corrosion resistance.

Image 4.2: Taps feature deep flutes for efficient chip removal and taper shanks for a firm grip in tap wrenches.
4.2 Dies
Dies are used to cut or repair external threads (e.g., on a bolt or rod). They have sharp threads for efficient material removal, a locking port for secure attachment to a die wrench, and clear size markings.

Image 4.3: Dies are designed with sharp threads for clean cuts, a locking port for secure wrench fit, and easily readable size markings.
4.3 Wrenches
The set includes long handle tap wrenches, T-handle tap wrenches, and adjustable die wrenches to accommodate various tap and die sizes and working conditions.

Image 4.4: Tap and die wrenches provide a safe and secure grip for threading operations, featuring knurled handles and adjustable mechanisms.
4.4 Thread Pitch Gauges
Thread pitch gauges are essential for accurately identifying existing thread sizes and pitches, ensuring you select the correct tap or die for repair or creation.

Image 4.5: Precise thread gauges for quickly measuring thread pitches in both SAE and Metric sizes.
5. Operation
This section outlines the general procedures for cutting internal and external threads. Always refer to the safety guidelines before beginning any work.
5.1 Compatible Materials
This tap and die set is suitable for use with various materials, including:
- Carbon Steel
- Cast Iron
- Aluminum
- Brass
- Copper
- Mild Steel

Image 5.1: The tap and die set is compatible with a range of materials for diverse applications.
5.2 Creating Internal Threads (Tapping)
- Select the Correct Tap: Identify the desired thread size and pitch. Choose the corresponding tap from the set.
- Drill the Pilot Hole: Drill a pilot hole in the workpiece using the appropriate drill bit size for the chosen tap. Refer to a standard tap drill chart for accurate sizing (drill bits are not included in this set).
- Chamfer the Hole: Lightly chamfer the top edge of the drilled hole with a larger drill bit or countersink tool. This helps the tap start straight and prevents burrs.
- Secure the Workpiece: Clamp the workpiece firmly in a vise, ensuring the drilled hole is accessible and stable.
- Mount the Tap: Insert the selected tap into a long handle or T-handle tap wrench. Ensure the tap is centered and securely tightened in the wrench.
- Start Tapping: Position the tap vertically over the pilot hole. Apply light, even downward pressure while slowly turning the tap clockwise (for right-hand threads). Ensure the tap starts straight into the hole.
- Lubricate and Clear Chips: After every half to full turn, rotate the tap counter-clockwise approximately a quarter turn to break and clear metal chips. Apply cutting fluid generously throughout the tapping process to reduce friction and heat.
- Continue Tapping: Repeat the clockwise and counter-clockwise rotation until the desired thread depth is achieved.
- Remove the Tap: Once the threads are cut, carefully turn the tap counter-clockwise to remove it from the workpiece.
5.3 Creating External Threads (Die Threading)
- Select the Correct Die: Identify the desired thread size and pitch. Choose the corresponding die from the set.
- Prepare the Rod: Ensure the rod or bolt to be threaded is slightly undersized (minor diameter) and has a chamfered end. The chamfer helps the die start smoothly.
- Secure the Workpiece: Clamp the rod securely in a vise, ensuring enough length protrudes for the desired thread length.
- Mount the Die: Insert the selected die into an adjustable die wrench. Ensure it is centered and securely tightened using the included flathead screwdriver if necessary.
- Start Threading: Position the die squarely onto the end of the rod. Apply light, even downward pressure while slowly turning the die clockwise. Ensure the die starts straight.
- Lubricate and Clear Chips: After every half to full turn, rotate the die counter-clockwise approximately a quarter turn to break and clear metal chips. Apply cutting fluid generously throughout the threading process.
- Continue Threading: Repeat the clockwise and counter-clockwise rotation until the desired thread length is achieved.
- Remove the Die: Once the threads are cut, carefully turn the die counter-clockwise to remove it from the workpiece.

Image 5.2: The tap and die set is suitable for a wide range of applications, including repairing stripped or damaged internal and external threads.
5.4 Using Thread Pitch Gauges
- Identify Thread Type: Determine if the thread you need to measure is Metric or SAE.
- Select Appropriate Gauge: Choose the corresponding Metric or SAE thread pitch gauge from your set.
- Match Pitch: Fan out the leaves of the gauge. Carefully place each leaf against the thread until you find one that perfectly matches the thread profile. There should be no gaps or light visible between the thread and the gauge leaf.
- Read the Measurement: The number stamped on the matching leaf indicates the thread pitch (e.g., M1.0 for Metric threads, 18 TPI for SAE threads).
6. Maintenance and Storage
Proper maintenance and storage will extend the life of your tap and die set and ensure optimal performance.
- Cleaning: After each use, clean all taps, dies, and wrenches to remove metal chips and cutting fluid residue. Use a brush and a suitable cleaning solvent if necessary.
- Lubrication: Apply a light coat of rust-preventative oil to all metal components before storage, especially the cutting edges of taps and dies.
- Storage: Always return tools to their designated slots in the blow-molded storage cases. This protects them from damage, keeps them organized, and prevents loss. Store the cases in a dry environment to prevent corrosion.
- Inspection: Periodically inspect the tools for signs of wear, dullness, or damage. Replace worn or damaged components as needed.
7. Troubleshooting
Here are some common issues and their potential solutions:
- Tap or Die Breaks:
- Cause: Excessive force, lack of lubrication, incorrect pilot hole size, or failure to clear chips.
- Solution: Always use cutting fluid, clear chips by backing off the tool, ensure correct pilot hole size, and apply steady, not excessive, pressure. Removing a broken tap or die can be challenging and may require specialized tools.
- Poor Quality Threads (Rough, Stripped, or Crooked):
- Cause: Misalignment at the start, insufficient lubrication, dull tools, or incorrect pilot hole/rod diameter.
- Solution: Ensure the tool starts perfectly straight. Use plenty of cutting fluid. Inspect tools for sharpness; replace if dull. Verify pilot hole or rod diameter is correct for the chosen thread.
- Tool Binding or Sticking:
- Cause: Chips accumulating in the flutes, insufficient lubrication, or attempting to cut too much material at once.
- Solution: Regularly back off the tool to break and clear chips. Apply more cutting fluid. Do not attempt to cut threads in a single pass; use a gradual approach.
8. Specifications
| Feature | Detail |
|---|---|
| Manufacturer | Orion Motor Tech |
| Model Number | TAD-SM80-N0 |
| Item Weight | 6.38 pounds |
| Package Dimensions | 13.5 x 8.46 x 3.98 inches |
| Size | 80 pc Metric and SAE |
| Measurement System | SAE and Metric |
| Included Components | 34 x Taps, 34 x Dies, 2 x Long Handle Tap Wrenches, 2 x T-Handle Tap Wrenches, 2 x Iron Rods, 2 x Die Wrenches, 2 x Flathead Screwdrivers, 2 x Thread Pitch Gauges, 1 x Gloves, 1 x Instructions |
| Date First Available | June 10, 2019 |
9. Warranty and Support
Orion Motor Tech is committed to providing quality tools. For specific warranty information, product support, or to inquire about replacement parts, please visit the official Orion Motor Tech website or contact their customer service directly. Keep your purchase receipt for warranty claims.
You can find more information and contact details on the Orion Motor Tech Store on Amazon.


