
1. Introduction
Thank you for choosing the USHA JANOME Allure DLX Electric Sewing Machine. This manual provides essential information for the safe and efficient operation, setup, maintenance, and troubleshooting of your new sewing machine. Please read these instructions carefully before using the machine to ensure optimal performance and longevity.
2. Product Overview and Features
The USHA JANOME Allure DLX is an automatic zig-zag sewing machine designed for various sewing tasks. It features a free arm for circular stitching and comes with an extension table for larger projects.
Key Features:
- 13 Built-in Stitches: Includes a buttonhole stitch for versatile sewing.
- 8 Applications: Such as button fixing, rolled hemming, satin stitch, zip fixing, and smocking.
- Automatic Needle Threading: Simplifies the threading process.
- LED Type Sewing Light: Provides clear illumination of the sewing area.
- Face Plate Thread Cutter: Conveniently located for quick thread trimming.
- Feed Drop Lever: Facilitates embroidery and darning.
- Free Arm: Ideal for sewing cuffs, sleeves, and other small, circular items.
- Extension Table: A 16-inch x 11-inch table is included for expanded work surface.

Figure 1: Front view of the USHA JANOME Allure DLX Electric Sewing Machine, showcasing its main controls and design.
3. Setup
3.1 Unpacking and Placement
- Carefully remove the machine from its packaging. Retain the packaging for future storage or transport.
- Place the machine on a stable, flat surface. Ensure there is adequate space around the machine for comfortable operation.
- Connect the power cord to the machine and then to a suitable electrical outlet.
3.2 Attaching the Extension Table
The extension table provides a larger work area, which is particularly useful for bigger projects. To attach it:
- Slide the accessory box off the free arm of the machine.
- Align the extension table with the free arm and gently slide it into place until it is securely attached.

Figure 2: The extension table for the USHA JANOME Allure DLX, providing an expanded work surface.
3.3 Winding the Bobbin
- Place a spool of thread on the spool pin.
- Guide the thread through the thread guide and around the bobbin winding tension disc.
- Place an empty bobbin onto the bobbin winder spindle.
- Wind the thread a few times manually around the bobbin.
- Push the bobbin winder spindle to the right.
- Press the foot controller to start winding. The machine will stop automatically when the bobbin is full.
- Cut the thread and remove the bobbin.
3.4 Threading the Upper Thread
- Raise the presser foot lever.
- Place a spool of thread on the spool pin.
- Follow the numbered threading path indicated on the machine, guiding the thread through all necessary guides and tension discs.
- Bring the thread down through the take-up lever and then down towards the needle.
- Use the automatic needle threader or manually thread the needle from front to back.
3.5 Inserting the Bobbin
- Open the bobbin cover plate.
- Insert the wound bobbin into the bobbin case, ensuring the thread unwinds in the correct direction (usually counter-clockwise).
- Pull the bobbin thread through the tension spring and out through the bobbin case opening.
- Close the bobbin cover plate.
- Hold the upper thread lightly and turn the handwheel towards you to bring the needle down and up, catching the bobbin thread. Pull both threads under the presser foot and towards the back.
4. Operating Instructions
4.1 Selecting Stitches and Adjusting Length
Your machine features two main dials for stitch control:
- Pattern Selection Dial: Rotate this dial to choose from the 13 built-in stitches, including zig-zag, straight stitch, and buttonhole.
- Stitch Length Selection Dial: Adjust this dial to control the length of your stitches. Higher numbers typically mean longer stitches.
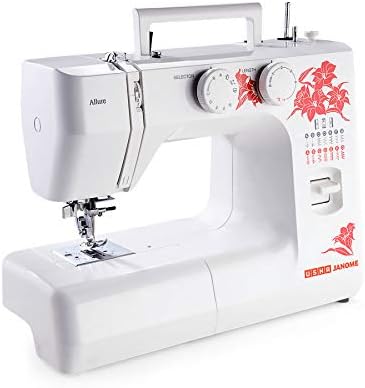
Figure 3: Side view of the USHA JANOME Allure DLX, highlighting the stitch selection and length dials.
4.2 Basic Stitching
- Place your fabric under the presser foot.
- Lower the presser foot lever.
- Gently press the foot controller to start sewing. Guide the fabric smoothly.
- To secure stitches at the beginning and end, use the reverse lever (if available) for a few stitches.
- When finished, raise the needle to its highest position, lift the presser foot, and pull the fabric away. Use the face plate thread cutter to trim threads.
4.3 Using Specific Applications
Refer to the stitch guide on your machine for the appropriate settings for applications like button fixing, rolled hemming, and zip fixing. Each application may require a specific presser foot (sold separately or included in accessories).
- Buttonhole: Select the buttonhole stitch on the pattern dial. Follow the instructions for your specific buttonhole foot.
- Free Arm Sewing: Remove the accessory box to expose the free arm. This is useful for sewing small, tubular items like sleeves and pant hems.
- Embroidery/Darning: Lower the feed dogs using the feed drop lever. This allows you to move the fabric freely for free-motion embroidery or darning. Remember to raise the feed dogs for regular sewing.
5. Maintenance
Regular maintenance ensures your sewing machine operates smoothly and extends its lifespan.
5.1 Cleaning
- Always unplug the machine before cleaning.
- Remove the needle plate and bobbin case.
- Use a small brush to remove lint and dust from the bobbin area, feed dogs, and tension discs.
- Wipe the exterior of the machine with a soft, dry cloth. Do not use harsh chemicals.
5.2 Needle Replacement
Replace the needle regularly (after 8-10 hours of sewing) or if it becomes bent, dull, or broken. Use only needles designed for household sewing machines.
- Turn off and unplug the machine.
- Loosen the needle clamp screw.
- Remove the old needle.
- Insert a new needle with the flat side facing the back of the machine, pushing it up as far as it will go.
- Tighten the needle clamp screw securely.
6. Troubleshooting
If you encounter issues with your sewing machine, refer to the following common problems and solutions. If the problem persists, contact customer support.
| Problem | Possible Cause | Solution |
|---|---|---|
| Skipped Stitches | Incorrect needle, bent needle, improper threading, wrong needle size for fabric. | Replace needle, re-thread machine, use correct needle type/size. |
| Thread Breaking | Incorrect tension, poor quality thread, bent needle, improper threading, burrs on needle plate. | Adjust tension, use good quality thread, replace needle, re-thread, check for burrs. |
| Machine Jamming | Thread tangled in bobbin area, fabric pulled too hard, incorrect stitch settings. | Clear bobbin area, do not force fabric, check stitch settings. |
| Uneven Stitches | Incorrect tension, worn needle, inconsistent fabric feeding. | Adjust tension, replace needle, ensure smooth fabric feeding. |
7. Specifications
- Brand: USHA
- Model Number: DLX
- Color: White
- Material: Metal
- Item Weight: 6.78 Kilograms
- Power Source: Corded Electric
- Stitches: 13 built-in stitches, including buttonhole
- Applications: 8 (button fixing, rolled hemming, satin stitch, zip fixing, smocking, blind stitch hemming)
- Special Features: Automatic needle threading, LED sewing light, Free arm, Feed drop lever
8. Warranty and Support
8.1 Warranty Information
This USHA JANOME Allure DLX Electric Sewing Machine comes with a 2-year manufacturer's warranty. Please retain your proof of purchase for warranty claims. For specific terms and conditions, refer to the warranty card included with your product or contact USHA customer service.
8.2 Customer Support
For technical assistance, service, or to schedule a free home demonstration (where available), please contact USHA customer support. Contact details can typically be found on the USHA official website or in the documentation provided with your machine.