
Introduction
This manual provides detailed instructions for the safe and effective use of your Andoer HD-130 Macro LED Ring Flash Light. Please read this manual thoroughly before operating the device to ensure proper functionality and to prevent damage. Keep this manual for future reference.
Package Contents
Verify that all items listed below are included in your package. If any items are missing or damaged, please contact your retailer.
- 1 x Macro Ring Flash Head
- 1 x Power Control Unit with LCD Display
- 8 x Adapter Rings (40.5mm, 52mm, 55mm, 58mm, 62mm, 67mm, 72mm, 77mm)
- 3 x Translucent Diffusers (Blue, Orange, Transparent)
- 1 x User Manual (English & Chinese)

Image: All components of the Andoer HD-130 Macro LED Ring Flash Light laid out, including the ring flash head, control unit, various adapter rings, and three diffusers.
Product Overview
The Andoer HD-130 Macro LED Ring Flash Light consists of a ring flash head and a separate power control unit with an LCD display. The control unit allows for easy adjustment of flash settings.

Image: The control unit of the Andoer HD-130 Macro LED Ring Flash, highlighting the LCD screen, control buttons (Pilot, Mode, Light, On/Off, Set), and output power adjustment buttons.
- LCD Display Screen: Shows current settings and battery status.
- Test Button (Pilot): Activates a test flash or pilot light.
- Mode Switch Button (Mode): Cycles through flash modes.
- LED Light Steady On Button (Light): Toggles the continuous LED light.
- Power Switch (On/Off): Turns the unit on or off.
- Output Power Adjustment: Adjusts flash intensity.
- Control Button (Set): Confirms selections.
- Output Power Adjustment Button (Right/Increase): Increases output power.
- Hot Shoe Contact: Connects the control unit to the camera.
Setup
1. Battery Installation
The power control unit requires 4 AA batteries (not included). Ensure correct polarity when inserting batteries.
- Open the battery compartment cover on the back of the power control unit.
- Insert 4 AA batteries according to the polarity indicators (+/-).
- Close the battery compartment cover securely.
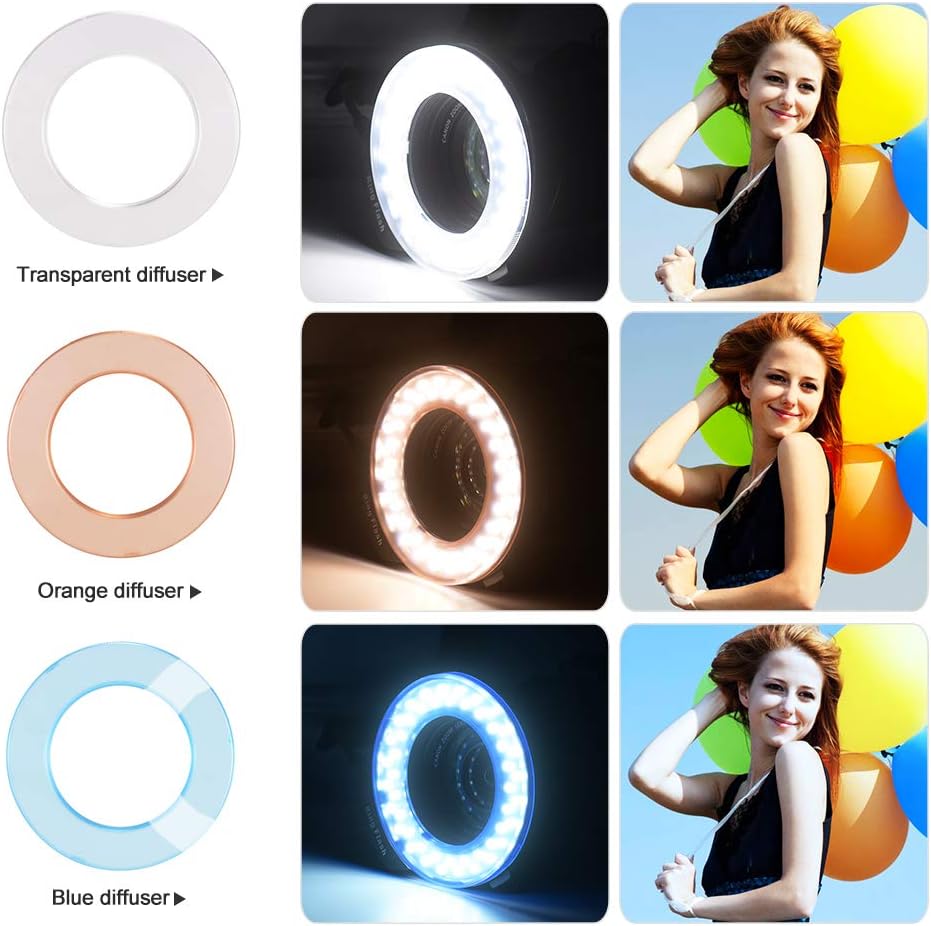
Image: The battery compartment of the control unit opened, showing the slots for AA batteries. The ring flash attachment point is also visible.
2. Mounting to Camera
Attach the power control unit to your camera's hot shoe and the ring flash head to your lens.
- Slide the hot shoe contact of the power control unit into your camera's hot shoe mount.
- Tighten the locking wheel on the control unit to secure it to the camera.
- Connect the coiled cable from the control unit to the ring flash head.

Image: The Andoer HD-130 Macro LED Ring Flash system fully assembled and mounted on a DSLR camera, with the control unit on the hot shoe and the ring flash head on the lens.
3. Attaching Adapter Rings
Select the appropriate adapter ring for your camera lens filter thread size.
- Identify your lens's filter thread size (usually printed on the front of the lens or lens cap).
- Screw the corresponding adapter ring onto your lens.
- Attach the ring flash head to the adapter ring by aligning the grooves and twisting until it locks into place.
4. Attaching Diffusers
The three translucent diffusers (transparent, orange, blue) can be used to modify the light output.
- Gently press the desired diffuser onto the front of the ring flash head until it clicks into place.
- To remove, gently pull the diffuser off.

Image: The transparent, orange, and blue diffusers for the ring flash, each displayed next to an example photo demonstrating the color temperature effect they produce.
Operating Instructions
1. Power On/Off
Press the On/Off button on the power control unit to turn the flash on or off. The LCD screen will illuminate when powered on.
2. Mode Selection
Press the Mode button to cycle through available flash modes. Refer to the LCD display for the current mode. The unit supports various flash modes, including full flash and left/right flash.
3. Brightness/Power Adjustment
Use the output power adjustment buttons (labeled with arrows or +/-) to increase or decrease the flash intensity. The LCD display will show the current power level.
4. Left/Right Flash Function
This feature allows you to activate only the left or right side of the ring flash, creating directional lighting for enhanced dimensionality in macro shots. Select this function via the Mode button and adjust intensity as needed.
5. Pilot Light
Press the Pilot button to activate a continuous LED light. This can be used for focusing in low light conditions or as a modeling light to preview lighting effects before taking a photo.
Maintenance
- Cleaning: Use a soft, dry cloth to clean the flash unit. For stubborn dirt, a slightly damp cloth can be used, followed by a dry cloth. Do not use strong detergents or solvents.
- Storage: When not in use for extended periods, remove the batteries to prevent leakage. Store the unit in a cool, dry place away from direct sunlight and extreme temperatures.
- Handling: Avoid dropping the unit or subjecting it to strong impacts. The LCD screen and LED lights are delicate components.
Troubleshooting
- Flash not firing:
- Ensure batteries are correctly installed and have sufficient charge.
- Check that the power control unit is securely mounted to the camera's hot shoe.
- Verify that the flash is powered on.
- LCD display not working:
- Check battery charge. Replace batteries if necessary.
- Ensure the unit is powered on.
- Inconsistent light output:
- Check battery level; low batteries can affect performance.
- Ensure diffusers are properly attached and clean.
- Ring flash not attaching to lens:
- Confirm you are using the correct adapter ring size for your lens.
- Ensure the adapter ring is securely screwed onto the lens.
Specifications
| Feature | Specification |
|---|---|
| Model | HD-130 |
| Guide Number | 46 |
| Color Temperature | 3000K-15000K |
| Exposure Time | 1/100s |
| Compatible Battery | 4 x AA batteries (not included) |
| Flash Range | 5cm-2m |
| Item Weight | Approx. 200g / 7.1oz |
| Dimensions (Control Unit) | Approx. 10cm (H) x 6.7cm (W) |
| Dimensions (Ring Flash Head) | Approx. 11.4cm (Diameter) x 10.3cm (Width) |
| LEDs | 46pcs |
| Compatible Mountings | Canon, Nikon, Panasonic and other DSLR cameras |

Image: A diagram illustrating the key dimensions of both the control unit and the ring flash head, including height, width, and diameter measurements.
Warranty and Support
Andoer products are designed for reliability and performance. For warranty information or technical support, please refer to the documentation provided with your purchase or contact your retailer. Keep your proof of purchase for any warranty claims.