1. Introduction
This manual provides essential information for the safe and efficient operation, maintenance, and troubleshooting of your Stanley SXVC25PTDE Wet and Dry Vacuum Cleaner. Please read this manual thoroughly before using the appliance and keep it for future reference. This vacuum cleaner is designed for both wet and dry vacuuming tasks, featuring a robust plastic tank and an integrated power tool socket for enhanced versatility.
2. Safety Instructions
Always observe basic safety precautions when using electrical appliances to reduce the risk of fire, electric shock, and personal injury.
- Electrical Safety: Ensure the power supply voltage matches the rating on the vacuum cleaner. Do not use the appliance with a damaged cord or plug. Always unplug the vacuum cleaner before cleaning or performing maintenance.
- Wet Vacuuming: When vacuuming liquids, ensure the float valve is clean and moves freely. Do not vacuum flammable or combustible liquids, such as gasoline, or use in areas where they may be present.
- Dry Vacuuming: Always use the appropriate filter (cartridge filter and paper bag) for dry vacuuming to protect the motor from dust.
- Power Tool Socket: The integrated power tool socket is designed for connecting power tools. Do not exceed the maximum power rating specified for the socket.
- General Use: Do not allow children to operate the vacuum cleaner. Keep hair, loose clothing, fingers, and all parts of the body away from openings and moving parts.
3. Product Components and Included Accessories
Your Stanley SXVC25PTDE vacuum cleaner comes with several components and accessories to facilitate various cleaning tasks.

Figure 3.1: Stanley SXVC25PTDE Wet and Dry Vacuum Cleaner with all included accessories laid out.
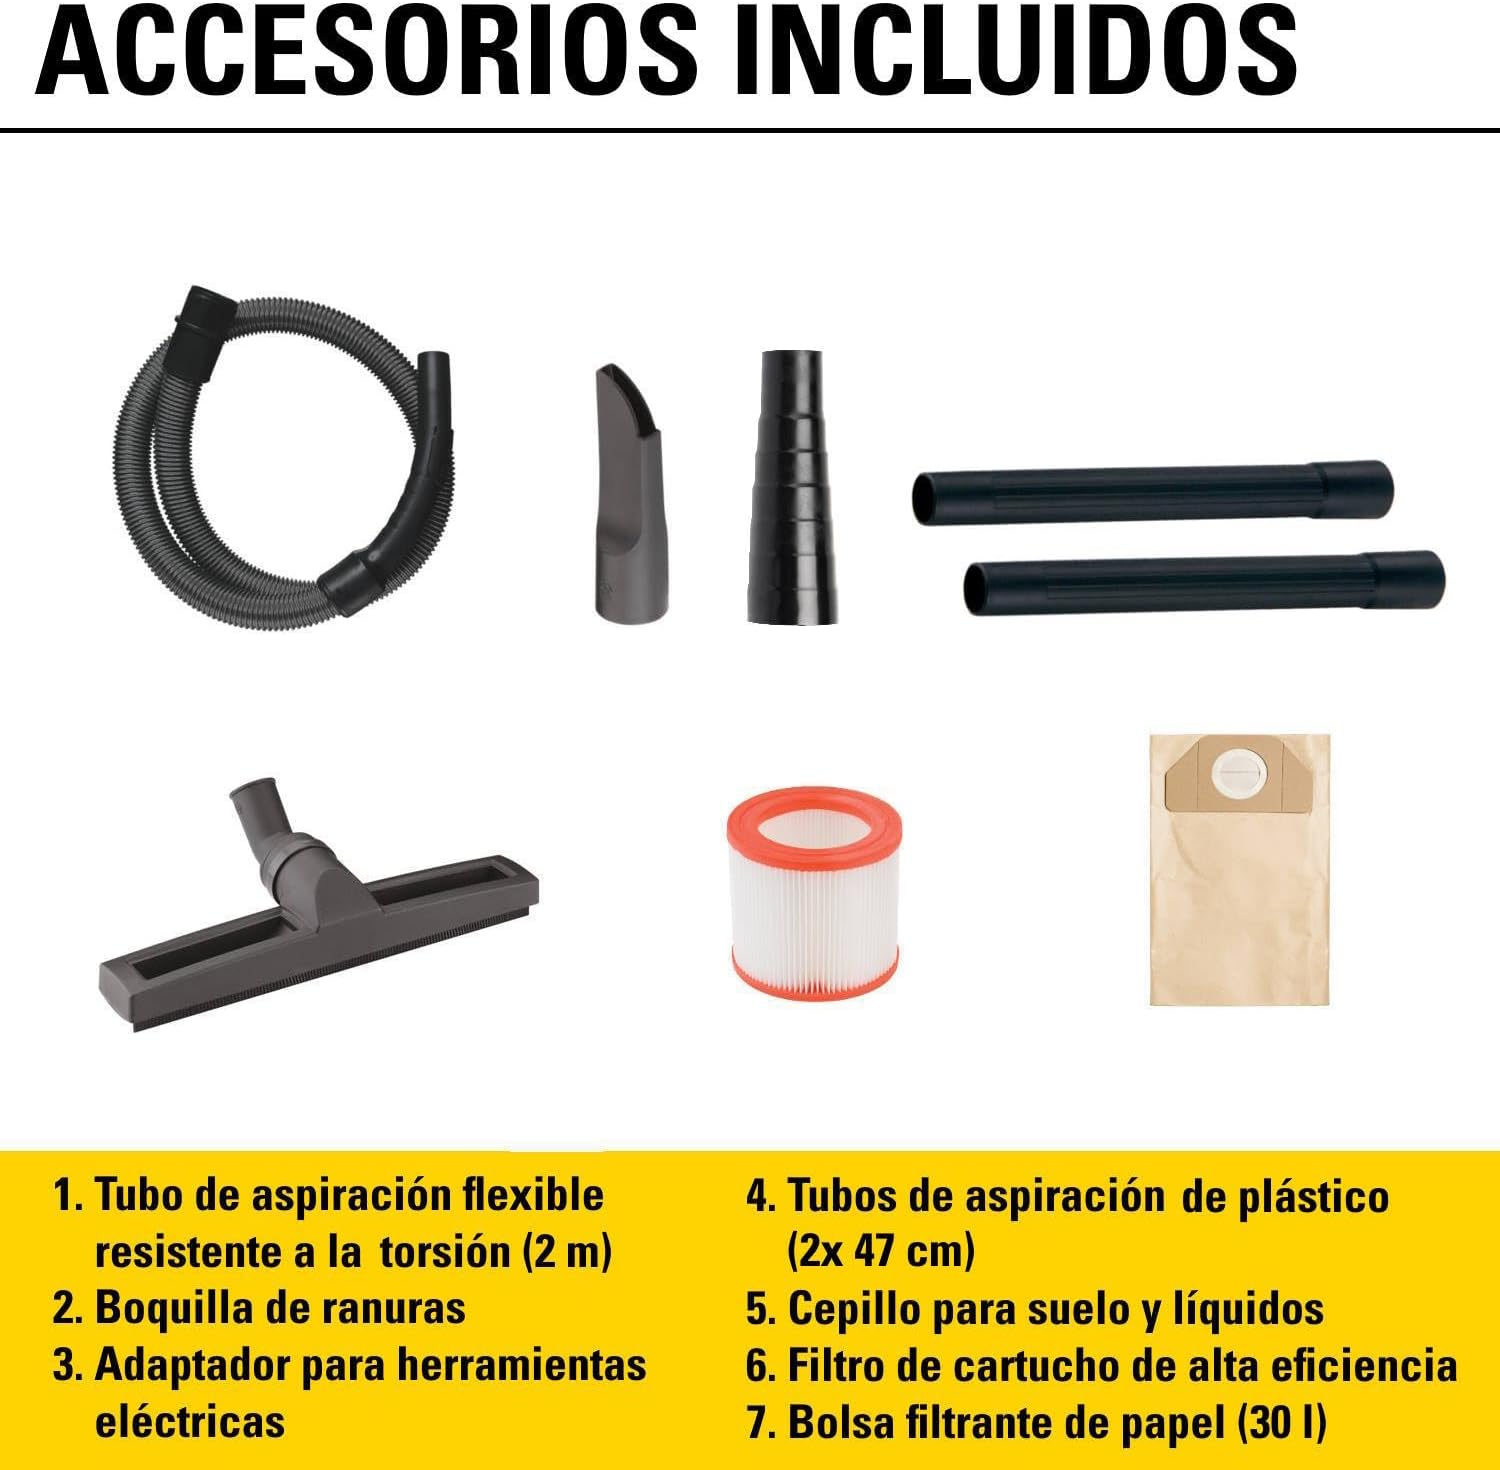
Figure 3.2: Side view of the vacuum cleaner, showing the ON/OFF switch, power tool socket, coupling hinges, accessory storage compartments, liquid drain plug, and swivel wheels.
The following items are included with your vacuum cleaner:
- 1x Flexible and torsion-resistant suction hose (2 m length)
- 2x Plastic suction tubes (47 cm length each)
- 1x Floor brush for solid and liquid surfaces
- 1x Crevice nozzle
- 1x Power tool adapter
- 1x High-efficiency cartridge filter (washable)
- 1x Paper filter bag (30 L capacity)

Figure 3.3: Close-up of the crevice nozzle, power tool adapter, and floor brush accessories.

Figure 3.4: The flexible suction hose and the two plastic extension tubes.

Figure 3.5: The high-efficiency cartridge filter and the paper filter bag.
4. Setup
Follow these steps to set up your vacuum cleaner for first use or after storage.
- Unpacking: Carefully remove all components from the packaging. Check for any damage.
- Wheel Assembly: Attach the four swivel wheels to the base of the vacuum cleaner by pushing them firmly into their designated slots until they click into place.
- Hose Connection: Insert the flexible suction hose into the suction inlet on the front of the vacuum cleaner until it is securely fastened.
- Tube and Accessory Connection: Connect the plastic suction tubes to the hose, and then attach the desired accessory (e.g., floor brush, crevice nozzle) to the end of the tubes.
- Filter Installation (Dry Vacuuming): For dry vacuuming, ensure the high-efficiency cartridge filter is securely installed over the motor housing. Additionally, insert the paper filter bag into the tank, ensuring its opening aligns with the hose inlet.
- Filter Preparation (Wet Vacuuming): For wet vacuuming, remove the paper filter bag. The cartridge filter can remain installed as it is washable and designed for both wet and dry use, but ensure it is clean. The float valve inside the tank will prevent overfilling.
5. Operating Instructions
Your Stanley SXVC25PTDE vacuum cleaner offers versatile cleaning modes.
5.1 Dry Vacuuming
For dry debris, dust, and fine particles:
- Ensure the cartridge filter and paper filter bag are correctly installed.
- Connect the vacuum cleaner to a suitable power outlet.
- Turn the ON/OFF switch to the 'ON' position.
- Begin vacuuming the desired area.

Figure 5.1: Using the crevice nozzle to vacuum a car interior.
5.2 Wet Vacuuming
For liquids and wet spills:
- Remove the paper filter bag. The cartridge filter can remain.
- Ensure the float valve is clean and can move freely.
- Connect the vacuum cleaner to a suitable power outlet.
- Turn the ON/OFF switch to the 'ON' position.
- Vacuum the liquid. The suction will automatically stop when the tank is full due to the float valve.
- After wet vacuuming, drain the liquid from the tank using the liquid drain plug at the bottom.

Figure 5.2: The vacuum cleaner effectively picking up liquid spills.
5.3 Blowing Function
To use the blowing function for clearing debris from hard-to-reach areas:
- Disconnect the suction hose from the front inlet.
- Connect the suction hose to the blowing outlet located on the rear of the vacuum cleaner.
- Turn the ON/OFF switch to the 'ON' position.
- Direct the hose towards the area to be cleared.

Figure 5.3: Demonstrating the blowing function of the vacuum cleaner.
5.4 Using the Integrated Power Tool Socket
The vacuum cleaner features an automatic START/STOP power tool socket.
- Plug your power tool into the integrated socket on the top of the vacuum cleaner.
- Connect the vacuum cleaner to a suitable power outlet.
- Turn the vacuum cleaner's ON/OFF switch to the 'AUTO' position (if available, otherwise 'ON').
- When you activate the power tool, the vacuum cleaner will automatically start. When you turn off the power tool, the vacuum cleaner will stop after a short delay to clear any remaining dust.
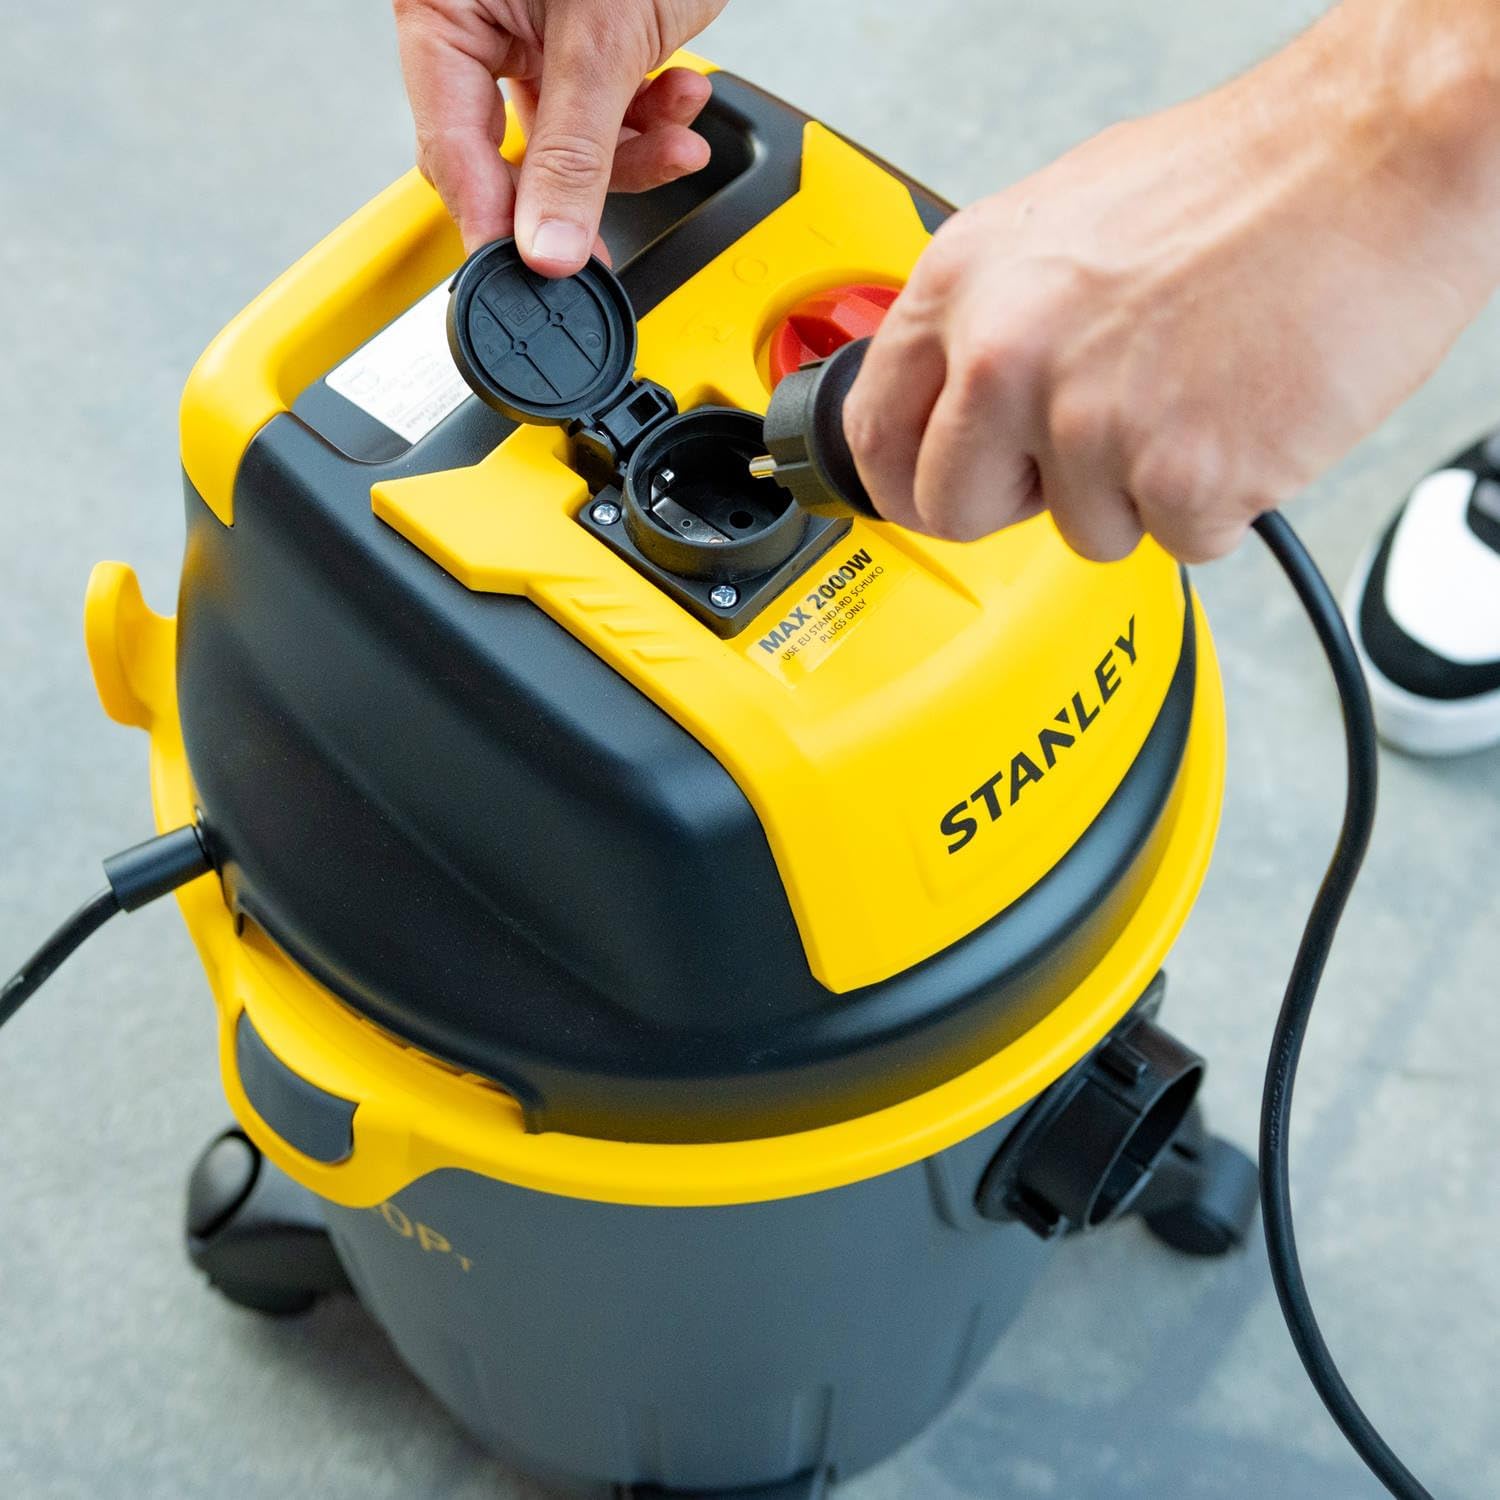
Figure 5.4: A power tool being plugged into the integrated socket on the vacuum cleaner.
No official seller videos were found for this product.
6. Maintenance
Regular maintenance ensures optimal performance and extends the life of your vacuum cleaner.
6.1 Cleaning the Tank
After each use, especially after wet vacuuming, empty and clean the tank.
- Unplug the vacuum cleaner from the power outlet.
- Release the coupling hinges and remove the motor head.
- Empty the tank. For liquids, use the liquid drain plug at the bottom of the tank.
- Rinse the tank with water and wipe it dry.

Figure 6.1: Draining accumulated liquid from the vacuum cleaner's tank using the drain plug.
6.2 Filter Maintenance
The filters are crucial for motor protection and suction efficiency.
- Cartridge Filter: This filter is washable. For dry use, clean it regularly by tapping off dust or rinsing with water. Ensure it is completely dry before re-installing for dry vacuuming.
- Paper Filter Bag: Replace the paper filter bag when it is full or when suction power decreases significantly during dry vacuuming. Do not reuse paper bags.
6.3 Accessory Cleaning
Clean the hose, tubes, and nozzles regularly to prevent blockages and maintain suction.
- Remove any debris or blockages from the hose and tubes.
- Wash accessories with water and mild detergent if necessary, then allow them to air dry completely before storage.
7. Troubleshooting
Refer to this section for common issues and their solutions.
| Problem | Possible Cause | Solution |
|---|---|---|
| Vacuum cleaner does not start. | No power supply; ON/OFF switch in wrong position; Damaged power cord/plug. | Check power outlet and plug connection; Ensure switch is in 'ON' or 'AUTO' position; Inspect power cord for damage, contact service if damaged. |
| Low suction power. | Full dust bag/tank; Clogged filter; Blocked hose/nozzle; Incorrect filter for task. | Empty dust bag/tank; Clean or replace filter; Clear blockages from hose/nozzle; Ensure correct filter is installed (e.g., no paper bag for wet vacuuming). |
| Liquid leakage from tank. | Tank not properly sealed; Damaged tank or seals. | Ensure motor head is securely latched onto the tank; Check tank and seals for cracks or damage, replace if necessary. |
| Vacuum cleaner stops during wet vacuuming. | Tank is full; Float valve is stuck. | Empty the tank; Check and clean the float valve to ensure it moves freely. |
8. Specifications
Key technical specifications for the Stanley SXVC25PTDE Wet and Dry Vacuum Cleaner.
| Feature | Specification |
|---|---|
| Brand | STANLEY |
| Model Number | A51849 (SXVC25PTDE) |
| Absorbed Power | 1200 W |
| Tank Capacity | 25 Liters |
| Depression (Suction Power) | 170 mbar |
| Air Flow | 28 l/s |
| Noise Level | 75 dB |
| Power Cable Length | 5 meters |
| Hose Length | 2 meters |
| Hose Diameter | 35 mm |
| Product Dimensions (L x W x H) | 41.8 x 38.2 x 59.2 cm |
| Product Weight | 7.88 kg |
| Special Features | Lightweight, Wheels, Integrated Power Tool Socket (Automatic START/STOP) |
| Filter Type | Cartridge |
9. Warranty and Support
Your Stanley SXVC25PTDE Wet and Dry Vacuum Cleaner is covered by a manufacturer's warranty. Please refer to the warranty card included in your product packaging for specific terms and conditions, including the warranty period and coverage details.
For technical assistance, spare parts, or warranty claims, please contact Stanley customer support through their official website or the contact information provided in your product documentation. Ensure you have your model number (SXVC25PTDE or A51849) and proof of purchase ready when contacting support.


