
1. Introduction
This manual provides comprehensive instructions for setting up, operating, maintaining, and troubleshooting your TP-Link Archer C6 AC1200 Wireless MU-MIMO Gigabit Router. The Archer C6 is designed to deliver high-speed wireless connectivity and reliable wired connections for your home network.
2. Safety Information
- Always follow basic safety precautions to reduce the risk of fire, electric shock, and injury to persons.
- Do not expose this device to water, fire, humidity, or hot environments.
- Do not attempt to disassemble, repair, or modify the device. If you need service, please contact TP-Link technical support.
- Use only the power adapter provided with the product.
- Ensure proper ventilation around the device. Do not block any ventilation openings.
3. Package Contents
Verify that your package contains the following items:
- TP-Link Archer C6 AC1200 Wireless MU-MIMO Gigabit Router
- Power Adapter
- Ethernet Cable
- Quick Installation Guide
4. Product Overview
4.1 Front Panel
The front panel of the Archer C6 features LED indicators that provide information about the router's status.

Image: Front view of the TP-Link Archer C6 router, showing its sleek black design with patterned top, four external antennas, and a row of green LED indicators for power, internet, Wi-Fi, and LAN activity.
4.2 Rear Panel
The rear panel contains all the necessary ports for connecting the router to your network and devices.
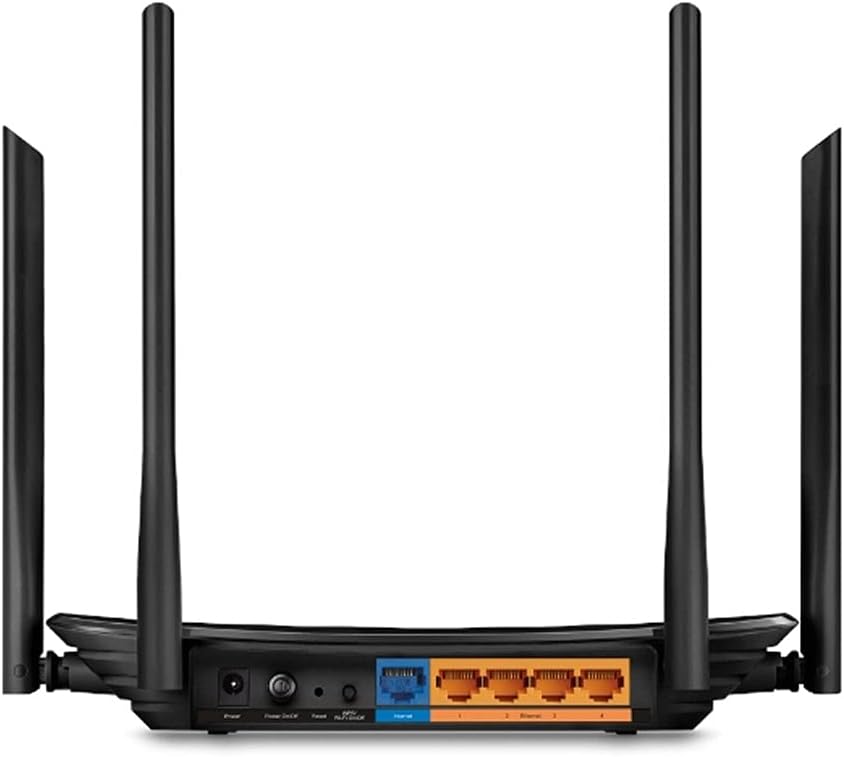
Image: Rear view of the TP-Link Archer C6 router, displaying the power input, power button, Reset button, WPS/Wi-Fi button, one blue WAN/Internet port, and four yellow Gigabit LAN ports.
Port and Button Descriptions:
- Power Port: Connects to the provided power adapter.
- Power Button: Turns the router on or off.
- Reset Button: Press and hold for several seconds to restore factory default settings.
- WPS/Wi-Fi Button: Press to enable Wi-Fi Protected Setup (WPS) or press and hold to turn Wi-Fi on/off.
- WAN/Internet Port (Blue): Connects to your modem or the Ethernet cable from your internet service provider.
- LAN Ports (Yellow): Connects to wired devices such as computers, smart TVs, or game consoles.
5. Setup
5.1 Hardware Connection
- Power Off: Disconnect the power from your modem and router (if applicable).
- Connect Modem: Connect your modem's Ethernet cable to the blue WAN/Internet port on your Archer C6 router.
- Connect Power: Connect the provided power adapter to the router's power port and plug it into a power outlet.
- Power On: Power on your modem first, then wait for it to fully boot up (usually indicated by stable internet LED). Then, power on your Archer C6 router.
- Connect Computer (Optional): For initial setup, you can connect your computer to one of the yellow LAN ports on the router using an Ethernet cable, or connect wirelessly using the default Wi-Fi SSID and password printed on the router's label.
5.2 Initial Configuration
- Access Web Interface: Open a web browser (e.g., Chrome, Firefox) on a device connected to the router. In the address bar, type
http://tplinkwifi.netorhttp://192.168.0.1and press Enter. - Login: Create a new login password when prompted. If you have previously set one, use that password. The default username and password are often
adminfor both, but TP-Link now typically prompts for a new password on first access. - Run Quick Setup: Follow the on-screen instructions of the Quick Setup Wizard. This will guide you through setting up your internet connection type and wireless network settings.
- Customize Wi-Fi: During the Quick Setup, you will be able to change the default Wi-Fi network name (SSID) and password. It is highly recommended to set a strong, unique password for your Wi-Fi network.
6. Operating
6.1 Connecting Devices
- Wireless Devices: On your smartphone, tablet, or laptop, search for available Wi-Fi networks. Select your router's Wi-Fi network name (SSID) and enter the password you set during setup.
- Wired Devices: Connect devices like desktop computers, gaming consoles, or smart TVs to the yellow LAN ports on the router using Ethernet cables.
6.2 Basic Network Management
Access the web management interface (http://tplinkwifi.net) to configure advanced settings.
- Guest Network: Create a separate Wi-Fi network for guests to provide internet access without sharing your main network resources.
- Parental Controls: Manage and restrict internet access for specific devices or users.
- QoS (Quality of Service): Prioritize network traffic for certain applications or devices to ensure smooth performance.
- Security Settings: Configure firewall rules, access control, and other security features.
7. Maintenance
- Firmware Updates: Regularly check the TP-Link website for the latest firmware updates for your Archer C6. Firmware updates can improve performance, add new features, and fix security vulnerabilities.
- Optimal Placement: Place the router in a central location in your home, away from obstructions and devices that emit strong electromagnetic interference (e.g., microwaves, cordless phones). Elevating the router can also improve signal coverage.
- Cleaning: Keep the router clean and free of dust. Use a soft, dry cloth to wipe the exterior. Do not use liquid cleaners or aerosols.
- Rebooting: Periodically rebooting your router (unplugging the power for 10 seconds and plugging it back in) can help resolve minor network issues and improve performance.
8. Troubleshooting
8.1 No Internet Access
- Check if the Internet LED on the router is solid green. If not, ensure the Ethernet cable from your modem is securely connected to the blue WAN port.
- Verify that your modem is working correctly and has an active internet connection. Try connecting a computer directly to the modem to confirm.
- Reboot both your modem and router.
- Check your router's web management interface for any error messages or connection status.
8.2 Slow Wireless Speed
- Ensure your devices are connected to the appropriate Wi-Fi band (5 GHz for faster speeds, 2.4 GHz for wider coverage).
- Reduce interference by moving the router away from other electronic devices.
- Adjust the router's antenna positions for optimal signal.
- Consider updating your router's firmware.
8.3 Cannot Access Web Management Page
- Ensure your device is correctly connected to the router (wired or wireless).
- Verify that you are typing the correct address:
http://tplinkwifi.netorhttp://192.168.0.1. - Clear your browser's cache and cookies, or try a different web browser.
- Temporarily disable any firewall or antivirus software on your computer.
9. Specifications
| Feature | Description |
|---|---|
| Model | Archer C6 |
| Wireless Standard | IEEE 802.11ac/n/a 5 GHz, IEEE 802.11n/b/g 2.4 GHz |
| Wireless Speed | AC1200 (867 Mbps on 5 GHz, 300 Mbps on 2.4 GHz) |
| Antennas | 4 External Antennas |
| Ethernet Ports | 1 Gigabit WAN Port, 4 Gigabit LAN Ports |
| Dimensions (L x W x H) | 5.67 x 3.58 x 1.38 inches (144 x 91 x 35 mm) |
| Weight | 1.1 pounds (0.5 kg) |
| Power Supply | 12VDC / 1.0A |
| Operating System | TP-Link proprietary router OS |
| Special Features | MU-MIMO, WPS |
| Color | Black |
10. Warranty Information
TP-Link products typically come with a limited warranty. For detailed warranty terms and conditions, including duration and coverage, please refer to the official TP-Link website or the warranty card included with your product. Keep your purchase receipt as proof of purchase for warranty claims.
11. Technical Support
For further assistance, technical support, or to download the latest drivers and firmware, please visit the official TP-Link support website:
You may also find helpful resources, FAQs, and community forums on their support page.


