
Dorman 38912
Dorman 38912 Tailgate Hardware Rebuild Kit
Instruction Manual
1. Product Overview
The Dorman 38912 Tailgate Hardware Rebuild Kit provides a convenient and comprehensive solution for repairing or replacing essential components of your vehicle's tailgate. This kit includes all necessary fasteners and hardware to restore proper function to the tailgate, ensuring reliable operation and a secure closure. Designed for durability, the components are manufactured from quality materials to offer a long service life.
2. Kit Contents
This kit contains the following components:
- 1 Tailgate Handle
- 1 Tailgate Handle Bezel
- 2 Tailgate Latches
- 2 Tailgate Cables
- 2 Tailgate Latch Rods
- 2 Tailgate Latch Bolts
- 7 Body Bolts

Image 2.1: Overview of all components included in the Dorman 38912 Tailgate Hardware Rebuild Kit, showing the handle, bezel, latches, cables, rods, and various bolts.
3. Vehicle Compatibility
This kit is compatible with select Chevrolet and GMC models. Please verify fitment for your specific vehicle using the model number 38912.
- Chevrolet Avalanche 1500: 2002-2006
- Chevrolet Avalanche 2500: 2002-2006
- Chevrolet Avalanche: 2007
- Chevrolet R-15: 2004-2007
- Chevrolet Silverado 1500 Classic: 2007
- Chevrolet Silverado 1500 HD Classic: 2007
- Chevrolet Silverado 1500 HD: 2001-2003, 2005-2006
- Chevrolet Silverado 1500: 1999-2006
- Chevrolet Silverado 2500 HD Classic: 2007
- Chevrolet Silverado 2500 HD: 2001-2006
- Chevrolet Silverado 2500: 1999-2006
- Chevrolet Silverado 3500 Classic: 2007
- Chevrolet Silverado 3500: 2001-2006
- GMC Sierra 1500 Classic: 2007
- GMC Sierra 1500 HD Classic: 2007
- GMC Sierra 1500 HD: 2001-2003, 2005-2006
- GMC Sierra 1500: 1999-2006
- GMC Sierra 2500 HD Classic: 2007
- GMC Sierra 2500 HD: 2001-2006
- GMC Sierra 2500: 1999-2004
- GMC Sierra 3500 Classic: 2007
- GMC Sierra 3500: 2001-2006
4. Setup and Installation
Before beginning installation, ensure you have all necessary tools and a safe working environment. It is recommended to consult a professional if you are unsure about any steps.
4.1. Safety Precautions
- Always wear appropriate personal protective equipment, such as safety glasses and gloves.
- Ensure the vehicle is parked on a level surface with the parking brake engaged.
- If working under the tailgate, ensure it is properly supported or removed to prevent accidental closure.
4.2. Tools Required (Typical)
- Socket Wrench Set
- Screwdriver Set (Phillips and Flathead)
- Pliers
- Trim Removal Tool (optional)
4.3. Installation Steps
- Remove Old Components: Carefully remove the existing tailgate handle, latches, latch rods, and cables. Note the orientation and connection points of each component before removal. You may need to remove an access panel on the inside of the tailgate to reach the internal mechanisms.

Image 4.1: An example of a tailgate handle assembly, similar to the one being replaced. This image shows the handle and its internal mechanism.
- Install Tailgate Latches: Position the new tailgate latches (2) into their respective locations on the tailgate. Secure them using the appropriate bolts. Ensure they are oriented correctly for proper engagement with the truck bed.

Image 4.2: A close-up view of one of the new tailgate latch components included in the kit.
- Connect Tailgate Latch Rods: Attach the new tailgate latch rods (2) to the tailgate handle mechanism and the latches. Ensure the rods are securely connected and move freely without binding. These rods transmit the motion from the handle to the latches.

Image 4.3: The tailgate latch rods and associated bolts, which connect the handle to the latches.
- Install Tailgate Handle and Bezel: Insert the new tailgate handle into the tailgate opening, followed by the tailgate handle bezel. Secure the handle assembly using the provided body bolts (7). Ensure the handle operates smoothly and the bezel sits flush.

Image 4.4: The tailgate handle bezel, which provides a finished look around the handle opening.
- Attach Tailgate Cables: Connect the new tailgate cables (2) to the tailgate and the truck bed. These cables support the tailgate when it is open. Ensure they are properly routed and secured to prevent pinching or damage.
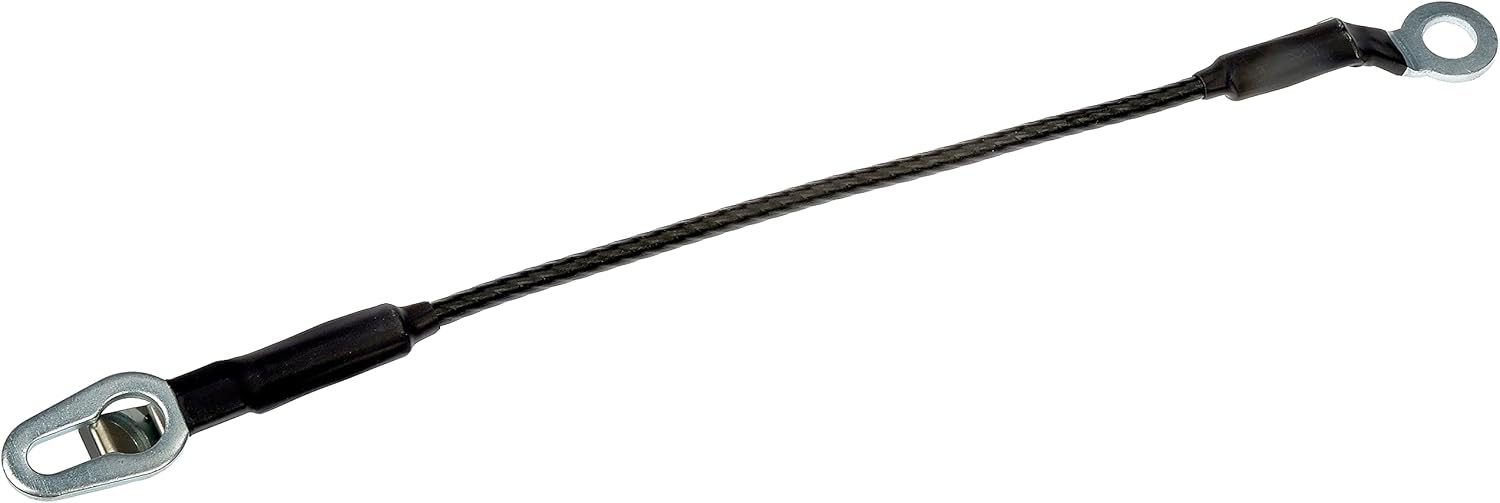
Image 4.5: One of the tailgate support cables, designed to hold the tailgate in the open position.

Image 4.6: The tailgate pivot brackets, which are typically where the tailgate cables attach to the truck bed or tailgate frame.
- Final Checks: Test the tailgate operation multiple times. Ensure it latches securely on both sides and opens smoothly. Check that the cables properly support the tailgate when open. Reinstall any removed access panels or trim.
5. Maintenance
To ensure the longevity and proper function of your tailgate hardware, consider the following maintenance tips:
- Regular Inspection: Periodically inspect the tailgate handle, latches, rods, and cables for any signs of wear, corrosion, or damage.
- Lubrication: Apply a small amount of automotive-grade lubricant to the moving parts of the latches and handle mechanism annually or as needed to ensure smooth operation.
- Cleaning: Keep the tailgate area clean from dirt, debris, and road salt, which can accelerate wear and corrosion.
6. Troubleshooting
If you encounter issues after installation or during normal use, refer to the following common problems and solutions:
- Tailgate Not Latching:
- Check if the latch rods are properly connected and adjusted.
- Ensure the latches are free of obstructions and move freely.
- Verify that the tailgate striker pins on the truck bed are aligned with the latches.
- Handle Feels Loose or Sticky:
- Ensure all mounting bolts for the handle assembly are tightened.
- Apply lubricant to the handle's pivot points and internal mechanism.
- Check for any foreign objects obstructing the handle's movement.
- Tailgate Cables Sagging or Damaged:
- Inspect the cables for fraying or breakage. Replace immediately if damaged.
- Ensure the cable attachment points are secure on both the tailgate and the truck bed.
7. Specifications
| Specification | Detail |
|---|---|
| Manufacturer | Dorman Products |
| Brand | Dorman |
| Item Weight | 6.98 pounds |
| Product Dimensions | 31.8 x 9.5 x 9.5 inches |
| Country of Origin | Taiwan |
| Item Model Number | 38912 |
| Manufacturer Part Number | 38912 |
| OEM Part Number | 15231877 |
| ASIN | B07RSRLYT4 |
| Date First Available | July 2, 2020 |
8. Warranty and Support
Dorman products are designed for quality and reliability. For specific warranty information or technical support regarding your Dorman 38912 Tailgate Hardware Rebuild Kit, please refer to the official Dorman website or contact Dorman customer service directly. Keep your purchase receipt for warranty claims.
For further assistance, visit the Dorman Store: Dorman Products Store on Amazon
Ask a question about this manual
Ask about setup, troubleshooting, compatibility, parts, safety, or missing instructions. Manuals+ will review the question and use this page’s manual context to help answer it.