
1. Important Safety Instructions
Please read all instructions carefully before using the appliance and retain them for future reference. Incorrect operation can cause damage to the appliance and injury to the user.
- Always ensure the appliance is unplugged from the power outlet before assembly, disassembly, or cleaning.
- Do not immerse the motor unit in water or any other liquid. Clean with a damp cloth only.
- Keep hands, hair, clothing, and utensils away from moving parts during operation to prevent injury.
- Never operate the appliance with a damaged cord or plug, or if it has malfunctioned or been dropped or damaged in any way. Contact customer support for repair.
- This appliance is not intended for use by persons (including children) with reduced physical, sensory, or mental capabilities, or lack of experience and knowledge, unless they have been given supervision or instruction concerning use of the appliance by a person responsible for their safety.
- Children should be supervised to ensure that they do not play with the appliance.
- Do not use attachments not recommended or sold by the manufacturer, as this may cause fire, electric shock, or injury.
- Do not use the appliance outdoors.
- Avoid contact with moving parts.
- Do not let the cord hang over the edge of a table or counter, or touch hot surfaces.
- Always operate the appliance on a flat, stable, and dry surface.
2. Product Overview and Components
The Continental EDISON Multifunction Pastry Robot is a versatile kitchen appliance designed for mixing, blending, and meat grinding tasks. Familiarize yourself with its components before use.
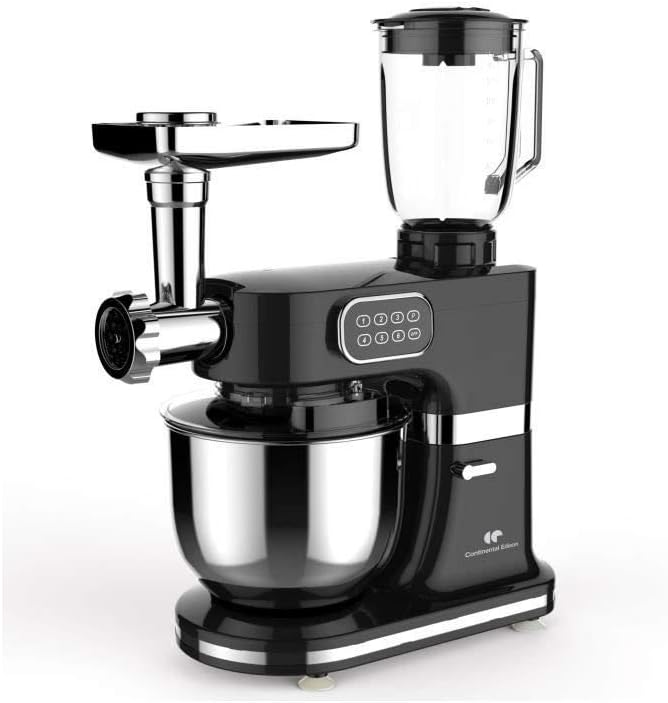
Figure 2.1: Main unit of the Continental EDISON Multifunction Pastry Robot. This image shows the stand mixer base with the stainless steel bowl, the blender attachment mounted on top, and the meat grinder attachment on the side. The control panel with speed settings is visible on the side of the motor unit.
Main Components:
- Motor Unit: The main body housing the motor and control panel.
- Mixing Bowl: 5-liter stainless steel bowl for mixing ingredients.
- Splash Guard: Prevents ingredients from splashing out of the mixing bowl during operation.
- Blender: 1.5-liter glass blender with lid for liquids and smoothies.
- Meat Grinder Attachment: For grinding meat and making sausages.
Accessories Included:

Figure 2.2: The Continental EDISON Multifunction Pastry Robot displayed with all its included accessories. This includes the mixing bowl, blender, meat grinder, dough hook, whisk, beater, various grinding plates, sausage stuffer attachments, and cookie accessory.
- Dough Hook: For kneading heavy doughs like bread or pizza dough.
- Whisk: For whipping cream, egg whites, and light batters.
- Meat Grinder Dies: Various sizes for fine, medium, and coarse grinding.
- Sausage Stuffer Accessories: For making homemade sausages.
- Cookie Accessory: For shaping cookies.
3. Setup and Assembly
Before first use, clean all parts that will come into contact with food as described in the 'Cleaning and Maintenance' section.
3.1 Stand Mixer Assembly:
- Place the motor unit on a clean, stable, and dry surface.
- Lift the head of the mixer by pressing the release button.
- Place the stainless steel mixing bowl into its base, turning it clockwise until it locks securely.
- Attach the desired accessory (dough hook, whisk, or beater) by pushing it upwards into the accessory shaft and turning it slightly until it clicks into place.
- Lower the mixer head until it locks into position.
- Place the splash guard over the mixing bowl.
3.2 Blender Assembly:
- Ensure the blender base is securely attached to the glass jug.
- Remove the cover from the blender drive on top of the motor unit.
- Place the assembled blender jug onto the blender drive, ensuring it is firmly seated.
- Secure the blender lid.
3.3 Meat Grinder Assembly:
- Remove the cover from the front attachment port of the motor unit.
- Insert the meat grinder attachment into the port, aligning the notch with the groove, and turn clockwise to secure.
- Assemble the meat grinder components: screw, blade, desired grinding plate, and locking ring.
- Attach the feeding tray on top of the grinder.
- For sausage making, attach the sausage stuffer accessory after the grinding plate.
4. Operating Instructions
Always ensure the appliance is correctly assembled and plugged into a suitable power outlet (230V, 50Hz) before operation.
4.1 General Operation:
- Plug the appliance into a power outlet.
- Turn the speed control knob to the desired setting (1-6). Start with a lower speed and gradually increase as needed.
- To stop the appliance, turn the speed control knob to '0' (off) and unplug.
4.2 Using the Stand Mixer:
- Ensure the mixing bowl and desired attachment are correctly installed.
- Add ingredients to the mixing bowl. Do not overfill.
- Lower the mixer head and ensure it is locked.
- Select a suitable speed. For dough, start slow (speed 1-2) and increase. For whipping, use higher speeds (speed 4-6).
- Use the splash guard to prevent splattering.
4.3 Using the Blender:
- Ensure the blender is correctly assembled and attached to the motor unit.
- Add liquids and ingredients to the blender jug. Do not exceed the maximum fill line (1.5L).
- Secure the lid.
- Select a suitable speed (typically higher speeds for blending).
- Do not operate the blender continuously for more than 1 minute. Allow it to cool down between uses.
4.4 Using the Meat Grinder:
- Ensure the meat grinder is correctly assembled and attached.
- Cut meat into small pieces that fit into the feeding tray. Remove bones, gristle, and tough sinews.
- Turn on the appliance to a medium speed (speed 3-4).
- Feed the meat into the grinder using the food pusher. Never use your fingers or other utensils.
- For sausage making, ensure the sausage stuffer is attached and feed the ground meat into the casing.
5. Cleaning and Maintenance
Proper cleaning and maintenance will ensure the longevity and optimal performance of your appliance.
5.1 Before Cleaning:
- Always unplug the appliance from the power outlet.
- Disassemble all removable parts (mixing bowl, attachments, blender jug, meat grinder components).
5.2 Cleaning Instructions:
- Motor Unit: Wipe the exterior of the motor unit with a damp cloth. Do not use abrasive cleaners. Never immerse the motor unit in water.
- Mixing Bowl, Attachments (Dough Hook, Whisk, Beater), Splash Guard, Blender Jug, Meat Grinder Components: Wash these parts in warm, soapy water. Rinse thoroughly and dry immediately. Note: The product is not suitable for dishwashers. Hand washing is recommended for all parts to preserve their finish and functionality.
- Ensure all parts are completely dry before reassembling or storing.
5.3 Storage:
Store the appliance and its accessories in a dry, clean place, out of reach of children.
6. Troubleshooting
If you encounter any issues with your appliance, please refer to the following common problems and solutions:
| Problem | Possible Cause | Solution |
|---|---|---|
| Appliance does not turn on. | Not plugged in; power outage; faulty outlet; appliance not assembled correctly. | Check power cord connection; check circuit breaker; try a different outlet; ensure mixer head is locked and attachments are secure. |
| Motor stops during operation. | Overload protection activated; motor overheating. | Turn off and unplug the appliance. Remove some ingredients if overloaded. Let the appliance cool down for at least 30 minutes before restarting. |
| Attachments not mixing properly. | Attachment not fully engaged; too much or too little ingredient. | Ensure attachment is securely clicked into place. Adjust ingredient quantities. |
| Blender leaks. | Blender base not tightened; lid not secure; seal damaged. | Ensure blender base is tightly screwed onto the jug. Secure the lid. Check the seal for damage. |
| Meat grinder jams. | Meat pieces too large; bones or gristle present. | Turn off and unplug. Disassemble and clear the obstruction. Cut meat into smaller, boneless pieces. |
If the problem persists after attempting these solutions, please contact customer support.
7. Specifications
- Model: 3612406289391
- Power: 1000 W
- Voltage: 230 V
- Frequency: 50 Hz
- Number of Speeds: 6
- Mixing Bowl Capacity: 5 Liters
- Blender Capacity: 1.5 Liters
- Cable Length: 1 meter
- Materials: Stainless Steel, Plastic, Glass
- Dishwasher Safe: No (Hand wash recommended)
8. Warranty and Support
Your Continental EDISON Multifunction Pastry Robot comes with a manufacturer's warranty. Please refer to the warranty card included with your purchase for specific terms and conditions, including the warranty period and coverage details.
For technical assistance, spare parts, or any questions not covered in this manual, please contact Continental EDISON customer support. Contact information can typically be found on the product packaging or the official Continental EDISON website.