
1. Introduction
Thank you for choosing the Rii RM200 Wireless Rechargeable Mouse. This manual provides detailed instructions for setting up, operating, maintaining, and troubleshooting your new mouse. Please read this manual carefully before use to ensure optimal performance and longevity of your device.
2. Product Overview and Package Contents
The Rii RM200 is an ergonomic 2.4 GHz wireless mouse featuring a rechargeable battery, 5 responsive buttons, and adjustable DPI settings. It also includes a dynamic multi-color LED lighting system, making it suitable for various computing tasks, including gaming.
Package Contents:
- Rii RM200 Wireless Rechargeable Mouse
- 2.4 GHz Nano USB Receiver
- USB Charging Cable
- User Manual (this document)

Image 2.1: Rii RM200 mouse, USB receiver, and charging cable as included in the package.

Image 2.2: Angled view of the Rii RM200 wireless mouse, showcasing its ergonomic design and multi-color LED illumination.
3. Setup Instructions
- Locate the USB Receiver: The Nano USB receiver is typically stored in a compartment on the bottom of the mouse for convenience during transport. Gently slide open the compartment cover to retrieve it.
- Connect the Receiver: Insert the USB receiver into an available USB port on your computer (laptop or PC). The system will automatically detect and install the necessary drivers. No additional software installation is required (Plug & Play).
- Power On the Mouse: Flip the power switch located on the bottom of the mouse to the "ON" position. There are three positions: "OFF", "ON", and "ON/LIGHTS ON". Select "ON" to use the mouse without LEDs or "ON/LIGHTS ON" to activate the LED lighting.
- Test Connection: Move the mouse to confirm that the cursor on your screen responds. If it does not, ensure the receiver is securely plugged in and the mouse is powered on.
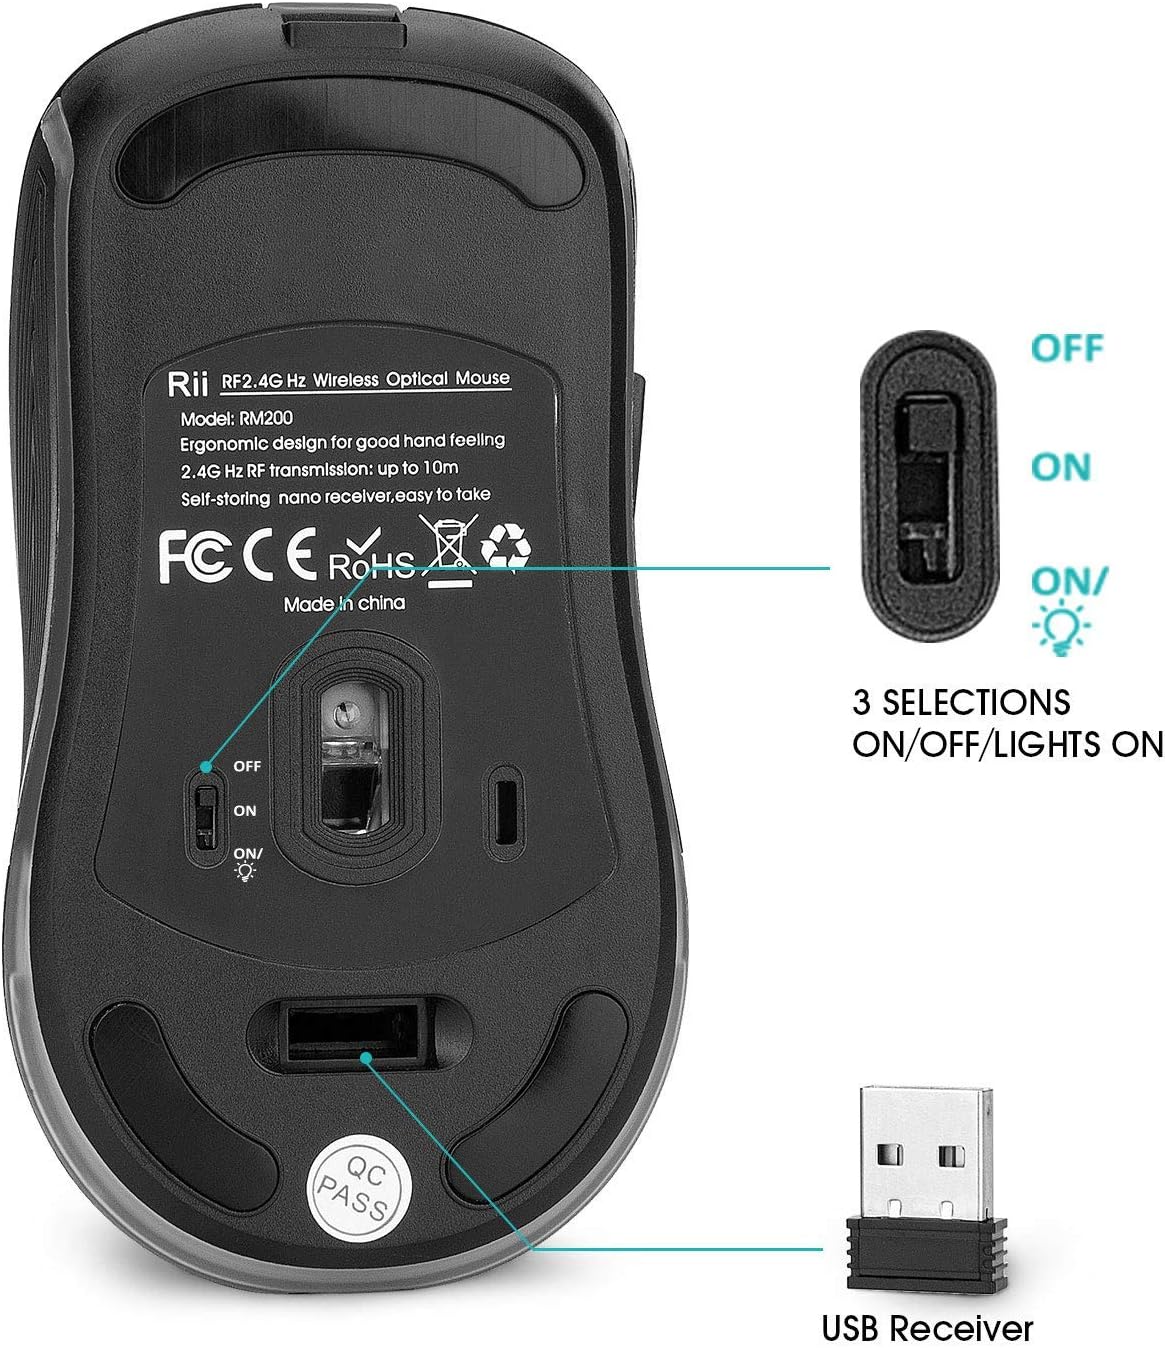
Image 3.1: The bottom of the Rii RM200 mouse, illustrating the power switch with ON/OFF/LIGHTS ON options and the storage slot for the USB receiver.
4. Operating Instructions
The Rii RM200 mouse features 5 buttons for enhanced productivity and control:
- Left Key: Standard left-click function.
- Right Key: Standard right-click function.
- Roller (Scroll Wheel): Scroll up/down, and click for middle-button functionality.
- DPI Button: Adjusts the mouse sensitivity (see Section 5).
- Forward Button: Navigates forward in web browsers or file explorers.
- Back Button: Navigates backward in web browsers or file explorers.

Image 4.1: Top view of the Rii RM200 mouse, clearly labeling the Roller (scroll wheel), Left Key, Right Key, DPI button, Forward button, and Back button.
5. DPI Adjustment
The Rii RM200 mouse offers three adjustable DPI (Dots Per Inch) levels to suit your preference and task requirements. The DPI button is located below the scroll wheel.
- Press the DPI button to cycle through the sensitivity settings.
- The available DPI levels are 800, 1200, and 1600.
- Each press will change the sensitivity, allowing you to find the optimal speed for your cursor movement.

Image 5.1: Close-up of the Rii RM200 mouse highlighting the DPI button and illustrating the three adjustable DPI levels (800, 1200, 1600).
6. LED Lighting
The Rii RM200 mouse features a dynamic multi-color LED lighting system that continuously changes colors. This provides an aesthetic enhancement to your workspace.
- To activate the LED lights, set the power switch on the bottom of the mouse to the "ON/LIGHTS ON" position.
- To turn off the LED lights while keeping the mouse functional, set the power switch to the "ON" position.

Image 6.1: Front view of the Rii RM200 mouse, demonstrating its illuminated geometric pattern and scroll wheel.
7. Charging the Mouse
The Rii RM200 mouse is equipped with a built-in rechargeable battery. When the battery is low, the mouse's performance may degrade, or the LEDs might dim.
- Connect the provided USB charging cable to the charging port on the front of the mouse.
- Plug the other end of the USB cable into a USB port on your computer or a USB wall adapter.
- The mouse can be used normally while it is charging.
- A full charge typically takes approximately one hour and provides extended usage time.

Image 7.1: Close-up of the Rii RM200 mouse with the USB charging cable connected to its front port.
8. Maintenance
- Cleaning: Use a soft, dry cloth to clean the mouse. For stubborn dirt, a slightly damp cloth can be used, but ensure no moisture enters the device. Avoid harsh chemicals or abrasive cleaners.
- Storage: When not in use, especially during travel, store the USB receiver in its dedicated compartment on the bottom of the mouse to prevent loss.
- Battery Care: To prolong battery life, avoid fully discharging the mouse frequently. Charge it when the low battery indicator appears or when you notice performance degradation.
9. Troubleshooting
- Mouse not responding:
- Ensure the USB receiver is securely plugged into a working USB port.
- Check if the mouse is powered on (switch on the bottom set to "ON" or "ON/LIGHTS ON").
- The battery might be low. Connect the mouse to a power source using the charging cable.
- Try plugging the USB receiver into a different USB port.
- Restart your computer.
- Intermittent connection or pointer lag:
- Ensure there are no large metallic objects or other 2.4 GHz wireless devices interfering with the signal between the mouse and the receiver.
- Move the mouse closer to the USB receiver. The effective range is up to 10 meters.
- Charge the mouse fully.
- LED lights not working:
- Ensure the power switch on the bottom of the mouse is set to the "ON/LIGHTS ON" position.
- Check the battery level; low battery might affect LED functionality.
10. Specifications
| Feature | Specification |
|---|---|
| Brand | Rii |
| Model Number | RM200 |
| Connectivity Technology | 2.4 GHz Wireless (USB Receiver) |
| Movement Detection Technology | Optical |
| Number of Buttons | 5 |
| DPI Levels | 800, 1200, 1600 (Adjustable) |
| Special Features | Ergonomic Design, Multi-color LED Light, Rechargeable, Wireless |
| Hand Orientation | Ambidextrous |
| Power Source | Battery Powered (1 A battery included) |
| Wireless Range | Up to 10 meters |
| Dimensions (L x W) | 12.5 cm x 7 cm (approximately) |
| Compatible Operating Systems | Windows (2000/2003/7/8/10/Vista/ME), Mac OS X, Linux, Android, Smart TV, Raspbian, PlayStation (3/4), Xbox (360/One) |
11. Warranty and Support
For warranty information and customer support, please refer to the documentation provided with your purchase or contact your retailer. Keep your proof of purchase for any warranty claims.


