
1. Product Overview
The SARTODOORS Planum 0020 Grey Oak Sliding Closet Bypass Doors are designed for modern interiors, offering a space-saving and aesthetically pleasing solution for closets and wardrobes. This set includes two pre-finished grey doors, along with all necessary hardware for installation.
Key Features:
- Door Dimensions: Two individual doors, each measuring 28 inches wide by 80 inches high, for a total opening width of 56 inches.
- Material: Constructed from solid pine wood and covered with an eco-veneer finish.
- Durability: Features high durability, cleanability, quality, stability, and resistance to scratches and stains.
- Sound Attenuation: The 1 3/5-inch thick solid pine wood and honeycomb core construction provides approximately 30% noise reduction compared to standard doors.
- Customizable: Doors can be trimmed by 3/4 inch on the top, bottom, left, and right sides for a custom fit.
2. Package Contents
Before beginning installation, verify that all components listed below are present in your package:
- 2 x Grey Doors (28x80 inches each)
- 2 x Aluminum Tracks
- 4 x Ball Bearing Wheel Door Hangers
- 2 x Round Pulls
- 2 x Door Stops
- All necessary mounting screws and adjustment wrench
- 1 x Door Guide Set

3. Installation Guide
This section provides step-by-step instructions for installing your SARTODOORS Sliding Closet Bypass Doors. It is recommended to review all steps before beginning.
3.1. Door Panel Preparation
The door panels require preparation for the floor guide and door hangers.
- Prepare Bottom Groove for Floor Guide:
- Measure and mark the bottom edge of each door panel for the floor guide groove. The groove depth should be 1 inch and width 1/4 inch.
- Use a router or similar tool to create the groove along the marked line. Ensure the groove is clean and free of debris.

Figure 3.1: Close-up of the door panel texture. 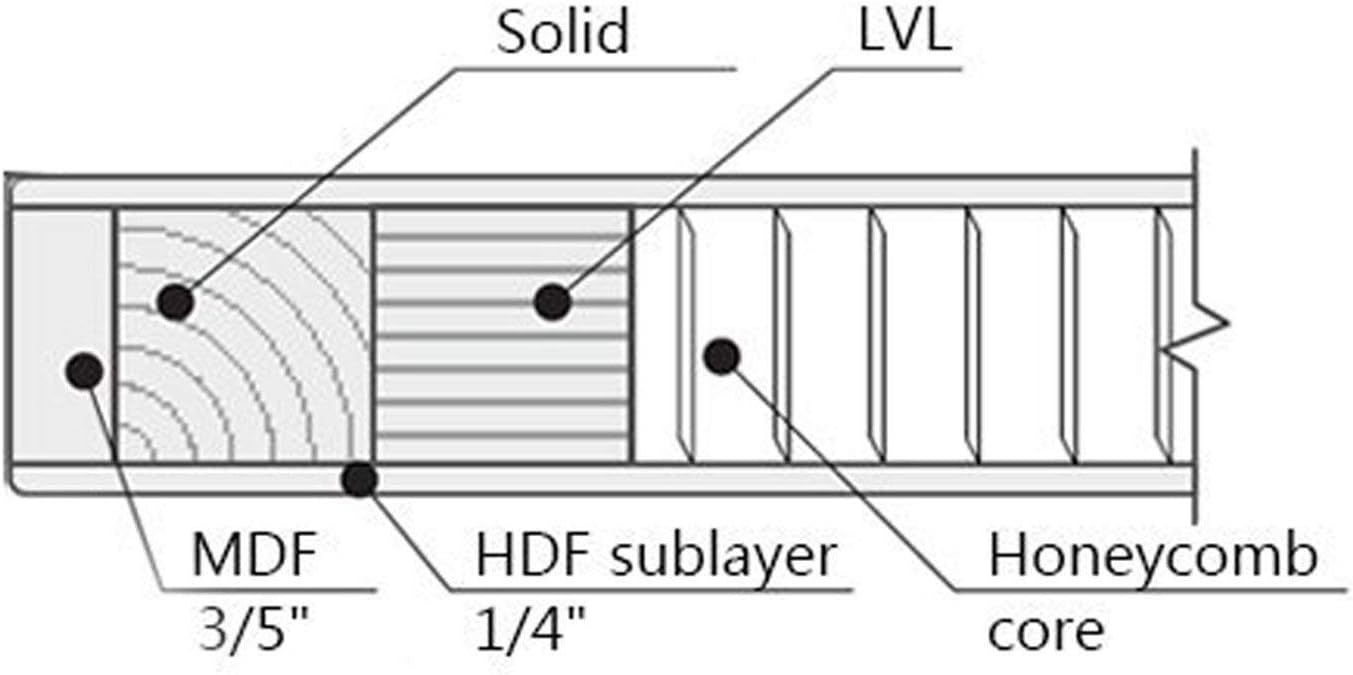
Figure 3.2: Door panel construction showing MDF, Solid wood, HDF sublayer, and Honeycomb core. - Install Door Hangers:
- Refer to the provided instruction sheet for precise measurements and placement of the door hangers on the top edge of each door panel.
- Pre-drill holes using a thin drill bit, then a larger diameter drill bit as specified.
- Attach the door hangers using the provided bolts. The bolts allow for minor adjustments to the hanger position later.
3.2. Track Installation
The aluminum tracks will be mounted above the door opening.
- Determine Track Height:
- Measure the height of your door panels. Add 1.7 inches to this measurement to determine the required height from the floor to the bottom of the track.
- If the floor is uneven, use the highest point of the floor as the zero level to prevent the doors from jamming.
- Mark the wall at the calculated height. Use a level to ensure the marks are perfectly horizontal across the entire opening.

Figure 3.3: Recommended opening dimensions for 56x80 inch bypass doors. - Mount the Tracks:
- Align the aluminum tracks with your marks and pre-drill holes into the wall as necessary.
- Securely fasten the tracks to the wall using the provided screws. Ensure the tracks are firmly mounted and level.
3.3. Hanging the Doors
- Carefully lift each door panel and engage the door hangers with the tracks. The doors should slide smoothly along the tracks.
- Adjust the door hangers as needed to ensure the doors are level and have proper clearance from the floor and each other.
3.4. Installing Floor Guides and Door Stops
- Install Floor Guides:
- Position the door panels in their desired closed positions.
- Mark the floor where the floor guides should be installed to align with the grooves on the bottom of the doors.
- Pre-drill holes and secure the floor guides to the floor using the provided screws.
- Install Door Stops:
- Install the door stops at the ends of the tracks to prevent the doors from sliding too far.
- Adjust the stops to ensure the doors close properly and do not collide with the frame or each other.
3.5. Handle Installation
- Mark Handle Placement:
- Determine the desired height for the round pulls on each door panel. A common height is around 36-42 inches from the floor.
- Mark the center point for each pull.
- Drill and Install Pulls:
- Carefully drill holes at the marked points.
- Insert and secure the round pulls into the drilled holes.
3.6. Installation Videos
For visual guidance, please refer to the following official SARTODOORS installation videos:
Step-by-Step Closet Bypass Door Installation Guide
This video provides a comprehensive step-by-step guide for installing SARTODOORS closet bypass doors, covering track mounting, door hanging, and final adjustments.
Barn Handle+Soft Close Kit Can Be Purchased Guide
While titled for barn doors, this video demonstrates useful techniques for preparing door panels, including routing the bottom groove for a floor guide and installing handles, which are applicable to bypass door systems.
4. Care and Maintenance
Proper care and maintenance will ensure the longevity and appearance of your SARTODOORS bypass doors.
- Cleaning: Wipe the door surfaces with a soft, damp cloth. Avoid abrasive cleaners or harsh chemicals that could damage the eco-veneer finish.
- Hardware: Periodically check all screws and fasteners for tightness. Lubricate the tracks and rollers annually with a silicone-based lubricant to ensure smooth operation.
- Environmental Conditions: Maintain stable humidity and temperature levels in the room to prevent warping or cracking of the wood.
5. Specifications
| Attribute | Detail |
|---|---|
| Brand | SARTODOORS |
| Model Number | 0020 |
| Size | 56" x 80" (2* 28x80) |
| Color | Grey Oak |
| Material | Wood (Solid Pine Wood, Honeycomb Core, Eco-Veneer) |
| Style | Modern |
| Item Weight | 90 Pounds |
| Assembly Required | Yes |
| Product Dimensions | 1.6 x 56 x 80 inches |
| UPC | 798418856820 |
6. Warranty and Support
This product is offered by UnitedPorte, a small business brand. For any questions regarding installation, product defects, or missing parts, please contact UnitedPorte directly.
Return Policy: This product typically includes a 30-day return policy for refunds or replacements. Please refer to your purchase agreement or contact the seller for specific details regarding your return options.

