Bandai A12
Instruction Manual
Bandai Haropla The Gundam Base Limited HARO [Painting Model] Clear & White
Model: A12
1. Introduction
Thank you for purchasing the Bandai Haropla The Gundam Base Limited HARO [Painting Model] Clear & White kit. This model kit allows you to assemble your own Haro unit, featuring both clear and white parts, designed specifically for painting customization. This kit is engineered for safe assembly without the need for glue.
For optimal results and a clean finish, it is recommended to prepare a special tool such as nippers for part separation.
![Box art of Bandai Haropla The Gundam Base Limited HARO [Painting Model] Clear & White kit, showing both clear and white assembled Haro models.](https://m.media-amazon.com/images/I/61uQ7aoXDOL._AC_SL1000_.jpg)
Image: Packaging of the Haropla Haro Painting Model kit, displaying the clear and white versions of the Haro model.
2. Safety Information
- This product contains small parts and is not suitable for children under 8 years old. Adult supervision is recommended.
- Keep plastic bags and other packaging materials away from children to prevent suffocation.
- Exercise caution when using hobby knives or nippers during assembly. Always cut away from your body.
- Do not put parts in your mouth.
- This kit does not require glue for assembly. Forcing parts may cause damage.
3. Package Contents
Please verify that all components are present before beginning assembly.
- Plastic runners (multiple frames with parts)
- Instruction manual (this document)
- Sticker sheet (if included)
Note: The kit includes parts for one Haro unit, with options for clear or white outer shells.
4. Setup and Assembly
Follow these steps to assemble your Haro model kit. No glue is required for this snap-fit kit.
- Prepare Your Workspace: Ensure you have a clean, well-lit area. It is highly recommended to use a cutting mat to protect your work surface.
- Tools Recommended:
- Nippers (for cleanly cutting parts from runners)
- Hobby knife (optional, for trimming nubs)
- Tweezers (optional, for applying small stickers)
- Identify Parts: Refer to the included parts diagram (usually on the first few pages of the physical manual) to identify each runner and part number.
- Cut Parts from Runners: Carefully cut each part from its runner using nippers. Cut slightly away from the part to avoid damaging it, then trim any remaining nubs with a hobby knife or by carefully sanding.
- Assemble Core Body: Begin by assembling the internal frame and core components of the Haro. Pay attention to the orientation of parts.
- Attach Limbs and Accessories: Connect the arms, legs, and any other movable parts to the core body. Ensure joints move smoothly.
- Choose Outer Shell: Decide whether to use the clear or white outer shell parts. Carefully snap them into place around the assembled core.
- Apply Stickers/Decals: If included, apply any stickers or decals according to the diagram for added detail.
- Final Check: Ensure all parts are securely attached and the model is stable.
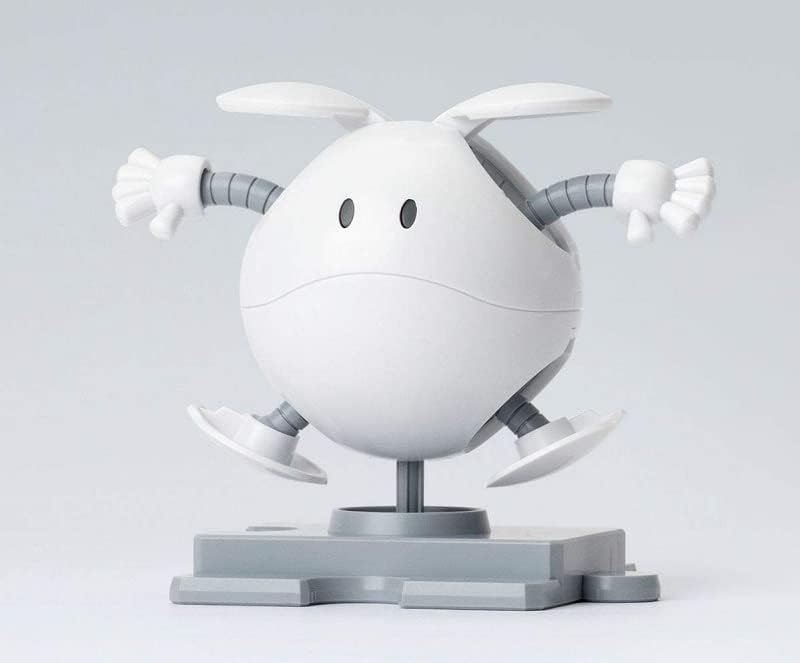
Image: An assembled white Haro model, showcasing its simple, spherical design with small arms and legs.
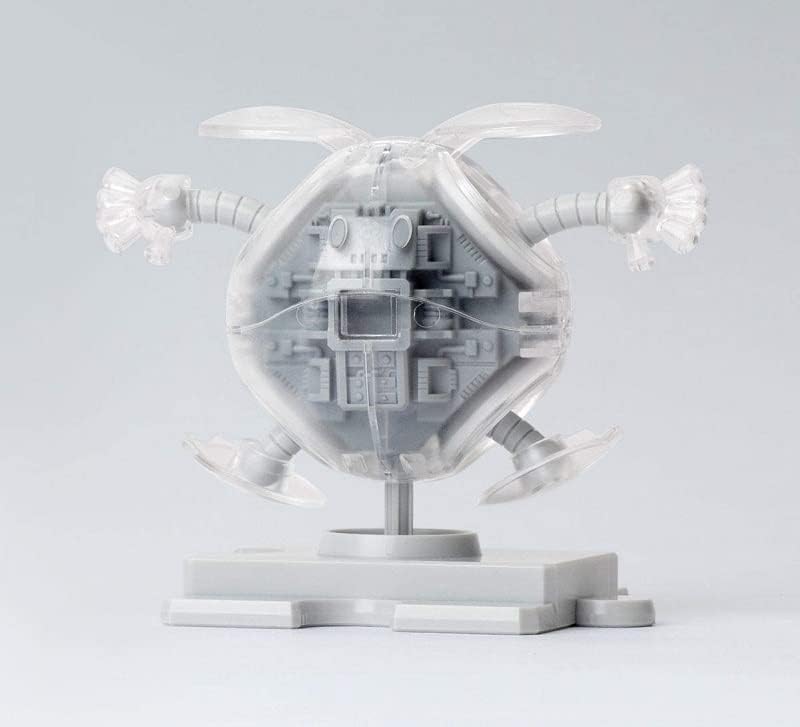
Image: An assembled clear Haro model, providing a view of the internal mechanical details and frame.
5. Operating Your Model
The Haropla Haro is a static display model with limited articulation. Once assembled, you can:
- Pose: Gently adjust the position of the arms and legs at their joints to achieve desired poses. Do not force movements beyond their intended range.
- Display: Place your assembled Haro on its included display base or any flat surface.
- Customization (Painting Model): This kit is specifically designed for painting. You can apply model paints (acrylic, lacquer, enamel) to customize its appearance. Ensure proper ventilation when painting and follow paint manufacturer's instructions.
6. Maintenance
To keep your Haro model in excellent condition:
- Cleaning: Dust the model regularly with a soft brush or a can of compressed air. Avoid using harsh chemicals or abrasive materials, which can damage the plastic or paint.
- Storage: Store the model away from direct sunlight, extreme temperatures, and high humidity to prevent discoloration or warping of plastic parts.
- Handling: Handle the model by its main body to avoid putting stress on smaller, delicate parts.
7. Troubleshooting
Common issues and their solutions:
| Problem | Possible Cause | Solution |
|---|---|---|
| Parts do not fit together. | Excess plastic (nub marks) or incorrect orientation. | Carefully trim any remaining nubs. Ensure parts are oriented correctly according to the manual. Do not force parts. |
| Joints are too loose. | Wear and tear, or manufacturing tolerance. | Apply a thin layer of clear nail polish or a specialized joint-tightening solution to the peg and let it dry before reassembling. |
| Parts break during assembly. | Excessive force or improper cutting. | Always use sharp nippers and cut cleanly. If a part breaks, consider using plastic cement (for model kits, not included) for repair, or contact customer support for replacement parts if available. |
8. Specifications
| Feature | Detail |
|---|---|
| Product Name | Bandai Haropla The Gundam Base Limited HARO [Painting Model] Clear & White |
| Model Number | A12 |
| Brand | Bandai |
| Material | Plastic |
| Color Options | Clear, White (interchangeable outer shells) |
| Assembly Type | Snap-fit (no glue required) |
| Recommended Age | 8 years and up |
| Package Dimensions | 30.7 x 20.4 x 5 cm |
| Package Weight | 199.58 grams |
9. Warranty and Support
As this is a limited edition model kit, specific warranty information may vary. Please refer to the official Bandai website or the retailer where you purchased the product for details regarding returns or defective parts.
For general inquiries or support regarding Bandai model kits, you may visit the official Bandai Hobby website or contact their customer service department. Please note that replacement parts for limited edition items may not always be available.
Disclaimer: This manual provides general guidance. Actual product appearance and assembly steps may vary slightly from illustrations.
Related Documents - A12
 |
Blockross Gundam Model Kit Assembly Instructions and Transformations Comprehensive assembly guide and transformation instructions for Bandai's Blockross series Gundam model kits, including Wing Gundam Zero, Gundam Epyon, Red Gundam, and Sinanju. |
 |
Gundam Head Collection Assembly and Battery Replacement Guide Detailed instructions for assembling the Gundam Head Collection toy, including safety warnings, step-by-step assembly guides for different models, and how to replace batteries in the light-up stand. |
 |
PG UNLEASHED 1/60 RX-78-2 Gundam: Premium Model Kit Overview Detailed information and overview of the PG UNLEASHED 1/60 RX-78-2 Gundam, a high-grade plastic model kit from Bandai, featuring advanced engineering and iconic design. |
 |
HG 1/144 RX-0 Unicorn Destruction Mode Model Kit Assembly Instructions Comprehensive assembly guide for the HG 1/144 RX-0 Unicorn Destruction Mode model kit, detailing part identification, step-by-step construction, and color recommendations. |
 |
HG 1/144 Gundam Astaroth Assembly Instructions Official assembly instructions and color guide for the HG 1/144 Gundam Astaroth model kit by Bandai. Includes detailed steps, part identification, safety warnings, and painting recommendations for building the mobile suit. |
 |
Master Grade 1/100 Scale Wing Gundam EW (Endless Waltz) Model Kit Assembly Guide Detailed assembly instructions and model information for the BANDAI Master Grade 1/100 Scale Wing Gundam EW (Endless Waltz) model kit. Includes parts list, color guide, assembly steps, and background story. |
Ask a question about this manual
Ask about setup, troubleshooting, compatibility, parts, safety, or missing instructions. Manuals+ will review the question and use this page’s manual context to help answer it.