
1. Product Overview
The AZIMOM 6W Bluetooth Music Control RGB LED Fiber Optic Lights Star Ceiling Light Kit provides a versatile lighting solution for various indoor and automotive applications. This kit features a 6W RGBW light source, fiber optic strands, and multiple control options including an RF remote and a Bluetooth-enabled mobile application. The system is designed to create a starry sky effect with customizable colors and dynamic modes, including sound-activated functions.
Included Components:
- 6W RGBW Light Source Engine
- Fiber Optic Strands (550pcs, 0.75mm diameter, 13.1ft length)
- RF 28-Key Remote Control (batteries not included)
- Power Adapter (AC86-265V / DC12V)

Image 1.1: Overview of the AZIMOM Fiber Optic Light Kit components, including the light engine, fiber strands, remote, and power cables.
2. Safety Information
- Ensure the power supply matches the specified voltage (AC86-265V or DC12V).
- Do not expose the light source engine to water or high humidity. This product is not water-resistant.
- Keep the light source engine in a well-ventilated area to prevent overheating.
- Avoid direct eye exposure to the light source.
- Do not press or tread on the fiber optic cables during installation or use to prevent damage.
- Keep out of reach of children.
3. Setup and Installation
Installation of the fiber optic star ceiling kit requires careful planning and execution. The process involves marking star points, drilling holes, inserting fibers, and securing the light engine.
Installation Steps:
- Prepare the Surface: Determine the desired pattern for your star ceiling. Mark the star points on the ceiling panel (e.g., car headliner or home ceiling board).
- Drill Holes: Drill holes vertically at each marked point. The size of the drill bit should be appropriate for the fiber optic strand diameter (0.75mm).
- Insert Fibers: Insert the fiber optic strands into the drilled holes from the front side of the panel. Insert approximately 10cm of fiber into the board.
- Secure Fibers: On the back side of the panel, fix the inserted fibers with hot melt adhesive or glass cement to prevent them from slipping out.
- Organize Fibers: Straighten and tie the fibers into small bundles. It is recommended to sort the fibers by length and location to ensure even distribution and avoid tangling.
- Connect to Light Engine: Insert the fiber bundles into the light source engine. Ensure all fibers are securely seated.
- Test and Trim: Connect the light engine to power and test the lighting. Once satisfied with the arrangement, clip off any excess fiber length from beneath the panel using nail clippers or similar tools for a clean finish.
- Mount Light Engine: Place the light engine in a location where it can be easily powered and is well-ventilated. For car installations, the light source is typically placed on the C-pillar and powered by a 6.5ft car cigarette lighter. For indoor use, ensure the light source is powered by the provided adapter.
Note: The required fiber length is calculated as: Length from LED light engine to the star point + 30-40cm. This extra length allows for flexibility during installation.
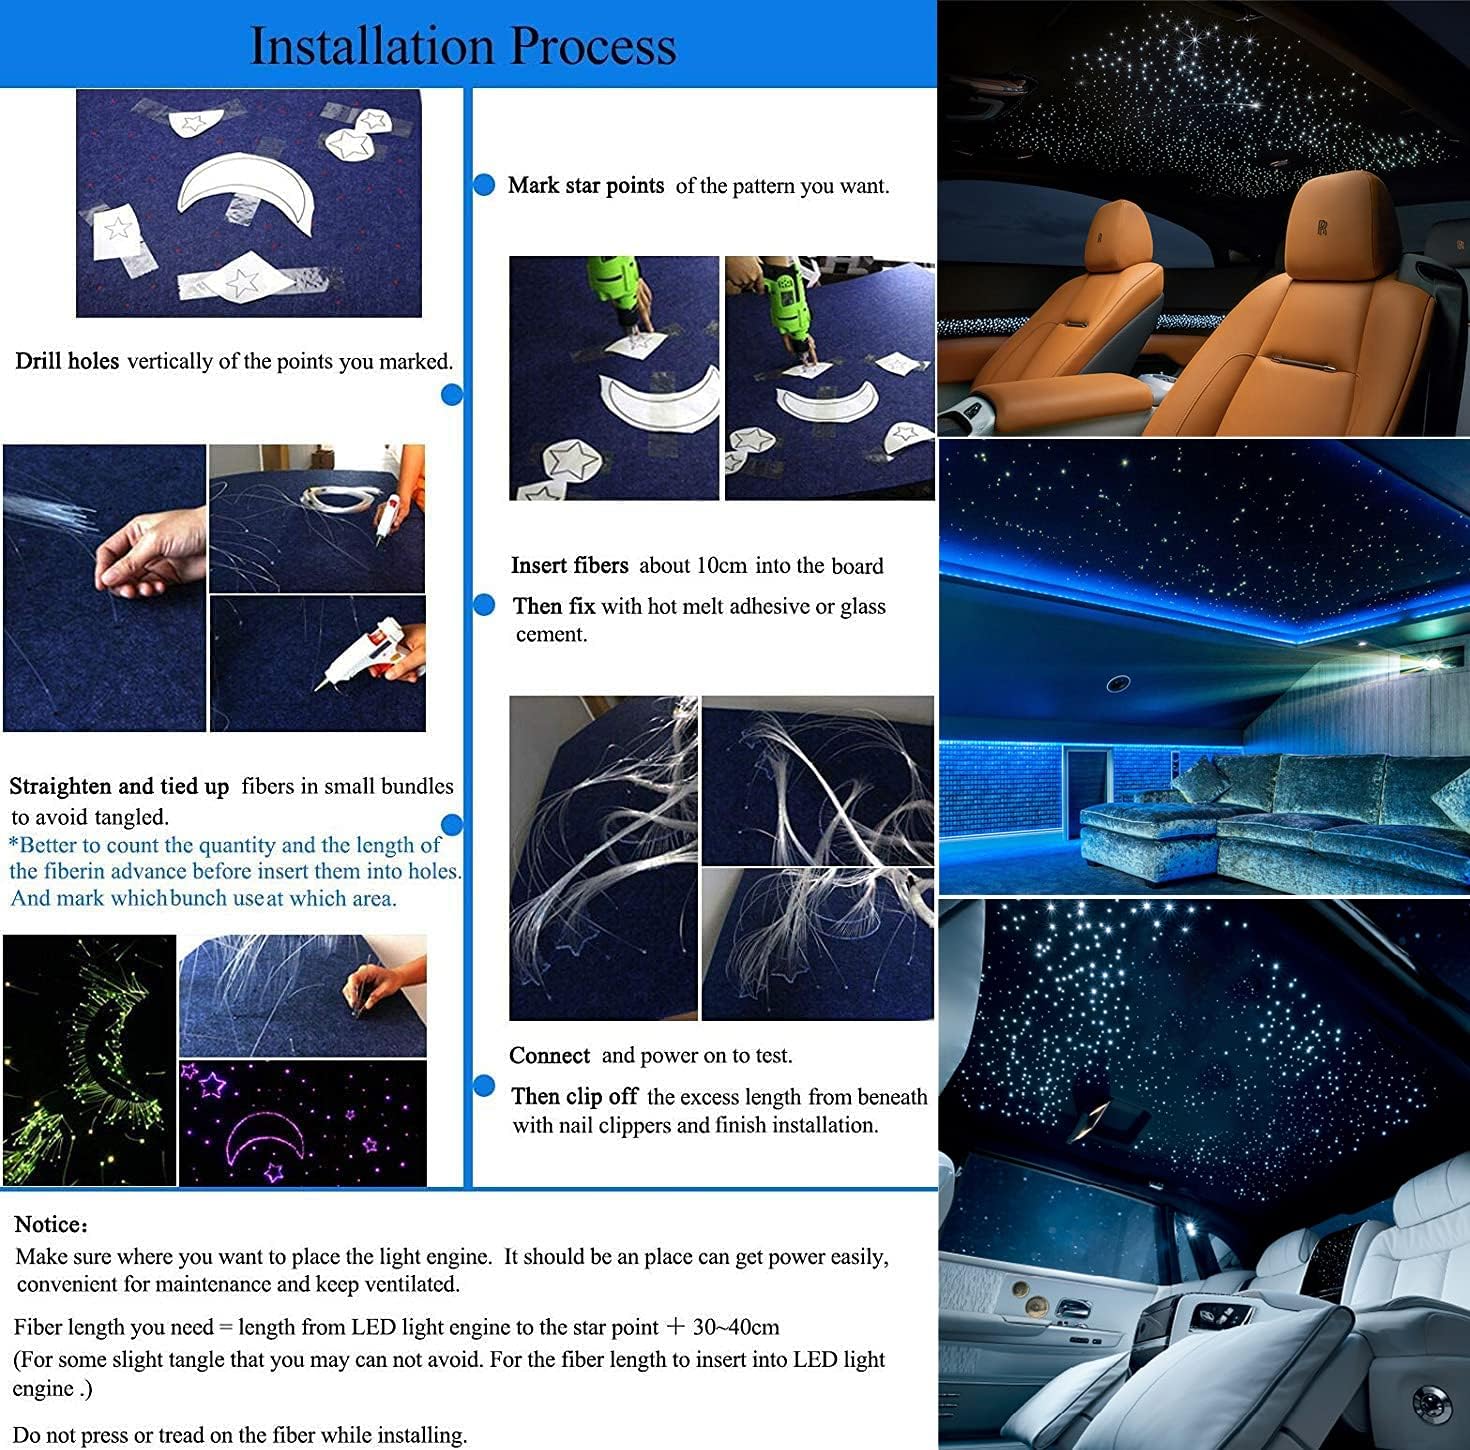
Image 3.1: Visual guide for the fiber optic light installation process.

Image 3.2: Illustration of light engine placement and fiber routing for home ceiling and car roof installations.
4. Operation
The AZIMOM Fiber Optic Light Kit offers multiple ways to control its lighting effects: via the RF remote control, a Bluetooth-enabled mobile application, and sound activation.
4.1 Powering On/Off
Connect the light engine to the appropriate power source (DC12V for car, AC adapter for home). Use the 'ON' and 'OFF' buttons on the RF remote or the power toggle within the mobile application to turn the lights on or off.
4.2 RF Remote Control Functions
The 28-key RF remote allows for direct control over various lighting parameters.
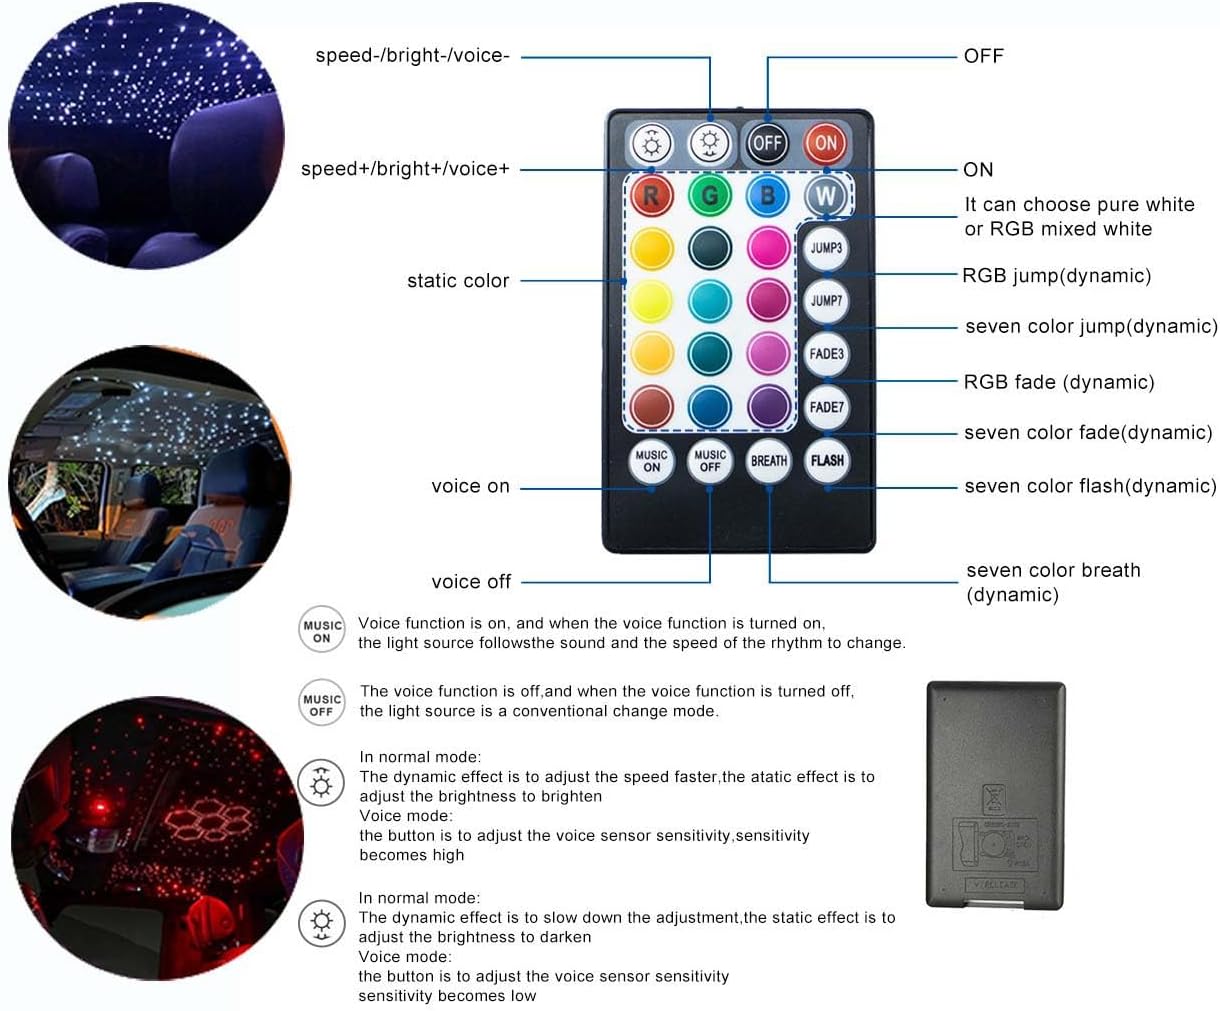
Image 4.1: Layout and functions of the 28-key RF remote control.
- ON/OFF: Power on/off the light kit.
- R, G, B, W: Select Red, Green, Blue, or White static colors.
- Color Palette: Choose from 16 static colors.
- JUMP3/JUMP7: Activate 3-color or 7-color jump dynamic modes.
- FADE3/FADE7: Activate 3-color or 7-color fade dynamic modes.
- FLASH: Activate flash mode.
- BREATH: Activate breath mode.
- Speed+/Speed-: Adjust the speed of dynamic modes.
- Bright+/Bright-: Adjust the brightness of the lights (1%-100%).
- MUSIC ON/MUSIC OFF: Toggle sound-activated mode. When 'MUSIC ON' is active, the lights will respond to ambient sound or music. When 'MUSIC OFF' is active, the light operates in conventional change mode.
- VOICE+/VOICE-: Adjust the sensitivity of the sound-activated mode.
4.3 Bluetooth APP Control
The light kit can be controlled via the "My SmartLED" mobile application, available for Android and iOS devices. This offers extended control options, including 16 million colors and group control.

Image 4.2: Screenshots of the 'My SmartLED' application interface for controlling the light kit.

Image 4.3: Visual representation of Bluetooth APP control functionality.
- Download the App: Scan the QR code provided in the product packaging or search for "My SmartLED" in the App Store (iOS) or Google Play Store (Android).
- Enable Bluetooth: Ensure Bluetooth is enabled on your mobile phone.
- Connect to Device: Power on the light kit. Open the "My SmartLED" app. The app should automatically detect and connect to the light engine.
- Control Functions:
- Static Colors: Select from over 16 million static colors using the color wheel.
- Dynamic Modes: Choose from 20 dynamic modes, including jump, fade, flash, and breath effects. Adjust speed and brightness.
- Music Mode: Activate sound-activated mode, where the fiber optic strands dance with the rhythm of music or ambient sound detected by your phone's microphone.
- Group Control: The app supports controlling multiple AZIMOM starlight kits simultaneously or individually.
4.4 Music Control
Both the RF remote and the mobile application feature a music control mode. When activated, the light effects will synchronize with the rhythm of music or ambient sounds, creating a dynamic and immersive experience.

Image 4.4: Examples of various colors and effects produced by the light kit.
5. Specifications
| Feature | Specification |
|---|---|
| Brand | AZIMOM |
| Model Number | C-889 |
| Light Source Power | 6W |
| Input Voltage | AC86-265V / DC12V |
| LED Type | RGBW LED |
| Fiber Head Inner Diameter | 20mm |
| Fiber Material | Plastic |
| Fiber Quantity & Size | 550pcs*0.03in*13.1ft (550pcs, 0.75mm diameter, 4m length) |
| Control Methods | RF 28-Key Remote, Bluetooth APP ("My SmartLED"), Sound-Activated |
| Colors | 16 static colors (remote), 16+ million static colors (APP), RGBW mixing |
| Dynamic Modes | 20+ (jump, fade, flash, breath) |
| Brightness/Speed | Adjustable (1%-100%) |
| Lifetime | 50,000 hours |
| Item Dimensions (L x W x H) | 5.9 x 3.9 x 2 inches |
| Item Weight | 3.8 pounds |
| Water Resistance Level | Not Water Resistant |
6. Maintenance
- Cleaning: Gently wipe the light engine and fiber optic ends with a soft, dry cloth to remove dust. Do not use liquid cleaners directly on the light engine.
- Fiber Care: Avoid bending the fiber optic strands sharply, as this can damage them and reduce light transmission.
- Storage: If storing the kit for an extended period, ensure it is kept in a dry, cool place away from direct sunlight and extreme temperatures.
7. Troubleshooting
- No Power:
- Ensure the power adapter is securely connected to both the light engine and a working power outlet.
- Verify the power source is active.
- Remote Control Not Working:
- Check if the remote control batteries are inserted correctly and are not depleted. (Note: Batteries are not included with the kit).
- Ensure there are no obstructions between the remote and the light engine's RF receiver.
- APP Connection Issues:
- Ensure Bluetooth is enabled on your mobile device.
- Verify the light engine is powered on.
- Restart the "My SmartLED" app and try connecting again.
- If issues persist, try restarting your mobile device and the light engine.
- Uneven Light Distribution:
- Check if all fiber strands are properly inserted into the light engine.
- Ensure fibers are not sharply bent or kinked, which can impede light flow.
- Verify that the light engine's LED is functioning correctly.
- Sound-Activated Mode Not Responding:
- Ensure 'MUSIC ON' is selected on the remote or within the app.
- Adjust the 'VOICE+' sensitivity setting on the remote or within the app.
- Ensure there is sufficient sound for the microphone to detect.
8. Warranty Information
The AZIMOM 6W Bluetooth Music Control RGB LED Fiber Optic Lights Star Ceiling Light Kit comes with a 2-year warranty from the date of purchase. This warranty covers manufacturing defects and malfunctions under normal use. Please retain your proof of purchase for warranty claims. The warranty does not cover damage caused by improper installation, misuse, accidents, unauthorized repairs, or natural disasters.
9. Customer Support
For further assistance, technical support, or warranty inquiries, please contact AZIMOM customer service through the retailer where the product was purchased or visit the official AZIMOM brand store.
AZIMOM Brand Store: Visit the AZIMOM Store on Amazon