Introduction
This manual provides comprehensive instructions for the operation and maintenance of your Bewinner Portable Full HD Digital Camcorder. Please read this manual carefully before using the device to ensure proper functionality and to maximize your user experience.
The Bewinner Digital Camcorder is designed for capturing high-definition video and still images. It features a durable ABS construction, a 270-degree rotatable screen for flexible shooting angles, and supports external memory cards up to 32GB. Its compact and lightweight design makes it ideal for various activities, including home parties, outdoor picnics, and camping.
Product Overview and Components
Familiarize yourself with the camcorder's components and their functions.
- Digital Camcorder Unit
- User Manual
- European Plug Power Adapter
- USB Cable
- Rechargeable Battery

Figure 1: Front view of the Bewinner Portable Full HD Digital Camcorder, showcasing its compact design and rotatable screen.

Figure 2: Dimensions of the camcorder, showing its length of 118mm (4.64in), height of 58.5mm (2.30in), and width of 51.5mm (2.03in).
Setup
1. Battery Installation and Charging
Insert the provided rechargeable battery into the battery compartment, ensuring correct polarity. Close the compartment cover securely. Connect the camcorder to a power outlet using the European plug power adapter and USB cable to charge the battery before first use. The charging indicator will typically show the charging status.
2. SD Card Insertion
This camcorder supports external SD memory cards up to 32GB. Locate the SD card slot, usually on the side or bottom of the device. Insert the SD card with the metal contacts facing down until it clicks into place. Ensure the SD card is unlocked before insertion (refer to Figure 3).
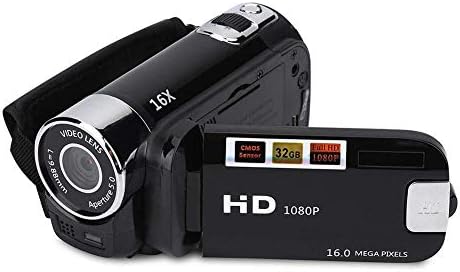
Figure 3: Illustration of the SD card with its lock/unlock switch. Ensure the switch is in the 'Unlock' position before inserting into the camcorder.
If the camcorder does not recognize the SD card, first check if the card's lock switch is in the 'Unlock' position. If the issue persists, try formatting the SD card using the camcorder's menu settings (refer to the 'Troubleshooting' section for more details).
Operating Instructions
1. Powering On/Off
To power on the camcorder, open the LCD screen. To power off, close the LCD screen or press and hold the power button (if available) until the device shuts down.
2. Recording Video
With the camcorder powered on, ensure it is in video recording mode. Press the Record button to start recording. Press it again to stop. The camcorder supports Full HD 1080P video resolution.

Figure 4: Visual comparison of video resolutions, including 1080P, 720P, and 480P, demonstrating the clarity difference.

Figure 5: Details on supported video formats (FHD 1920x1080, HD 1280x720, D1 848x480, VGA 640x480) and picture pixel resolutions (16MP, 12MP, 5MP, 3MP, 1MP, VGA).
3. Taking Photos
Switch the camcorder to photo mode. Press the Shutter button to capture a still image. The maximum image resolution is 16 Megapixels.
4. Using Digital Zoom
The camcorder features a 16x digital zoom. Use the zoom controls (usually a rocker switch) to zoom in or out while recording or taking photos.

Figure 6: Demonstration of digital zoom capabilities, showing 4x, 8x, and 16x zoom levels.
5. Utilizing the 270° Rotatable Screen
The LCD screen can rotate up to 270 degrees, allowing for flexible viewing angles, including self-recording. Adjust the screen to your desired position for optimal viewing during shooting or playback.
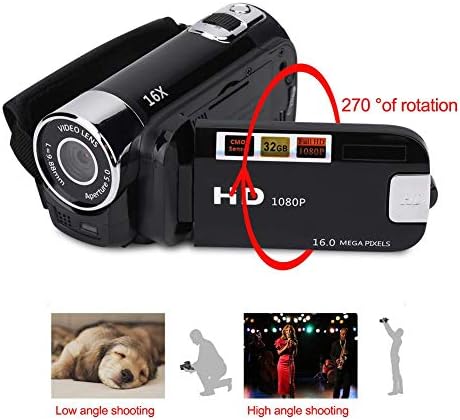
Figure 7: Illustration of the camcorder's 270-degree rotatable screen, enabling various shooting angles like low-angle and high-angle.
6. Connecting to TV/PC
Use the provided USB cable to connect the camcorder to a computer for file transfer. The camcorder also supports 1080P high-definition TV output for viewing your recordings on a larger screen.

Figure 8: Diagram showing how to connect the camcorder to a TV or personal computer using the provided cables for playback or data transfer.
7. Shooting Modes
The camcorder offers various shooting modes to optimize your captures for different scenarios. Navigate through the menu to select the appropriate mode.
- Auto Mode: Standard setting for general use.
- Portrait Mode: Optimized for capturing people.
- Beach Mode: Adjusts settings for bright, outdoor environments.
- Motor Pattern Mode: Suitable for capturing moving subjects.
- Scenery Mode: Enhances landscape shots.
- Night Mode: Improves visibility in low-light conditions.
- Night Portrait Mode: Combines night mode with portrait optimization.

Figure 9: Examples of various shooting modes available on the camcorder, including Auto, Portrait, Beach, Motor, Scenery, Night, and Night Portrait modes.
Maintenance
1. Cleaning the Camcorder
Use a soft, dry cloth to clean the exterior of the camcorder. For the lens and LCD screen, use a specialized lens cleaning cloth and solution to avoid scratches. Do not use abrasive cleaners or solvents.
2. Battery Care
To prolong battery life, avoid exposing it to extreme temperatures. If the camcorder will not be used for an extended period, remove the battery and store it in a cool, dry place.
3. Storage
Store the camcorder in a dry, dust-free environment, away from direct sunlight and high humidity. Use a protective case when transporting the device.
Troubleshooting
| Problem | Possible Cause | Solution |
|---|---|---|
| Camcorder does not power on. | Battery is depleted or not installed correctly. | Charge the battery fully. Ensure the battery is inserted with correct polarity. |
| "No Card" error message. | SD card is locked, not inserted correctly, or corrupted. | Ensure the SD card's lock switch is in the 'Unlock' position. Reinsert the SD card. If the issue persists, try formatting the SD card via the camcorder's menu (this will erase all data). If still unresolved, try a different SD card. |
| Zoom function is not working. | Incorrect mode or temporary software glitch. | Ensure you are in a mode that supports zoom. Restart the camcorder. |
| Camera stops filming unexpectedly. | Low battery, full SD card, or software issue. | Check battery level and recharge if necessary. Check available space on the SD card. Restart the camcorder. |
| Poor image/video quality. | Dirty lens, insufficient lighting, or incorrect settings. | Clean the lens. Ensure adequate lighting. Adjust shooting mode or exposure settings. |
Specifications
- Brand: Bewinner
- Model: Bewinner349zgys065-01
- Color: EU Black
- Product Type: Portable Digital Camcorder
- Optical Zoom: 16x Multiplier
- Screen: 2.7 inches TFT Rotatable Screen
- Image Stabilization: Digital
- Special Features: Lightweight
- Focal Length: 7.6 millimeters
- Aperture: 2.38 Millimeters
- Connectivity Technology: USB
- Supported Formats: SD Card (up to 32GB)
- Digital Zoom: 16x Multiplier
- Video Resolution: 1080p
- Compatible Devices: Personal Computer
- Dimensions (L x W x H): 13.2 x 11.2 x 7 centimeters
- Water Resistance Level: Not waterproof
- Focus Type: Auto Focus
- Effective Still Resolution: 16 Megapixels
- Photo Sensor Technology: Other (CMOS)
- Video Capture Format: MP4
Warranty and Support
Bewinner products are designed for reliability and performance. For any technical assistance or inquiries regarding your camcorder, please refer to the contact information provided with your purchase documentation or visit the official Bewinner website.
Information regarding spare parts availability and guaranteed software updates is not explicitly provided. Please contact customer support for the most current information.


