
TEKONE CR-9905
TEKONE CR-9905 Digital PLL FM Alarm Clock Radio
User Manual
Introduction
Thank you for purchasing the TEKONE CR-9905 Digital PLL FM Alarm Clock Radio. This manual provides detailed instructions for the setup, operation, and maintenance of your new device. Please read this manual thoroughly before use to ensure proper functionality and to maximize your user experience.
The TEKONE CR-9905 features a clear red LED display, an FM radio with PLL tuning, and an alarm function. It is designed for ease of use and reliable performance.
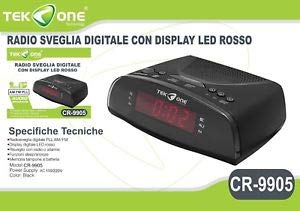
Image: Front view of the TEKONE CR-9905 Digital PLL FM Alarm Clock Radio, showing the red LED display and control buttons.
Setup
1. Unpacking
- Carefully remove the alarm clock radio from its packaging.
- Check for any damage during transit. If damaged, do not use the device and contact customer support.
- Ensure all components are present: the alarm clock radio unit and this user manual.
2. Powering the Device (Battery Installation)
The TEKONE CR-9905 operates on 9V batteries (not included). For continuous operation, it is recommended to use an appropriate AC adapter (not included) in addition to batteries for backup power.
- Locate the battery compartment cover on the bottom or back of the unit.
- Open the battery compartment cover.
- Insert one 9V battery, ensuring the correct polarity (+ and - terminals).
- Close the battery compartment cover securely.
- If using an AC adapter, plug it into the DC input jack on the unit and then into a standard wall outlet.
3. Initial Time Setting
Upon first power-up or after battery replacement, the display may flash or show a default time. Refer to the 'Setting the Time' section under 'Operating' for detailed instructions.
Operating
1. Basic Controls
Familiarize yourself with the buttons on your alarm clock radio. Common buttons include:
- TIME SET: Used to enter time setting mode.
- ALARM SET: Used to enter alarm setting mode.
- HOUR / MIN: Used to adjust hour and minute values.
- SNOOZE / SLEEP: Activates snooze function or sleep timer.
- RADIO ON/OFF: Turns the FM radio on or off.
- TUNING: Adjusts radio frequency.
- VOLUME: Adjusts the sound level.
2. Setting the Time
- Press and hold the TIME SET button until the hour digits begin to flash.
- Use the HOUR button to adjust the hour.
- Press the TIME SET button again, and the minute digits will flash.
- Use the MIN button to adjust the minutes.
- Press TIME SET one more time to confirm and exit time setting mode.
3. Setting the Alarm
- Press and hold the ALARM SET button until the alarm hour digits begin to flash.
- Use the HOUR button to set the desired alarm hour.
- Press the ALARM SET button again, and the alarm minute digits will flash.
- Use the MIN button to set the desired alarm minutes.
- Press ALARM SET one more time to confirm the alarm time.
- To activate the alarm, ensure the alarm switch (if present) is set to 'ON' or the alarm icon is displayed.
- To choose between buzzer or radio alarm, use the ALARM MODE switch (if present).
4. Using the FM Radio
- Press the RADIO ON/OFF button to turn on the FM radio.
- Use the TUNING knob or buttons to scan for your desired FM station.
- Adjust the volume using the VOLUME control.
- To turn off the radio, press the RADIO ON/OFF button again.
5. Volume Adjustment
Rotate the VOLUME knob or press the VOLUME +/- buttons to increase or decrease the sound level of the radio or alarm.
6. Snooze Function
When the alarm sounds, press the SNOOZE button (often a large button on top of the unit) to temporarily silence the alarm. The alarm will sound again after a few minutes (typically 9 minutes).
To stop the alarm completely, press the ALARM OFF button or the RADIO ON/OFF button.
Maintenance
1. Cleaning
- Before cleaning, ensure the device is unplugged from the power source and batteries are removed.
- Wipe the exterior surfaces with a soft, dry cloth.
- Do not use abrasive cleaners, waxes, or solvents as they may damage the finish.
- Avoid getting moisture into any openings.
2. Battery Replacement
When the display dims or the clock loses time frequently, it may be time to replace the 9V battery. Follow the battery installation steps in the 'Setup' section.
- Always use a fresh 9V alkaline battery.
- Dispose of old batteries responsibly according to local regulations.
3. Storage
If the device will not be used for an extended period, remove the batteries to prevent leakage and store the unit in a cool, dry place away from direct sunlight and extreme temperatures.
Troubleshooting
| Problem | Possible Cause | Solution |
|---|---|---|
| Display is blank or dim. | No power, dead battery, or AC adapter not connected/faulty. | Check battery installation and charge. Ensure AC adapter is securely plugged in. Replace battery if necessary. |
| Alarm does not sound. | Alarm not set, alarm volume too low, or alarm function is off. | Verify alarm time is set correctly. Increase alarm volume. Ensure alarm is activated (alarm icon visible). |
| Radio static or poor reception. | Weak signal, antenna not extended, or interference. | Extend the FM wire antenna fully. Reposition the unit for better reception. Tune to a stronger station. |
| Clock loses time. | Low battery power. | Replace the 9V battery with a fresh one. |
Specifications
- Model: CR-9905
- Display Type: Digital LED (Red)
- Radio Type: PLL FM
- Power Source: 9V Battery (not included) / AC Adapter (not included)
- Functions: Clock, Alarm, FM Radio, Snooze
- Mounting Type: Tabletop
- Dimensions (Package): Approximately 16.99 x 14 x 5.99 cm
- Weight (Product): Approximately 399.16 g
- Manufacturer: TEKONE
Warranty and Support
TEKONE products are manufactured to high-quality standards. For warranty information or technical support, please refer to the warranty card included with your purchase or contact TEKONE customer service directly. Please have your model number (CR-9905) and purchase details ready when contacting support.
For further assistance, please visit the official TEKONE website or contact your retailer.
Ask a question about this manual
Ask about setup, troubleshooting, compatibility, parts, safety, or missing instructions. Manuals+ will review the question and use this page’s manual context to help answer it.