
rockspace F-253
rockspace WiFi Extender User Manual
Model: F-253
1. Product Overview
The rockspace WiFi Extender is designed to expand the coverage of your existing wireless network, eliminating Wi-Fi dead zones and providing stable, high-speed internet access throughout your home or office. It supports dual-band operation (2.4GHz and 5GHz) for optimal performance.
- Dual Band High Speed: Offers combined speeds of up to 1167 Mbps (300Mbps for 2.4GHz and 867Mbps for 5GHz), ideal for HD streaming and online gaming.
- Wide Coverage: Extends Wi-Fi coverage up to 1292 sq.ft., reaching previously uncovered areas.
- Smart Signal Indicator: Helps in finding the best placement for optimal signal extension.
- High Compatibility: Works with all 802.11 a/b/g/n/ac standard routers and gateways.
- Access Point Function: Includes a Gigabit Ethernet port for wired connections or to function as a wireless access point.
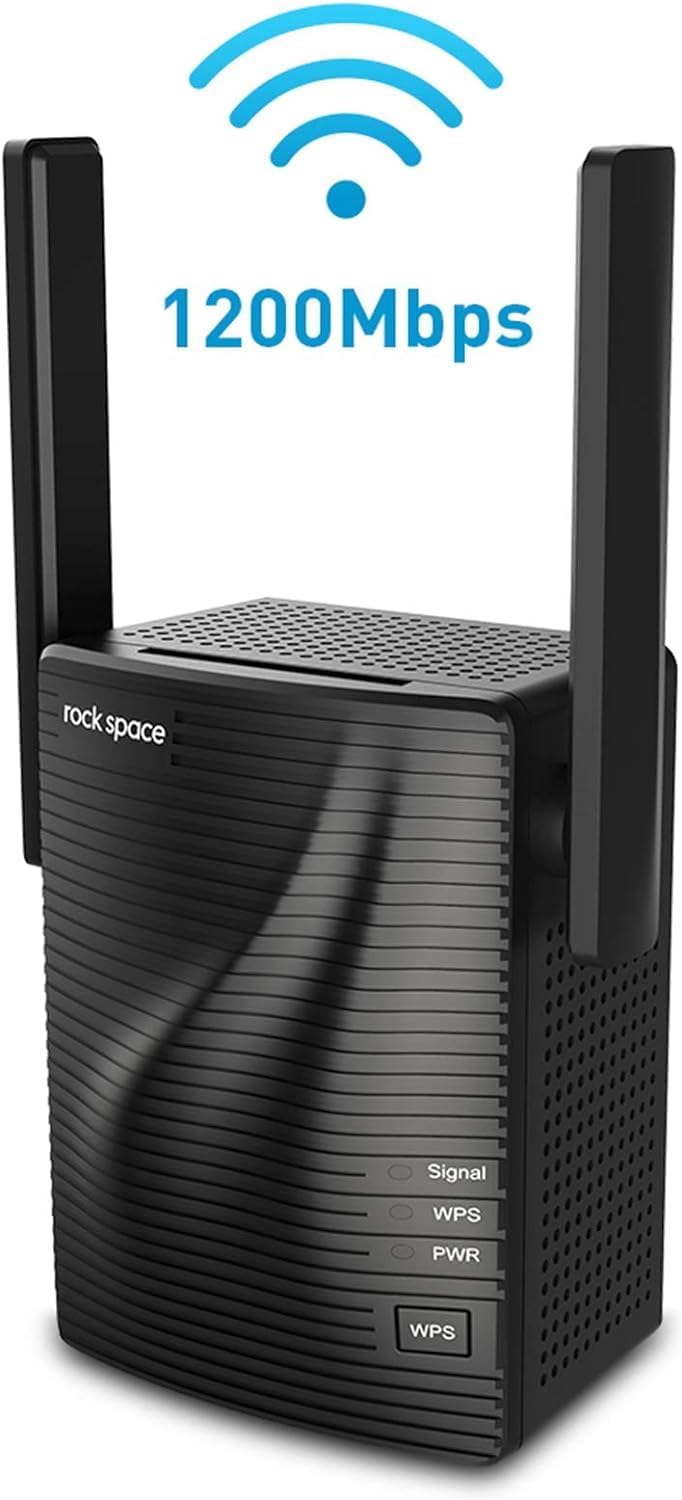
Figure 1: Front view of the rockspace WiFi Extender, showing indicator lights and WPS button.
2. Package Contents
Please check the package contents upon unboxing:
- rockspace WiFi Extender (Model F-253)
- Quick Installation Guide
- Warranty Card
- Antenna (pre-attached)
3. Specifications
| Feature | Detail |
|---|---|
| Brand | rockspace |
| Model Number | F-253 |
| Wireless Type | 802.11a/b/g/n/ac |
| Data Transfer Rate | Up to 1200 Mbps (300Mbps 2.4GHz, 867Mbps 5GHz) |
| Frequency Band Class | Dual-Band |
| Connector Type | RJ45 (Ethernet Port) |
| Operating System Compatibility | Windows XP/Vista/7/8/8.1/10, Mac OS, iOS, Android, Linux |
| Item Weight | 9.1 ounces |
| Product Dimensions (LxWxH) | 3 x 2.5 x 2.5 inches |
4. Setup Instructions
The rockspace WiFi Extender offers two primary setup methods: WPS (Wi-Fi Protected Setup) for quick connection, and Web Browser setup for more detailed configuration.
4.1. WPS Setup (Recommended for quick setup)
- Plug the rockspace WiFi Extender into a power outlet near your existing router. Wait for the PWR indicator light to turn solid blue.
- Press the WPS button on your router.
- Within two minutes, press the WPS button on the rockspace WiFi Extender. The WPS indicator light will blink during the connection process.
- Once the WPS indicator light on the extender turns solid blue, the setup is complete. The Signal indicator light will also turn on, indicating a successful connection.

Figure 2: Visual guide for one-click WPS setup.
4.2. Web Browser Setup
- Plug the rockspace WiFi Extender into a power outlet. Wait for the PWR indicator light to turn solid blue.
- On your mobile device or computer, turn off your mobile data (if applicable) and connect to the Wi-Fi network named "rockspace_EXT". This network does not require a password.
- Open a web browser (e.g., Chrome, Safari) and enter
re.rockspace.localor192.168.0.254in the address bar. - Follow the on-screen instructions to create a login password for the extender.
- Select the existing Wi-Fi network you wish to extend from the list.
- Enter the password for your existing Wi-Fi network.
- The extender will then create extended networks (e.g., "YourNetworkName_EXT" and "YourNetworkName_5GEXT").
- Once setup is complete, reconnect your devices to the new extended Wi-Fi networks.

Figure 3: Setting up the extender via a web browser on a mobile phone.

Figure 4: Illustration of dual-band performance (2.4GHz and 5GHz) provided by the extender.

Figure 5: Depiction of stable dual band transmission for various devices.
4.3. Setup Video Guide
For a visual walkthrough of the setup process, please refer to the official rockspace setup video:
Video 1: Official setup guide for the rockspace AC 1200 WiFi Extender, demonstrating both WPS and web browser setup methods.
5. Operating Instructions
After successful setup, the rockspace WiFi Extender will broadcast extended Wi-Fi networks. To ensure optimal performance, consider the following:
- Connecting Devices: Connect your Wi-Fi enabled devices (smartphones, tablets, laptops, smart TVs) to the new extended network names (e.g., "YourNetworkName_EXT" or "YourNetworkName_5GEXT"). Use the same password as your original router's Wi-Fi network.
- Optimal Placement: Place the extender roughly halfway between your main router and the Wi-Fi dead zone you wish to cover. The Signal LED indicator on the extender will help you determine the best location:
- Blue: Proper position, good signal strength.
- Red: Too far from the router, move closer.
- Off: No signal, move closer to the router.
- Ethernet Port Usage: The Gigabit Ethernet port can be used to connect a wired device (like a desktop PC, gaming console, or smart TV) to the extended network, providing a stable wired connection. It can also be used to connect the extender directly to your router, functioning as a wireless access point.

Figure 6: Guide illustrating optimal placement of the WiFi extender between the router and the dead zone.
6. Maintenance
To ensure the longevity and optimal performance of your rockspace WiFi Extender:
- Keep the device in a well-ventilated area to prevent overheating.
- Avoid placing the extender near large metal objects, concrete walls, or other electronic devices that may cause interference.
- Periodically check for firmware updates on the official rockspace website to ensure the best performance and security.
- Clean the device gently with a dry, soft cloth. Do not use liquid cleaners.
7. Troubleshooting
If you encounter issues with your rockspace WiFi Extender, try the following solutions:
- Extender not connecting to router:
- Ensure the extender is plugged into a working power outlet and the PWR light is solid.
- If using WPS, ensure you press the WPS button on both the router and extender within the two-minute window.
- If Web Browser setup fails, double-check that your mobile device's cellular data is off and you are connected to the "rockspace_EXT" network. Verify the correct address (
re.rockspace.localor192.168.0.254) is entered. - Confirm you are entering the correct password for your existing Wi-Fi network.
- Poor signal or frequent disconnections:
- Relocate the extender. It should be placed where it receives a strong signal from your main router (Signal LED is blue) but is also close enough to the dead zone. Avoid placing it too close to the router or too far away.
- Check for interference from other electronic devices (microwaves, cordless phones, Bluetooth devices).
- Ensure your devices are connected to the extended network (ending in _EXT or _5GEXT) and not the original, weaker signal.
- Extended network names are confusing:
- During web browser setup, you may have the option to customize the extended network names to be different from your original network, which can help in distinguishing them.
- How to Reset the Extender:
- If all else fails, you can perform a factory reset. With the extender powered on, use a needle-shaped object (like a paperclip) to long-press the "RESET" button (usually a small pinhole) on the extender for about 8-10 seconds until all indicator lights blink. This will restore the extender to its factory default settings, and you will need to set it up again.
8. Warranty and Support
For warranty information and technical support, please refer to the documentation included with your product or visit the official rockspace website. Always exercise caution when dealing with electrical devices.
Legal Disclaimer: Please be careful when using electricity.
Related documentsF-253


Ask a question about this manual
Ask about setup, troubleshooting, compatibility, parts, safety, or missing instructions. Manuals+ will review the question and use this page’s manual context to help answer it.