
DUMBORC DUMBORC X6
DUMBORC X6 6-Channel RC Transmitter and Receiver User Manual
Model: DUMBORC X6 | Brand: DUMBORC
1. Introduction
This manual provides detailed instructions for the DUMBORC X6 6-Channel RC Transmitter and P6FG/P6F Receiver kit. This system is designed for remote control cars, boats, and tanks, featuring a built-in gyroscope function and mixed mode capabilities. It offers versatile power charging methods and stable control over long distances.
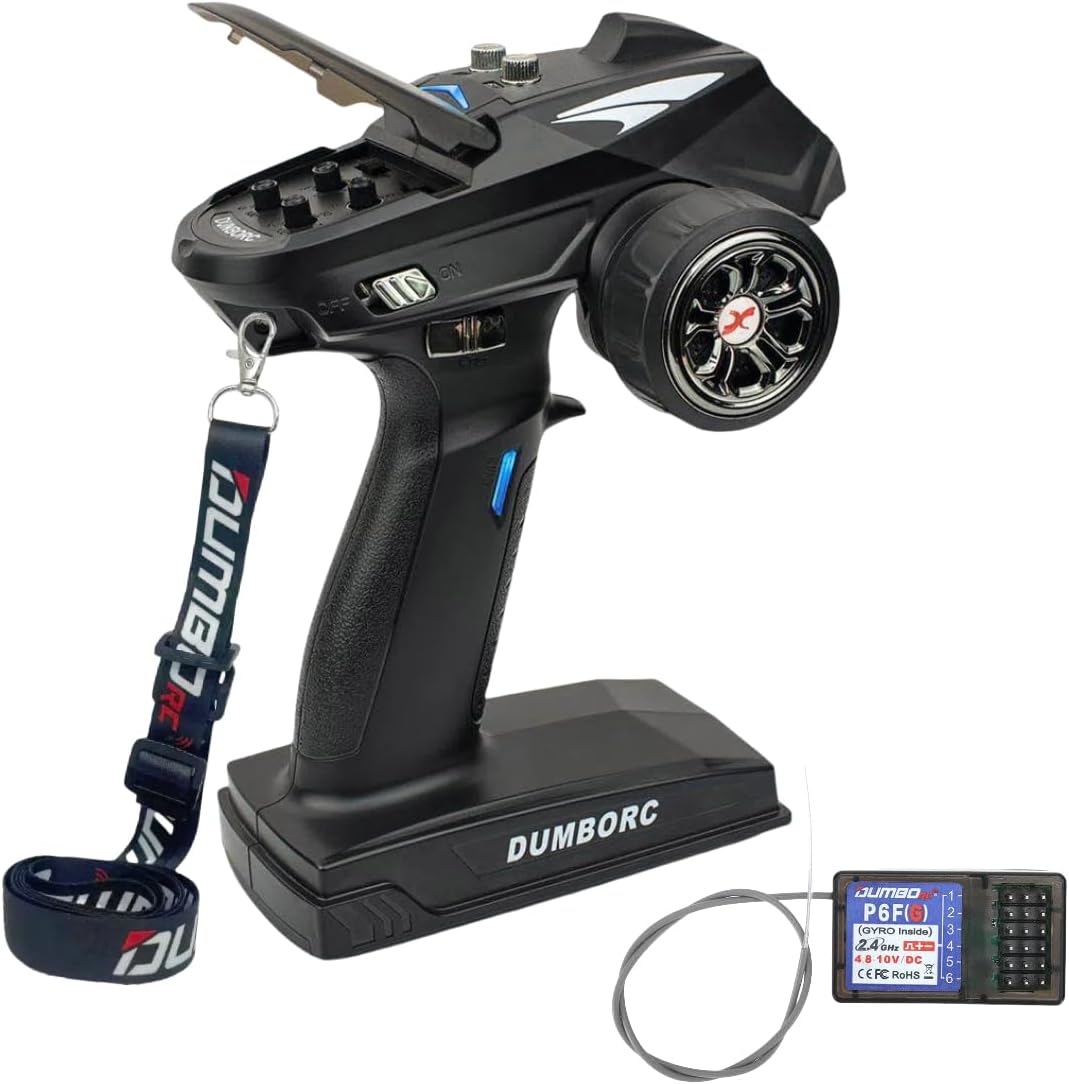
Figure 1: DUMBORC X6 Transmitter and P6FG Receiver
2. What's in the Box
- 1 x DUMBORC X6 Remote Control Transmitter
- 1 x P6FG/P6F Receiver
- 2 x Batteries (Note: 4x 1.5V AA batteries for transmitter are not included)
3. Product Specifications
| Feature | Specification |
|---|---|
| Brand | DUMBORC |
| Item No. | X6 (transmitter), P6FG/P6F (receiver) |
| Product Size | 20.5 x 16 x 10 cm |
| Receiver Size | 3.5 x 2 x 1.3 cm |
| Battery (Transmitter) | 4x 1.5V AA (Not included) |
| Channel | 6CH |
| Fit For | RC Car, Boat, Tank Model |
| Modulation Mode | GFSK |
| Spreading Mode | FHSS 67 channel pseudo-random frequency hopping |
| Control Distance | 400-500 meters |
| Remote Control Voltage Range | 4.8-12V |
| Remote Control Working Current | 80-120mA |
| Receiver Voltage Range | 3.3-10V |
| Receiver Operating Current | 30mA |
| RF Power | <20dbm |
| Data Resolution | 4096 levels, 0.5us per level |
| Voltage Alarm | 7.4V | 4.8V |
| Transmission Frequency | 2.4GHz ISM band (2400MHz~2483.5MHz) |
| Supported Receiver | P6F/P6FG |
4. Key Features
- Gun Style Remote Controller: Designed for comfortable one-handed control and ease of operation.
- 2.4GHz Transmission: Provides anti-interference capabilities with a remote control distance of 400-500 meters.
- Three Power Supply Modes: Supports 4x 1.5V AA dry batteries, USB power port (5V only), or a Lithium Battery Socket (any 2S lithium battery with compatible size and interface).
- Low Power Alarm: Alerts when the controller is predicted to disconnect (7.4V/4.8V), allowing safe return of the model and preventing loss.
- Throttle/Steering Direction Switch: Allows users to switch throttle and steering control directions based on personal preference.
- Throttle Sensitivity Fine Adjustment: Enables precise control of motor differential speed.
- Forward, Back, and Steering Proportional Speed Change: Offers adjustable speed control for various operational needs.
- Built-in Gyro Function: Helps the model maintain a straight path and improves control, with adjustable sensitivity.
- Mixed Mode: Supports mixed control of channels 1 and 2, useful for DIY models with dual motors or tank-like steering.
5. Setup Guide
5.1 Controller Power Supply
The DUMBORC X6 transmitter offers three methods for power supply:
- Dry Battery: Insert 4x 1.5V AA batteries into the battery compartment, ensuring correct polarity.
- Lithium Battery: Install a 2S lithium battery into the lithium battery socket. The socket has anti-reverse insertion protection to prevent damage from incorrect connection.
- USB Power Port: Connect a USB cable to the controller's USB power port and a mobile power supply. Important: Only use a 5V power supply to avoid damaging the remote controller.

Figure 2: Controller Power Supply Options
5.2 Binding Transmitter to Receiver
To establish a connection between your DUMBORC X6 transmitter and the P6FG/P6F receiver, follow these steps:
- Connect the receiver to power. Ensure +5 volts (red wire) goes to any middle pin and -5 volts (black wire) to any pin closest to the receiver's edge (farthest from the antenna). The green LED on the receiver should be lit.
- Turn on the transmitter.
- To bind the receiver, locate the small black button in the hole next to the receiver's antenna. Use a paperclip or similar thin object to press and hold this button for 1 to 2 seconds.
- The green LED on the receiver should blink for a few seconds during the binding process. Once successfully bound, the LED will remain steady.
5.3 Steering Wheel Installation
The steering wheel can be easily installed or removed for convenience:
- Push the steering buckle up and down.
- Locate the slot and push the steering wheel into it until it clicks securely into place.

Figure 3: Steering Wheel Installation
6. Operating Instructions
6.1 Channel Functions Overview
The DUMBORC X6 transmitter features 6 channels, each with specific functions:
- Channel 1: Direction (Steering)
- Channel 2: Throttle (Forward/Backward/Brake)
- Channel 3: Control positive and negative output (e.g., for lights or other accessories)
- Channel 4: Tap Position (often used for multi-position switches)
- Channel 5: Dial (adjustable from zero to high)
- Channel 6: Gyro sensitivity adjustment (also a dial)

Figure 4: Transmitter Channel Functions
6.2 Gyro Function Setting
The P6FG receiver includes a built-in gyroscope to assist with stable driving. To activate or deactivate the gyro function and adjust its sensitivity:
- Ensure the receiver is powered on (green LED lit).
- To toggle the gyro mode, press the small button next to the antenna on the receiver three times in quick succession. The red LED will blink and then remain on when the gyro is activated (both red and green LEDs will be lit). Pressing it three times again will disable the gyro (red LED turns off).
- The 6th channel knob on the transmitter is used to adjust the sensitivity of the gyro. Rotate the knob to increase or reduce the gyro's effect.
- For optimal performance, ensure the receiver is mounted horizontally on your model.
Video 1: Gyro Function Setting Guide. This video demonstrates how to activate, deactivate, and adjust the sensitivity of the built-in gyroscope on the P6FG receiver using the transmitter's 6th channel knob.
6.3 Mixed Mode Setting
Mixed mode is ideal for models with two motors (e.g., tanks or dual-propeller motorboats) where the steering wheel controls the speed difference between the left and right motors, and the throttle controls overall speed. To switch between normal and mixed steering mode:
- Turn off the transmitter.
- Pull the throttle trigger all the way forward (towards the front of the transmitter) and twist the steering wheel fully clockwise simultaneously.
- While holding the trigger and steering wheel in position, turn on the transmitter. The top LED should blink red-blue.
- Release the steering wheel and throttle trigger.
- Pull the throttle trigger all the way backward (against the handle-stop). The top LED should change to a solid color: blue for normal steering, or red for mixed steering.
Video 2: Mixed Mode Setting Guide. This video illustrates the process of enabling or disabling mixed mode on the DUMBORC X6 transmitter for dual-motor control applications.
6.4 Setting Channels 1-6 (New Pro Version)
For the new Pro Version of the DUMBORC X6, follow these steps to enter the setting mode and adjust channels 1-6:
- Turn off the transmitter.
- Pull the throttle trigger all the way backward (against the handle-stop) and twist the steering wheel fully counter-clockwise simultaneously.
- While holding the trigger and steering wheel in position, turn on the power.
- Release the steering wheel and throttle trigger. The blue lights on the transmitter will start flashing, indicating it's ready for resetting.
- Press the Channel 3 button (located below the trigger).
- Now you can start setting channels 1-6. Push the Steering and Throttle forward and backward to set their ranges.
- To confirm the settings, press the Channel 3 button again.
Video 3: DUMBORC Transmitter New Pro Version Setting Mode. This video guides you through entering the setting mode and adjusting channel ranges on the new Pro Version transmitter.
6.5 3-4 Channel Setting
To adjust the positive and negative settings for channels 3 and 4:
- Enter the 3-4 channel setting mode (refer to the video for specific steps).
- Adjust the 3-4CH range route using the knobs located under the cover on the transmitter.
- Press the 3CH knob to confirm the setting.
Video 4: 3-4 Channel Setting Guide. This video demonstrates how to enter and adjust settings for channels 3 and 4 on the DUMBORC X6 transmitter.
6.6 1-2 Channel Setting
To adjust the range route for channels 1 and 2:
- Enter the 1-2 channel reset mode (refer to the video for specific steps).
- Adjust the 1-2 channel range route using the appropriate controls.
- Press the 3CH knob to confirm the setting.
Video 5: 1-2 Channel Setting Guide. This video demonstrates how to enter and adjust settings for channels 1 and 2 on the DUMBORC X6 transmitter.
6.7 Light System Integration (X6DCG Receiver)
If you are using the X6DCG Light System Receiver, you can integrate and control your RC model's lights:
- Connect the light system to the appropriate channels on the X6DCG receiver.
- Use the transmitter to control the light functions. The video demonstrates how to bind the transmitter with the light system receiver and operate the lights.
Video 6: 6-Channel Transmitter with X6DCG Lights System Receiver. This video shows the setup and operation of the DUMBORC X6 transmitter with a light system receiver.
7. Maintenance
- Cleaning: Regularly wipe the transmitter and receiver with a soft, dry cloth. Avoid using harsh chemicals or solvents.
- Storage: Store the unit in a cool, dry place away from direct sunlight and extreme temperatures. Remove batteries if storing for extended periods to prevent leakage.
- Battery Care: Ensure batteries are charged according to their specifications. Do not overcharge or deep discharge lithium batteries.
- Physical Inspection: Periodically check for any loose connections, damaged wires, or physical wear and tear.
8. Troubleshooting
Common Issues and Solutions:
- Throttle Not Working in Reverse: If your model's throttle does not work in reverse, ensure you are using a two-way Electronic Speed Controller (ESC). Try reprogramming your ESC. It is also recommended to keep the "sub-trim for steering/Throttle" at 0 and "EPA for steering /Throttle" at 80.
- Gyro Not Functioning Correctly: Ensure the receiver is mounted horizontally on your model. If the gyro works in reverse, press the small button next to the antenna twice to change its direction.
- Loss of Control/Disconnection: The transmitter has a low power alarm (7.4V/4.8V). Ensure your batteries are adequately charged. Maintain control distance within 400-500 meters.
- Difficulty Binding: Ensure the receiver is properly powered and the binding button is pressed correctly for 1-2 seconds. Check that the transmitter is turned on during the binding process.
- No Reverse After Installation: If your rig loses reverse after installing the system, adjust the throttle trim to ensure you get maximum power forward and some power backward. This is especially relevant if using a non-name brand ESC.
9. Warranty and Support
For warranty information, technical support, or any product-related inquiries, please contact DUMBORC customer service through the retailer where you purchased the product or visit the official DUMBORC website for contact details. Please retain your proof of purchase for warranty claims.
Related documentsDUMBORC X6


Ask a question about this manual
Ask about setup, troubleshooting, compatibility, parts, safety, or missing instructions. Manuals+ will review the question and use this page’s manual context to help answer it.