
1. Introduction
The Maxcio Smart WiFi Garage Door Opener Remote Controller allows for remote operation and monitoring of your garage door using a smartphone application or voice commands. This device integrates with existing garage door motors to provide smart control, security notifications, and scheduling capabilities.
2. Safety Information
- Ensure all power to the garage door motor is disconnected before installation to prevent electrical shock.
- Keep hands and clothing clear of moving garage door parts during operation.
- This device is designed for use with compatible garage door openers. Refer to the compatibility section before installation.
- Do not allow children to operate the garage door opener without supervision.
- Regularly inspect the garage door and its components for proper function and safety.
3. Product Overview and Package Contents
The Maxcio Smart WiFi Garage Door Opener Remote Controller package includes the main control unit, a sensor, connection cables, and mounting accessories. Familiarize yourself with all components before beginning installation.
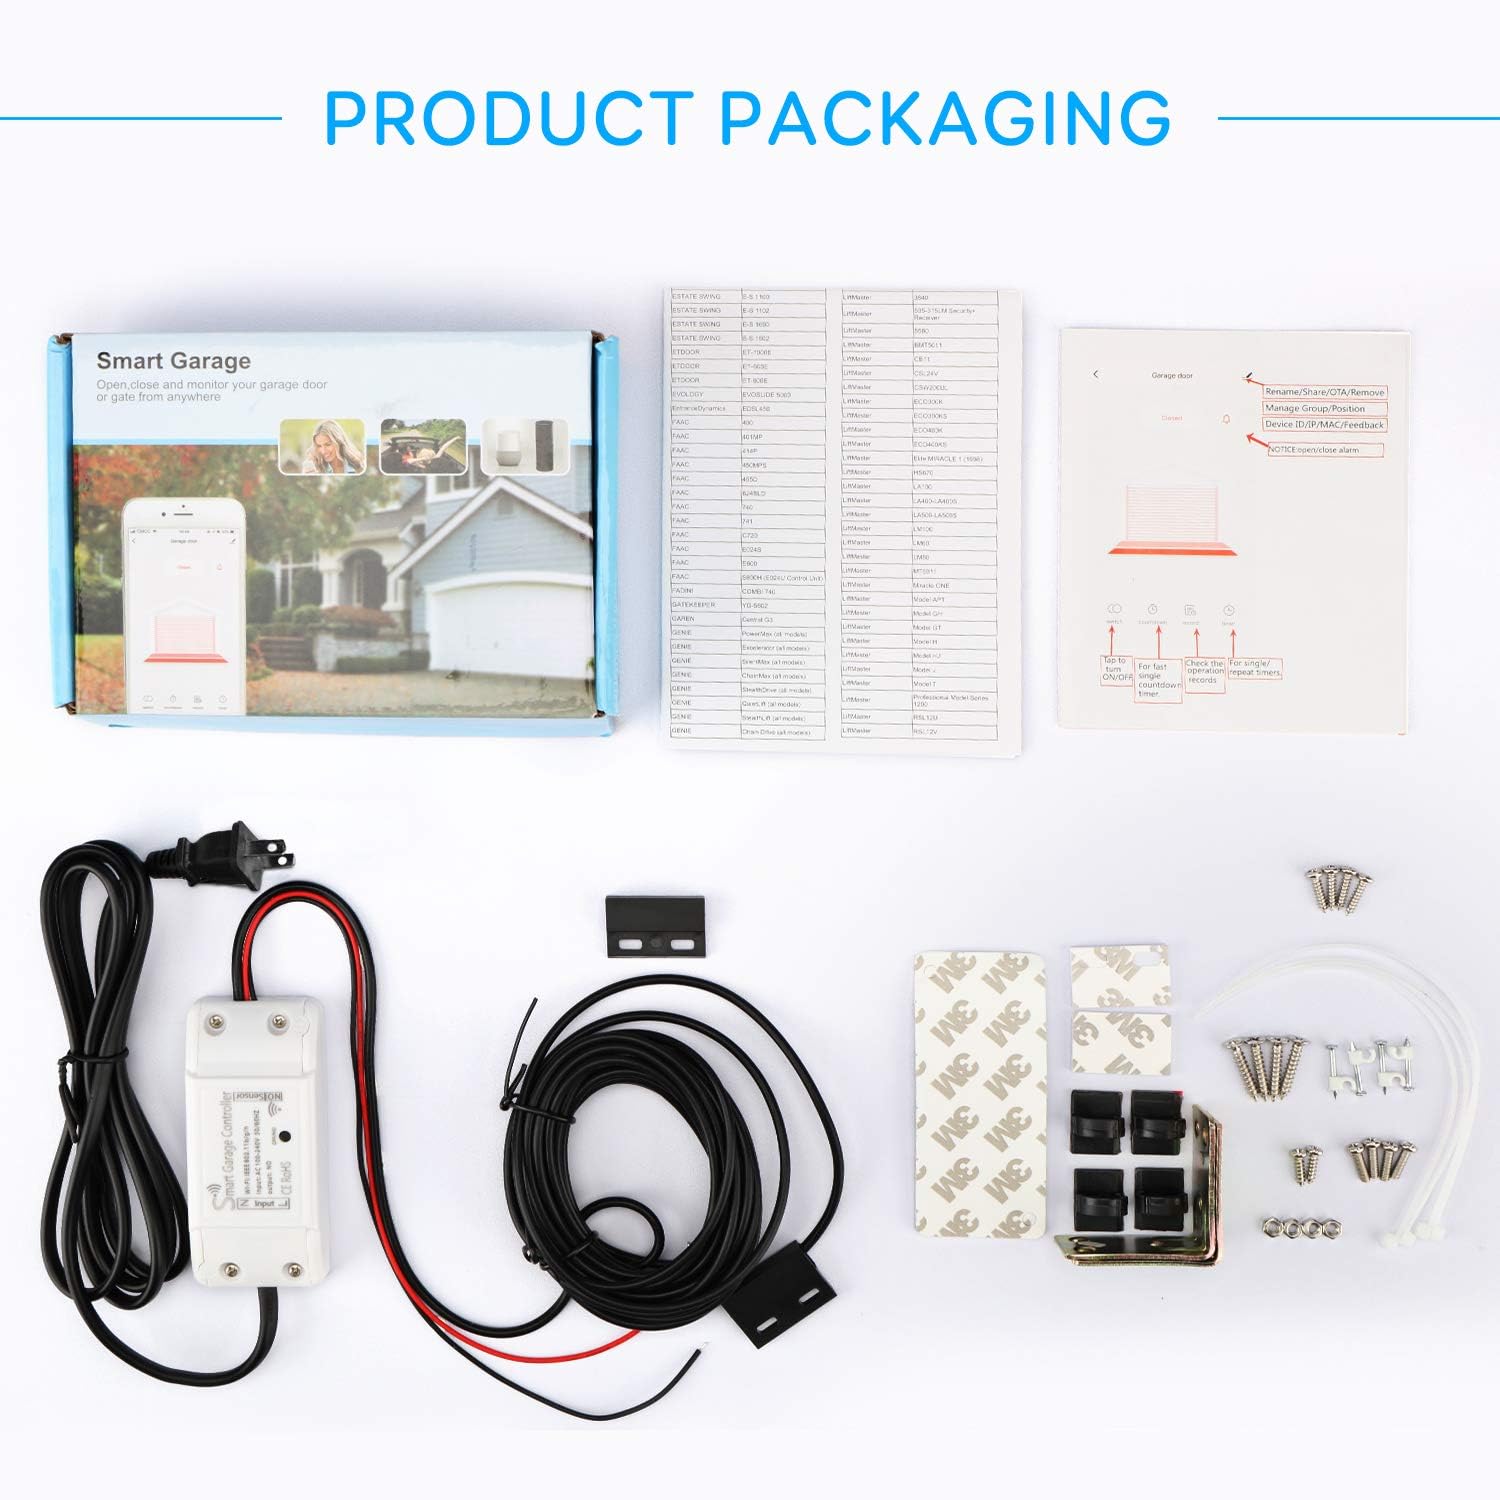
Image: Product Packaging and Components. This image displays the contents of the Maxcio Smart WiFi Garage Door Opener package, including the main controller unit, the door sensor, power adapter, connection wires, and various mounting accessories such as screws and adhesive pads.
Package Contents:
- Smart Garage Door Controller Unit
- Door Sensor (with cable)
- Power Adapter
- Connection Wires
- Mounting Screws and Anchors
- Adhesive Pads
- User Manual (this document)
4. Specifications
| Feature | Specification |
|---|---|
| Wireless Standard | IEEE802.11b/g/n |
| Wireless Type | 2.4GHz (5GHz not supported) |
| Using App | Tuya / SmartLife (Android & iOS) |
| Voice Control | Compatible with Alexa Echo and Google Home |
| Connection Wire Length | 5 meters |
| Working Temperature | -10℃ ~ 50℃ |
| Item Size (L*W*H) | 3.5 * 1.5 * 1.0 inches |
| Item Weight | 4.5 oz |
| Material | Plastic, Metal |
| Control Method | App, Voice |
| Connectivity Protocol | Wi-Fi |
5. Compatibility
This device is compatible with most garage door motors on the market. It requires a 2.4GHz Wi-Fi network for operation. Before installation, verify your garage door opener's compatibility by checking the provided list or contacting support if your model is not listed.
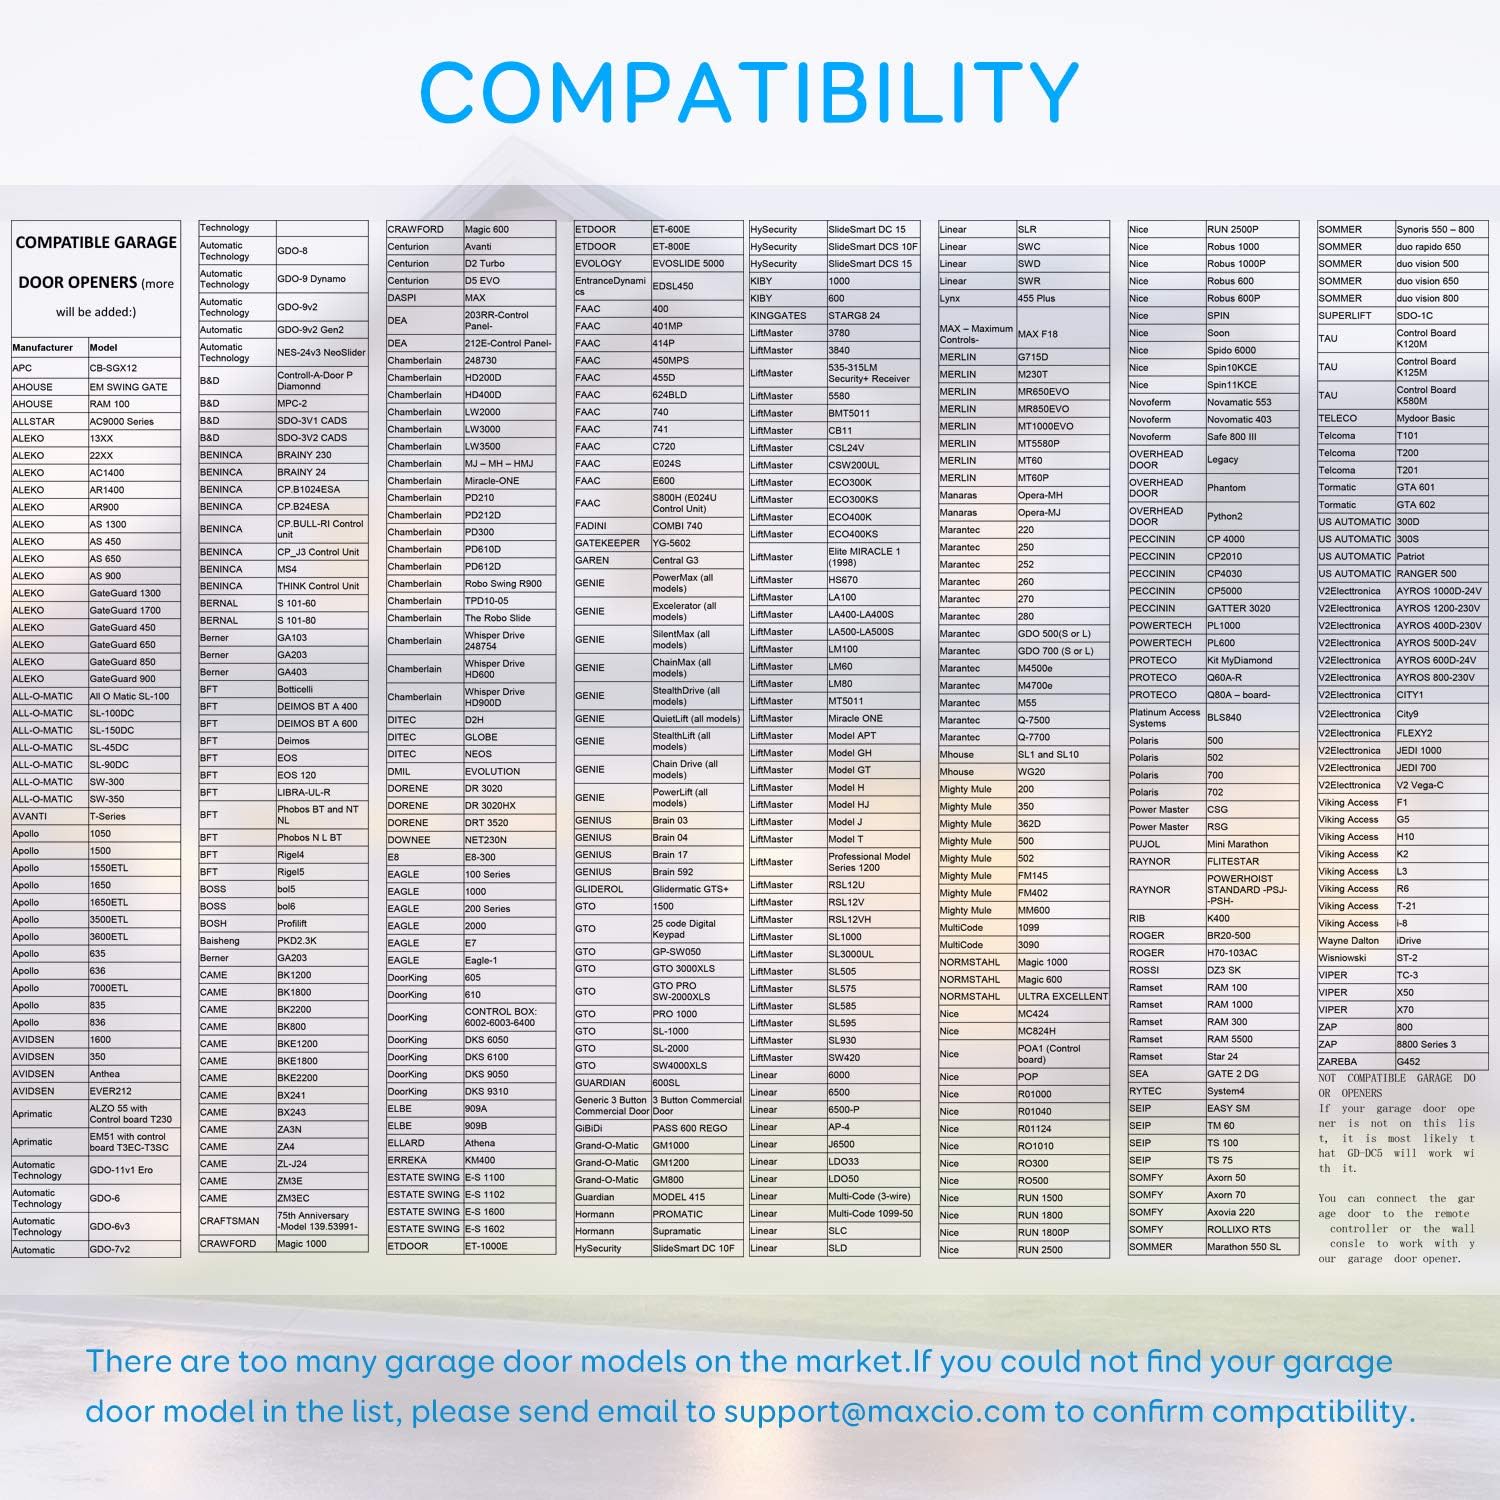
Image: Compatibility List. This image displays a detailed list of garage door opener brands and models that are compatible with the Maxcio Smart WiFi Garage Door Opener. Users should consult this list to confirm their existing opener's compatibility.
If your garage door model is not found in the compatibility list, please contact support@maxcio.com to confirm compatibility before proceeding with installation.
6. Setup and Installation
Follow these steps for proper installation of your Maxcio Smart WiFi Garage Door Opener Remote Controller.
6.1 Pre-Installation Checks
- Ensure your Wi-Fi network is 2.4GHz. The device does not support 5GHz Wi-Fi.
- Verify that the Wi-Fi signal strength is acceptable near your garage door.
- Confirm your garage door opener's compatibility using the list in Section 5.
6.2 Physical Installation

Image: Easy Installation Diagram. This diagram illustrates the two main steps for installing the Maxcio Smart WiFi Garage Door Opener. Step 1 shows the wiring connections to the garage door motor. Step 2 details the placement and mounting of the sensor on the garage door and wall.
- Mount the Controller: Choose a suitable location near your garage door motor and a power outlet. Mount the smart controller unit using the provided screws or adhesive pads.
- Connect Wires to Garage Door Motor: Identify the control terminals on your garage door motor (typically labeled COM, NO, GND, SENSE, or similar). Connect the controller's output wires to the corresponding terminals that trigger the door's open/close function. Refer to your garage door opener's manual for specific wiring instructions.
- Install the Sensor: Attach the two parts of the door sensor to the garage door. One part should be mounted on the stationary wall or door frame, and the other on the moving part of the garage door. Ensure they are aligned and close enough to detect open/close status when the door moves. Connect the sensor cable to the smart controller unit.
- Power On: Connect the power adapter to the smart controller unit and plug it into a power outlet. The indicator light on the controller should illuminate.
6.3 App Pairing
- Download the App: Download and install the 'Smart Life' or 'Tuya' app from your smartphone's app store (available for Android and iOS).
- Register/Log In: Open the app and register for a new account or log in with an existing one.
- Add Device: In the app, tap '+' or 'Add Device'. Select 'Garage Door Opener' or a similar category.
- Connect to Wi-Fi: Follow the in-app instructions to connect the device to your 2.4GHz Wi-Fi network. This typically involves putting the device into pairing mode (often by pressing and holding a button on the controller) and entering your Wi-Fi password.
- Name the Device: Once successfully paired, you can rename your garage door opener for easy identification within the app.
7. Operating Instructions
After successful installation and pairing, you can control and monitor your garage door using the Smart Life/Tuya app or voice commands.
7.1 Remote Control via App

Image: Remote Control via App. This image depicts a user operating their garage door remotely using the Smart Life mobile application on their smartphone. The app interface shows the garage door status as 'Opened' and provides controls for operation.
- Open/Close: Tap the corresponding button in the app to open or close your garage door from anywhere with an internet connection.
- Status Monitoring: The app displays the current status of your garage door (open or closed) in real-time.
- Notifications: Receive instant notifications on your smartphone when the garage door opens or closes. This feature enhances security by alerting you to any unauthorized access or if you forget to close the door.
- Operation Record: The app maintains a history of all garage door operations, including open/close times and user actions.
- Timer/Schedule: Set schedules for your garage door to automatically open or close at specific times, for example, ensuring it closes every night.

Image: Security Notifications. This image illustrates the security feature of the Maxcio Smart WiFi Garage Door Opener, showing a smartphone notification that reads 'Garage door closed at 8:35'. This notification system helps users stay informed about their garage door's status and enhances home security.
7.2 Voice Control
The Maxcio Smart WiFi Garage Door Opener is compatible with Amazon Alexa and Google Home for hands-free voice control.

Image: Voice Control Integration. This image demonstrates the voice control capability of the Maxcio Smart WiFi Garage Door Opener, showing individuals interacting with Amazon Alexa and Google Assistant devices to open or close their garage door using spoken commands.
- Linking Accounts: In the Alexa or Google Home app, enable the 'Smart Life' or 'Tuya' skill/service and link your account.
- Voice Commands: Use commands such as:
- "Alexa, open the garage door."
- "Hey Google, close the garage door."
- "Alexa, is the garage door open?"
7.3 Family Sharing
You can authorize family members or trusted individuals to access and control your garage door through the Smart Life/Tuya app's sharing function. This allows multiple users to manage the garage door without needing to share account credentials.

Image: Application Scenarios. This image illustrates the versatility of the Maxcio Smart Garage Controller, showcasing its potential use across different types of doors, including warehouse doors, car park doors, shop doors, and standard residential garage doors.
8. Maintenance
- Keep the device clean and free from dust.
- Ensure the door sensor remains properly aligned and securely attached.
- Periodically check all wiring connections for security.
- Ensure your Wi-Fi network is stable and the device has a strong signal.
9. Troubleshooting
| Problem | Possible Cause | Solution |
|---|---|---|
| Device fails to pair with app | Incorrect Wi-Fi frequency (5GHz), weak Wi-Fi signal, incorrect pairing mode. | Ensure your router is broadcasting a 2.4GHz Wi-Fi signal. Move the device closer to the router. Re-enter pairing mode as per app instructions. |
| Garage door does not respond to commands | Incorrect wiring to garage door motor, power issue, app not connected to device. | Check all wiring connections to the garage door motor. Verify the controller has power. Ensure the device is online in the app. |
| Door status is incorrect in app | Door sensor misalignment or damage. | Check the alignment and secure attachment of the door sensor components. Ensure the sensor cable is properly connected. |
| Voice control not working | Alexa/Google Home account not linked, incorrect commands. | Ensure the 'Smart Life' or 'Tuya' skill/service is enabled and linked in your Alexa/Google Home app. Use the correct voice commands as specified in Section 7.2. |
10. Warranty and Support
For any issues, questions, or support needs, please contact Maxcio customer service. The app is free, with no hidden fees or monthly subscriptions.
Email Support: support@maxcio.com
If you have attempted troubleshooting steps and are still experiencing difficulties, please reach out to our technical support team for assistance.