1. Introduction
Thank you for choosing the Optonica Solar LED Projector. This manual provides essential information for the safe and efficient use of your solar-powered lighting system. Please read these instructions carefully before installation and operation, and retain them for future reference.
2. Safety Instructions
- Ensure all connections are secure and properly insulated to prevent electrical hazards.
- Do not attempt to disassemble or modify the product. Unauthorized modifications may void the warranty and pose safety risks.
- Keep the solar panel and projector away from flammable materials.
- Avoid direct eye exposure to the LED light when it is active, as it can be very bright.
- Install the solar panel in a location that receives maximum direct sunlight for optimal charging performance.
- This product is waterproof; however, avoid submerging it in water.
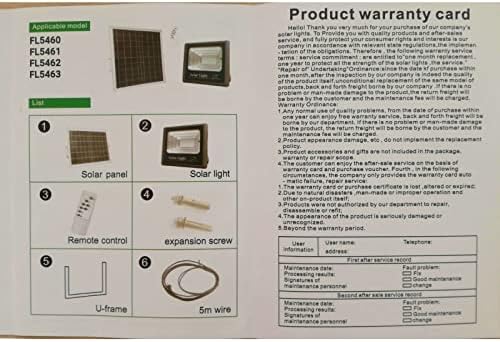
3. Package Contents
Please verify that all components are present in your package:

This image shows the product warranty card and a diagram illustrating the package contents, including the solar panel, solar light, remote control, expansion screws, U-frame, and 5m wire.
- Solar Panel
- Solar Light (LED Projector)
- Remote Control
- Expansion Screws (for mounting)
- U-frame (for mounting)
- 5-meter Connection Wire
4. Product Overview
The Optonica Solar LED Projector system consists of a high-efficiency solar panel, a powerful LED projector, and a convenient remote control for various lighting modes.
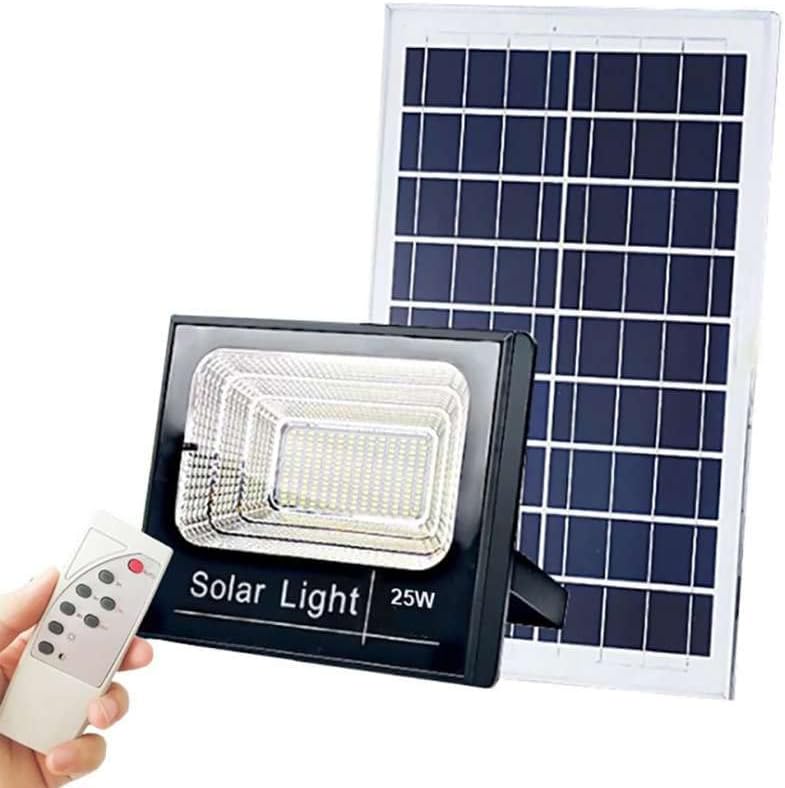
This image displays the Optonica Solar LED Projector, its accompanying solar panel, and the remote control. The projector is a black rectangular unit with an LED array, and the solar panel is a larger rectangular panel designed to capture sunlight.
4.1 Solar Panel
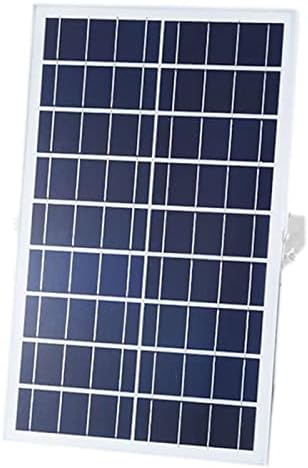
A close-up view of the solar panel component, showing its photovoltaic cells designed to convert sunlight into electrical energy.
The solar panel converts sunlight into electrical energy, which is stored in the projector's internal battery. It is designed for outdoor use and should be positioned to receive maximum direct sunlight.
4.2 LED Projector
The projector houses the LED light source and the rechargeable battery. It is designed to be waterproof and durable for outdoor environments, providing bright illumination.
4.3 Remote Control
A detailed view of the remote control for the Optonica Solar LED Projector, with labels indicating the functions of each button, such as AUTO, 3H, 5H, 8H, ON, OFF, and brightness adjustment.
The remote control allows you to manage the projector's functions, including power, automatic mode, timer settings, and brightness levels.
5. Setup and Installation
Follow these steps for proper installation:
- Choose a Location: Select a mounting location for the solar panel that receives at least 6-8 hours of direct sunlight daily. The projector can be mounted separately in the desired lighting area.
- Mount the Solar Panel: Use the U-frame and expansion screws to securely mount the solar panel. Adjust its angle to face the sun directly for maximum efficiency.
- Mount the Projector: Install the LED projector in your chosen location using appropriate mounting hardware (e.g., on a wall). Ensure it is stable and directed as desired.
- Connect the Components: Connect the 5-meter wire from the solar panel to the input port on the LED projector. Ensure the connection is firm.
- Initial Charge: Allow the solar panel to charge the projector's battery for at least 8-10 hours in direct sunlight before first use.
6. Operating Instructions
Use the remote control to operate the projector:
- AUTO Button: Activates the automatic mode. The projector will turn on automatically at dusk and turn off at dawn.
- ON Button: Manually turns the projector ON.
- OFF Button: Manually turns the projector OFF.
- 3H / 5H / 8H Buttons: Sets the projector to turn off automatically after 3, 5, or 8 hours of operation, respectively. This function is typically used in conjunction with the ON button.
- Brightness Adjustment Buttons (☀ / ☾): Adjusts the brightness level of the LED light. Use ☀ to increase brightness and ☾ to decrease brightness.
7. Maintenance
- Cleaning: Regularly clean the surface of the solar panel with a soft, damp cloth to remove dust, dirt, or debris. A clean panel ensures optimal charging efficiency.
- Inspection: Periodically check all cables and connections for any signs of wear or damage. Ensure they remain securely connected.
- Battery Care: For optimal battery life, ensure the product receives sufficient sunlight for charging. Avoid prolonged periods of discharge.
8. Troubleshooting
- Projector does not turn on:
- Ensure the solar panel is receiving adequate direct sunlight for charging.
- Check if the connection cable between the solar panel and projector is securely plugged in.
- Verify that the remote control battery is functional.
- Allow for an initial charge of 8-10 hours if it's the first use or after prolonged storage.
- Light is dim or short-lived:
- The solar panel may not be receiving enough sunlight. Relocate or clear any obstructions.
- Clean the solar panel surface to remove dirt or dust.
- Battery capacity might be reduced due to insufficient charging or aging.
- Remote control not working:
- Check and replace the remote control battery if necessary.
- Ensure there are no obstructions between the remote and the projector's sensor.
9. Specifications
| Feature | Specification |
|---|---|
| Brand | Optonica |
| Model Number | FL5462 (also FL5460, FL5461, FL5463) |
| Power | 20 Watts |
| Luminous Flux | 1800 Lumens |
| Color Temperature | 6000K (Daylight White) |
| Voltage | 6.4 Volts |
| Battery Capacity | 11Ah |
| Material | Aluminium |
| Special Feature | Waterproof |
| Power Source | Battery Powered (Solar Charged) |
| Control Method | Remote Control |
| Installation Type | Wall Mount |
10. Warranty and Support
This product comes with a warranty period. Please refer to the warranty card included in your package for specific terms and conditions. Generally, the warranty covers manufacturing defects for a specified period from the date of purchase.
Warranty Conditions:
- Any normal use quality problems within one year from the purchase date are covered.
- Product appearance damage is not covered.
- Product accessories and gifts are not included in the warranty.
- The warranty card or purchase certificate must be presented for service.
- Damage due to natural disasters, improper operation, or unauthorized disassembly is not covered.
- The warranty is void if the product is seriously damaged or unrecognized.
For technical support or warranty claims, please contact your retailer or the manufacturer's customer service with your purchase details and model number (FL5462).


