
Anlapus 6971627216065
Anlapus H.265+ Security System User Manual
Model: 6971627216065
Product Overview
This manual provides detailed instructions for the Anlapus H.265+ Security System, a comprehensive wired analog surveillance camera kit designed for home and business monitoring. It features a Full HD 1080P 8-channel DVR recorder with a pre-installed 1TB hard drive and 2MP outdoor surveillance cameras.

Figure 1: Anlapus H.265+ Security System Components
Key Features:
- H.265+ Full HD 1080p System: Includes an 8-channel 1080p DVR with a built-in 1TB hard drive and four 2.0MP surveillance cameras.
- Advanced Night Vision: Cameras are equipped with 24 IR LEDs and an IR-CUT filter, providing clear night vision up to 24 meters (80 feet).
- Smart Motion Detection: Receive push alerts via the free mobile application when motion is detected, keeping you informed even when away from home.
- IP66 Weatherproof Cameras: Durable plastic housing designed for both indoor and outdoor use, capable of withstanding extreme weather conditions. The cable is integrated into the camera mount for added protection.
- Pre-installed 1TB Hard Drive: Ready for immediate use, specifically designed for continuous surveillance data recording.
- Multiple Recording Modes: Supports 24/7 continuous recording, motion detection recording, scheduled recording, and manual recording.
- Remote Viewing: Access live and recorded footage anytime, anywhere via smartphone, tablet, or PC.
Package Content
Before beginning installation, please verify that all components listed below are present in your package:

Figure 2: Included Package Contents
- 1 x DVR (Digital Video Recorder) with 1TB HDD pre-installed
- 4 x 1080p Surveillance Cameras
- 4 x BNC Video Cables (approx. 18.3m / 60ft each)
- 2 x Power Adapters
- 1 x 1-to-4 Power Splitter Cable
- 1 x USB Mouse
- 1 x Instruction Manual (this document)
- 4 x Mounting Screw Bags
- 4 x Warning Stickers
Setup Guide
1. DVR Connection
- Connect Cameras: Connect each surveillance camera to the BNC video input ports on the back of the DVR using the provided BNC cables. Ensure connections are secure.
- Connect Power: Use the power adapters and the 1-to-4 power splitter cable to power the cameras. Connect the DVR to a power outlet using its dedicated power adapter.
- Connect to Monitor: Connect the DVR to a monitor or TV using an HDMI or VGA cable (not included) to view the live feed and access system settings.
- Connect USB Mouse: Plug the included USB mouse into a USB port on the DVR for navigation.
- Network Connection (Optional but Recommended): For remote viewing and email alerts, connect the DVR to your router using an Ethernet cable (not included).
2. Camera Installation
The cameras are designed for both indoor and outdoor use, with an IP66 weatherproof rating. Choose strategic locations that provide optimal coverage and are within reach of the BNC cables.
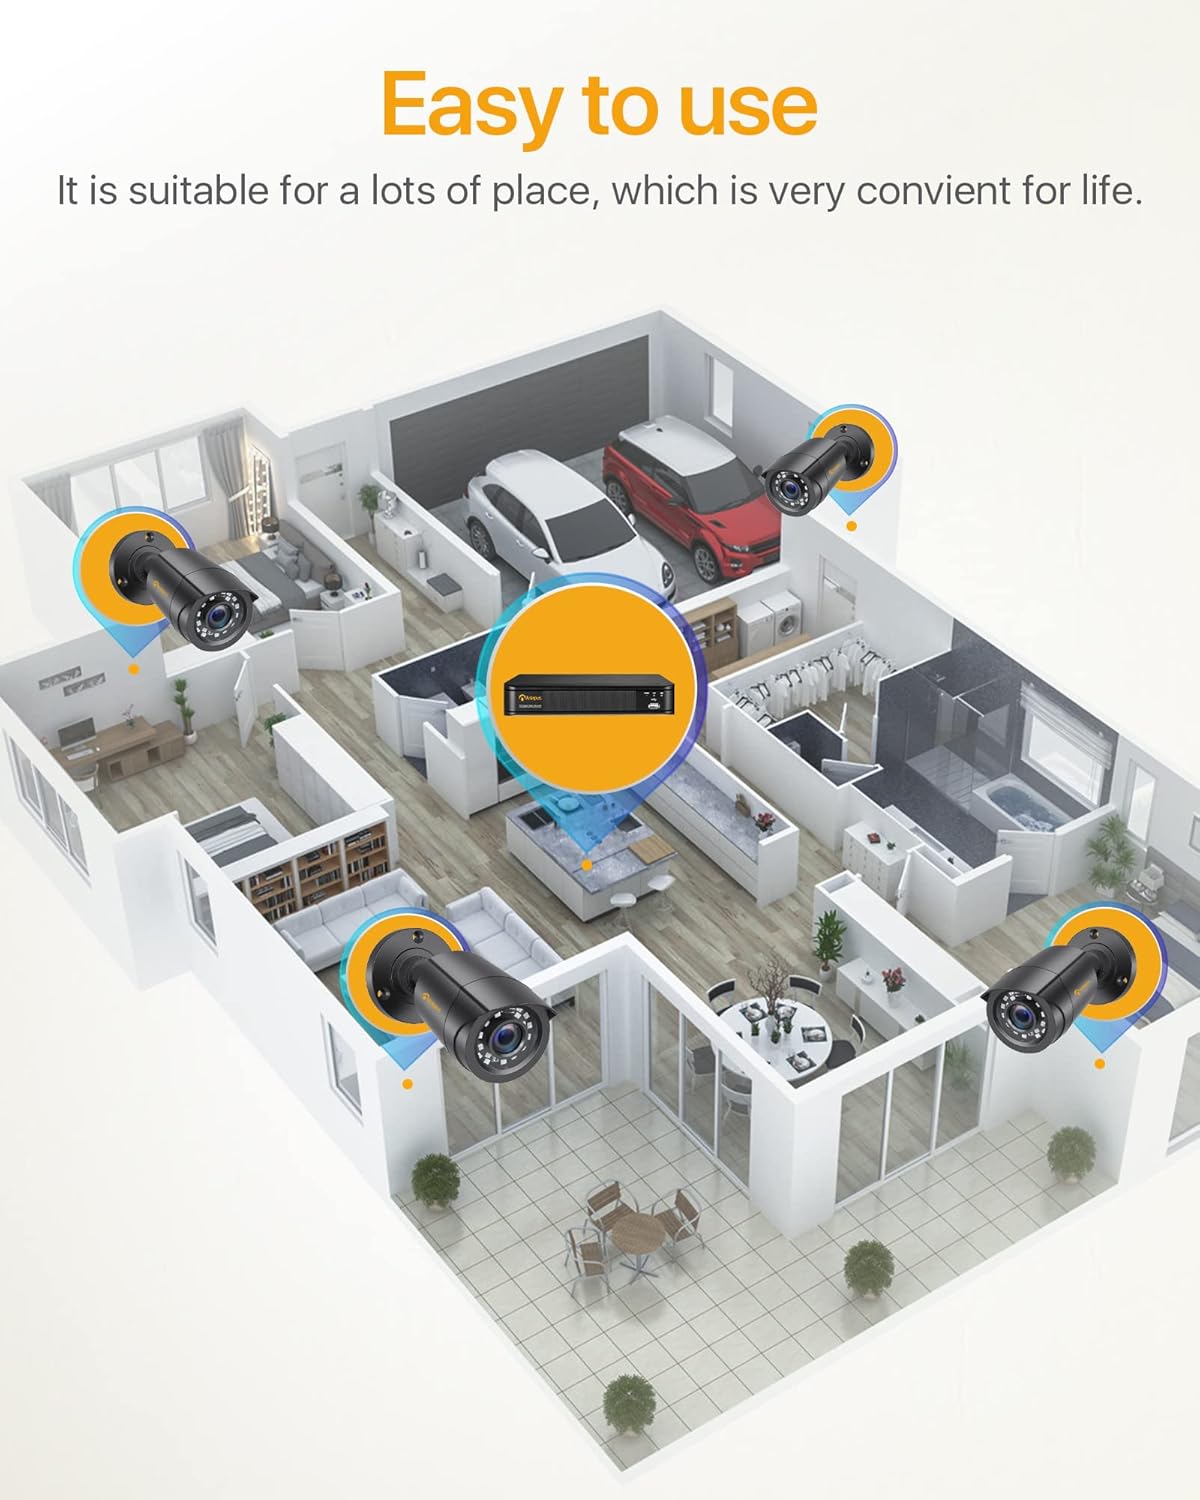
Figure 3: Example Camera Placement for Optimal Coverage
- Mounting: Use the provided mounting screws and anchors to securely attach the cameras to walls or ceilings.
- Adjust Angle: Adjust the camera's angle (180° horizontal, 360° vertical) to cover the desired area. Ensure the lens is clean and free from obstructions.
- Cable Management: Route the BNC cables neatly and securely to prevent damage and tripping hazards. The cable is integrated into the camera mount for protection.

Figure 4: Camera Features and Adjustability
Operating Instructions
1. Initial Setup and Login
Upon first power-on, the DVR will guide you through an initial setup wizard. You will be prompted to create a strong password for the administrator account. It is crucial to remember this password.
2. Live View
Once logged in, the system will display the live view from all connected cameras on the monitor. You can switch between single-camera view and multi-camera grid view.

Figure 5: 24/7 Live Monitoring Setup
3. Recording Modes
- Continuous Recording: The system is pre-configured for 24/7 continuous recording to the 1TB hard drive.
- Motion Detection Recording: To enable, navigate to the DVR's menu, select "Record" > "Motion Detection." Configure the detection area and sensitivity for each camera.
- Scheduled Recording: Set specific times for recording via "Record" > "Schedule."
- Manual Recording: Initiate recording manually from the live view interface.
4. Remote Viewing via Mobile App
Download the official Anlapus mobile application (available for iOS and Android) to view your cameras remotely.
- Download App: Search for "Anlapus" in your device's app store.
- Register Account: Create a new user account within the app.
- Add Device: Scan the QR code displayed on your DVR's monitor (found in Network settings) or manually enter the device ID to add your DVR to the app.
- Live View & Playback: Once added, you can view live feeds, play back recorded footage, and receive motion detection alerts on your smartphone or tablet.

Figure 6: Remote Viewing Across Devices
5. Motion Detection Alerts
Configure email alerts for motion detection events through the DVR's network settings. Ensure your DVR is connected to the internet.

Figure 7: Smart Motion Detection Alerts
Maintenance
- Regular Cleaning: Periodically clean the camera lenses with a soft, dry cloth to ensure clear image quality. For outdoor cameras, check for dirt, dust, or spiderwebs.
- Firmware Updates: Check the Anlapus official website for any available firmware updates for your DVR. Updates can improve performance and add new features.
- Hard Drive Health: The 1TB hard drive is designed for continuous recording. Monitor its health through the DVR's system settings. If the hard drive becomes full, older footage will be overwritten automatically (loop recording).
- Cable Inspection: Regularly inspect all cables for any signs of wear, damage, or loose connections, especially for outdoor installations.
- Power Supply: Ensure the DVR and camera power adapters are connected to stable power sources.
Troubleshooting
| Problem | Possible Cause | Solution |
|---|---|---|
| No image on monitor. | Loose video cable, incorrect input selected on monitor, DVR not powered on. | Check all BNC and HDMI/VGA cable connections. Ensure monitor input matches DVR output. Verify DVR power. |
| Cameras not displaying. | Camera power issue, BNC cable disconnected, faulty camera. | Check camera power connections and power splitter. Re-seat BNC cables. Test camera on a different port if possible. |
| No remote viewing. | DVR not connected to network, incorrect network settings, app configuration issue. | Ensure DVR is connected to router via Ethernet. Check network settings on DVR (DHCP enabled or static IP configured correctly). Verify app device ID/QR code. |
| Poor night vision. | IR LEDs obstructed, camera lens dirty, insufficient ambient light. | Clean camera lens. Ensure no obstructions are blocking the IR LEDs. Consider adding external IR illuminators if needed. |
| Motion detection not working. | Motion detection not enabled, sensitivity too low, detection area not set. | Enable motion detection in DVR settings. Adjust sensitivity. Define the detection area correctly. |
Specifications
| Feature | Detail |
|---|---|
| Model Number | 6971627216065 |
| DVR Channels | 8-channel |
| Video Recording Resolution | 1080p Full HD |
| Video Compression | H.265+ |
| Storage Capacity | 1TB HDD (pre-installed) |
| Camera Resolution | 2.0 Megapixel |
| Camera Type | Bullet, Wired |
| Night Vision Range | Up to 24 meters (80 feet) with 24 IR LEDs |
| Weatherproof Rating | IP66 (Indoor/Outdoor use) |
| Connectivity | Wired (BNC), Ethernet for network features |
| Power Supply | 12 Volts (via included power adapters) |
| Operating Temperature | -10°C to 55°C (14°F to 131°F) |
| Dimensions (DVR) | Approx. 27.94 x 35.56 x 17.78 cm (L x W x H) |
| Weight (Total Package) | 4.56 kilograms |
Warranty and Support
Anlapus products are designed for reliability and performance. For specific warranty details, please refer to the warranty card included in your package or visit the official Anlapus website.
For technical assistance, troubleshooting, or any inquiries regarding your security system, please contact Anlapus customer support. Our team is dedicated to providing prompt and helpful solutions.
- Online Support: Visit the Anlapus official website for FAQs, support articles, and contact forms.
- Email Support: Refer to your product documentation for the dedicated support email address.
Related documents6971627216065


Ask a question about this manual
Ask about setup, troubleshooting, compatibility, parts, safety, or missing instructions. Manuals+ will review the question and use this page’s manual context to help answer it.