
1. Introduction
This manual provides detailed instructions for the OTOHANS AUTOMOTIVE Complete Electrics Stator Coil CDI Wiring Harness. This kit is designed to replace the electrical system in compatible 4-stroke ATVs and Quad Dirt Bikes.
1.1 Compatibility
- Fits most Chinese-made 150CC, 200CC, 250CC, and 300CC ATV / QUAD and Dirt Bikes.
- Suitable for engines from brands such as Lifan, Loncin, Ducar, Shineray, Zongshen, YX, and others.
1.2 Important Compatibility Notes
This kit is not compatible with GY6 engine motorbikes or other Mini ATV / QUAD vehicles (49cc, 50cc, 80cc, 90cc, 100cc, 110cc, 125cc) that utilize a different stator or CDI unit. Always compare your existing stator and CDI with the components shown in this manual to ensure compatibility before installation.

Figure 1: Complete Electrics Stator Coil CDI Wiring Harness Kit components.
2. Product Components
The OTOHANS AUTOMOTIVE Complete Electrics Stator Coil CDI Wiring Harness kit includes the following main components:
- Wiring Harness (full copper wire)
- Stator
- CDI (Capacitor Discharge Ignition) Unit
- Ignition Coil
- Spark Plug
- Rectifier
- Relay
- Multi-functional Switch (Handlebar Switch)
- Ignition Switch with Keys

Figure 2: Individual components of the electrical kit, including wire harness, stator, ignition coils, multi-functional switch, ignition switch, rectifier, relay, spark plug, and CDI.
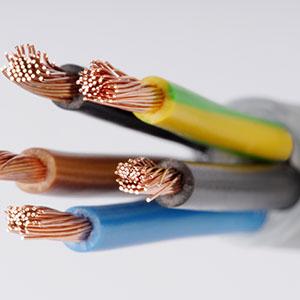
Figure 3: Detail of the full copper wiring used in the harness for optimal conductivity.
3. Setup & Installation
Installation of this electrical wiring harness requires careful attention to detail. It is highly recommended to consult or hire a qualified mechanic if you are unsure about any wiring procedures. Incorrect assembly can lead to electrical malfunctions or fire hazards.
3.1 General Installation Guidelines
- Safety First: Disconnect the vehicle's battery before beginning any electrical work.
- Reference Diagrams: Always refer to the provided installation diagram and wiring diagram for precise connections.
- Component Placement: Identify the correct mounting locations for each component (CDI, rectifier, relay, ignition coil, etc.) on your ATV/Quad.
- Wiring Connections: Connect each component to the main wiring harness according to the color-coded wires and connector types. Ensure all connections are secure and properly seated.
- Stator Installation: Install the new stator and ensure its rubber seal is correctly positioned to prevent leaks.
- Spark Plug: Install the new spark plug.
- Final Checks: Before reconnecting the battery, double-check all connections against the wiring diagram to ensure accuracy.
3.2 Wiring Diagram
The following diagrams illustrate the layout and connections of the wiring harness components. Pay close attention to wire colors and connector types.

Figure 4: Overview of the complete wiring harness and its associated components.

Figure 5: Detail of an upgrade interface connector, designed for easy installation.

Figure 6: Detailed wiring diagram indicating connections for the ignition coil, CDI box, fan, brake switches, electric door lock, magneto coil, relay, rectifier, fuse wire, and tail lamp.

Figure 7: Close-up view of specific wiring connections for the headlamp, gear position sensor, four-function switch, electric door lock, rear brake switch, foot brake, engine gear, magneto coil, CDI box, ignition coil, rectifier, fuse wire, positive electrode, negative electrode, and tail lamp.
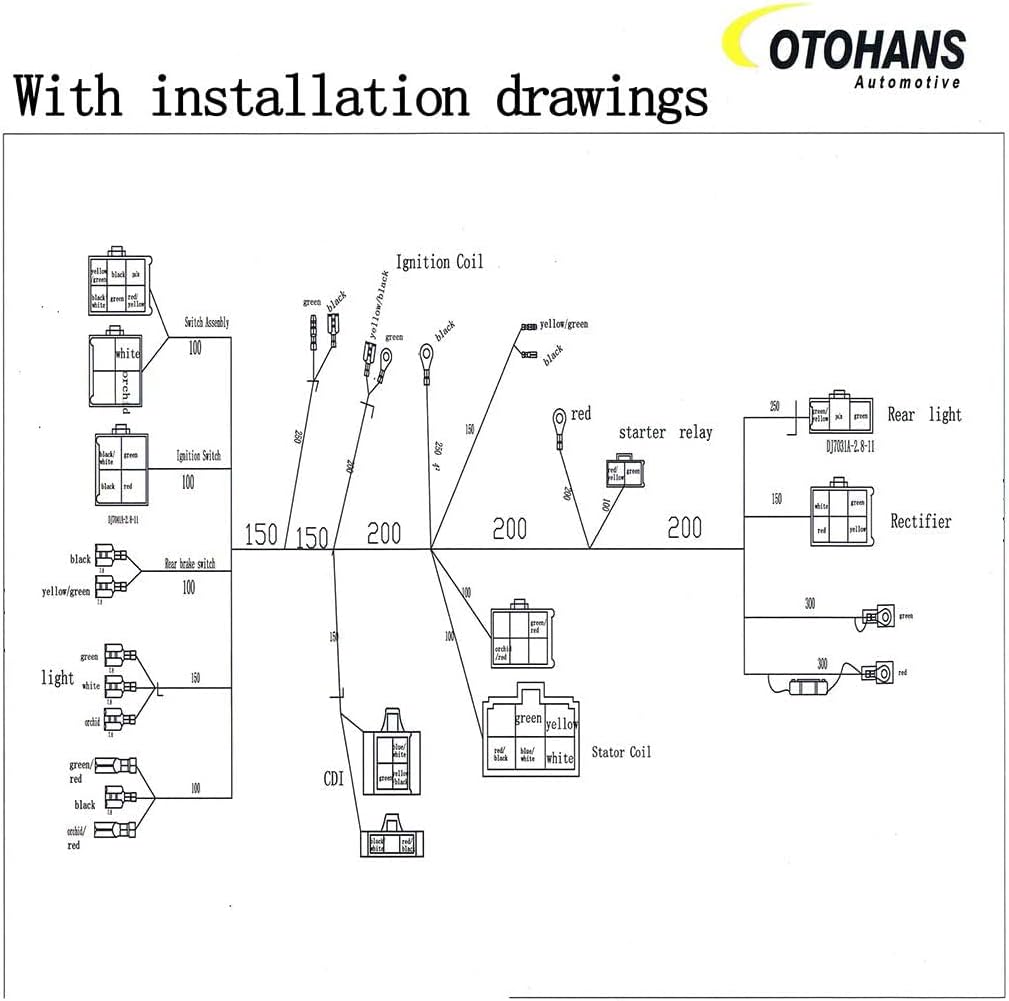
Figure 8: Comprehensive electrical schematic detailing the entire wiring system, including switch assembly, ignition switch, rear brake switch, light, CDI, stator coil, ignition coil, starter relay, rear light, and rectifier.
3.3 Installation Video Guide
For a visual guide on the components and general compatibility, please refer to the video below. This video provides an overview of the complete electrics stator coil wiring harness.
Video 1: Overview of the OTOHANS AUTOMOTIVE Complete Electrics Stator Coil CDI Wiring Harness components and general compatibility for 150cc-300cc ATVs.
4. Operation
Once the wiring harness is correctly installed, the ATV/Quad's electrical system should function as intended. Refer to your vehicle's specific owner's manual for detailed operating procedures.
- Ignition: Insert the key into the ignition switch and turn it to the 'ON' position.
- Starting: Use the starter button on the multi-functional switch to engage the engine.
- Lights: Operate headlights, tail lights, and other lighting functions using the controls on the multi-functional switch.
- Engine Kill Switch: Familiarize yourself with the engine kill switch for emergency shutdowns.
5. Maintenance
Regular maintenance helps ensure the longevity and reliable performance of your electrical system.
- Inspect Wiring: Periodically check all visible wiring for signs of wear, fraying, or damage. Ensure all connections remain tight.
- Clean Components: Keep electrical components clean and free from dirt, moisture, and corrosion.
- Battery Health: Maintain your vehicle's battery in good condition, as a weak battery can affect the entire electrical system.
- Fuse Check: If an electrical component stops working, check the fuse wire for continuity and replace if blown.
- Spark Plug: Inspect and replace the spark plug as part of routine engine maintenance.
6. Troubleshooting
If you encounter issues after installation, consider the following troubleshooting steps:
- No Power:
- Check battery connections and charge level.
- Inspect the fuse wire for breaks and replace if necessary.
- Ensure the ignition switch is fully in the 'ON' position.
- Engine Not Cranking/Starting:
- Verify all connections to the starter relay, CDI, and stator are secure.
- Confirm the spark plug is correctly installed and firing.
- Ensure the engine kill switch is in the 'RUN' position.
- Lights Malfunctioning or Cross-Wired Behavior:
- Carefully re-examine the wiring diagram (Figure 6, 7, 8) to ensure all wires are connected to their correct terminals. Incorrectly matched wire colors or terminals can lead to unintended functions (e.g., lights activating when the starter button is pressed).
- Check the multi-functional switch for proper operation and secure connections.
- No Spark:
- Check the ignition coil and CDI unit connections.
- Test the spark plug for proper function.
- Verify the stator connections and output.
If problems persist after following these steps, it is advisable to seek assistance from a professional mechanic.
7. Specifications
| Feature | Detail |
|---|---|
| Brand | OTOHANS AUTOMOTIVE |
| Model Number | US-XQZCZX-56 |
| Material | Copper (wiring) |
| Compatibility | 4-Stroke ATV Quad 150cc-300cc (Chinese-made) |
| Item Weight | 3.96 pounds (1.8 Kilograms) |
| Package Dimensions | 9.17 x 5.79 x 5.31 inches |
| UPC | 788601478564 |
8. Warranty & Support
For specific warranty information or technical support regarding your OTOHANS AUTOMOTIVE Complete Electrics Stator Coil CDI Wiring Harness, please contact OTOHANS AUTOMOTIVE directly through their official channels or the retailer where the product was purchased. Ensure you have your model number (US-XQZCZX-56) and purchase details available.