1. Introduction
This manual provides essential information for the proper setup, operation, and maintenance of your RCA RT2781HB 1000-Watt Audio Receiver Home Theater System. Please read this manual thoroughly before using the product to ensure optimal performance and safety. This system delivers Dolby Digital 5.1 surround sound, an AM/FM tuner, Bluetooth connectivity, and USB playback capabilities.
2. Safety Information
- Power Source: Connect the unit only to the specified power supply as indicated on the product label.
- Ventilation: Ensure adequate ventilation. Do not block ventilation openings.
- Water and Moisture: Do not expose the unit to rain, moisture, or dripping/splashing liquids.
- Heat: Keep the unit away from heat sources such as radiators, heat registers, stoves, or other heat-producing appliances.
- Servicing: Do not attempt to service this product yourself. Refer all servicing to qualified service personnel.
- Cleaning: Unplug the unit from the wall outlet before cleaning. Use a dry cloth for cleaning.
3. Package Contents
Verify that all items listed below are included in your package:
- 1 x RCA RT2781HB Audio Receiver
- 5 x Satellite Surround Sound Speakers
- 1 x Subwoofer
- 1 x Remote Control (batteries included)
- 1 x FM Antenna
4. Product Overview
The RCA RT2781HB system is designed to provide an immersive audio experience. It includes a central receiver unit, five satellite speakers, and a subwoofer.

Figure 4.1: Complete RCA RT2781HB Home Theater System
4.1. Components
- Receiver: The central unit for audio processing, amplification, and input management.
- Satellite Speakers (5): Four compact speakers for front left/right and rear left/right channels, and one center channel speaker for dialogue clarity.
- Subwoofer (1): Provides deep bass frequencies for a rich audio experience.
- Remote Control: For convenient operation of all system functions.
4.2. Front Panel Overview
The front panel of the receiver features controls for power, volume, input selection, and sound adjustments, along with a display and front-facing input ports.
4.3. Rear Panel Overview
The rear panel provides various connection ports for speakers, audio/video sources, and the power supply.

Figure 4.2: Rear Panel Digital and Analog Audio Inputs
This image illustrates the digital audio inputs (Coaxial, Optical 1, Optical 2) and analog audio inputs (AUX 1 R/L) on the rear panel of the receiver. These ports are used to connect external audio sources such as Blu-ray/DVD players, game systems, and cable boxes.

Figure 4.3: Rear Panel HDMI Inputs and Output
This image shows the HDMI IN ports (HDMI IN 1, HDMI IN 2, HDMI IN 3) and the HDMI OUT (to TV) port on the rear panel. These are used for connecting HDMI-enabled devices and outputting video to your television.
5. Setup
5.1. Speaker Connection
Connect the included speakers to the corresponding terminals on the rear of the receiver. Ensure correct polarity (+ to + and - to -) for each speaker.
- Front Left/Right: Connect the two satellite speakers to the FRONT L/R terminals.
- Center: Connect the center speaker to the CENTER terminal.
- Rear Left/Right: Connect the remaining two satellite speakers to the SURROUND L/R terminals.
- Subwoofer: Connect the subwoofer to the SUBWOOFER output.
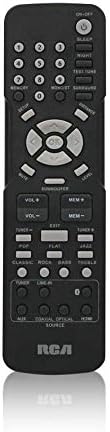
Figure 5.1: Subwoofer Unit
This image displays the subwoofer unit, which connects to the receiver to provide low-frequency audio.
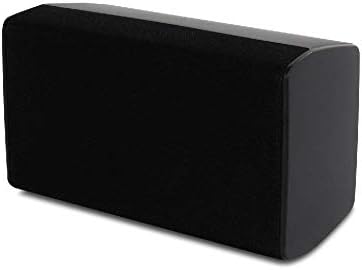
Figure 5.2: Center Speaker Unit
This image shows the center channel speaker, crucial for clear dialogue in your home theater setup.

Figure 5.3: Satellite Speaker Unit
This image illustrates one of the satellite speakers, used for front and surround sound channels.
5.2. Audio/Video Connections
Connect your audio and video sources to the receiver using the appropriate cables.
- HDMI Connections: Use HDMI cables to connect devices like Blu-ray players, game consoles, or cable boxes to the HDMI IN ports. Connect your TV to the HDMI OUT (to TV) port.
- Digital Audio Connections: For devices with optical or coaxial digital audio outputs, use the OPTICAL or COAXIAL inputs on the receiver.
- Analog Audio Connections: Use RCA stereo cables for devices with analog audio outputs (e.g., CD players, VCRs) to the AUX IN ports.
5.3. Power Connection
Once all speakers and audio/video sources are connected, plug the receiver's power cord into a standard AC outlet.
6. Operating Instructions
6.1. Basic Operation
- Power On/Off: Press the POWER button on the front panel or remote control to turn the system on or off.
- Volume Adjustment: Use the VOLUME +/- buttons on the remote or the main volume knob on the receiver to adjust the master volume.
6.2. Input Selection
Press the SOURCE button on the front panel or the corresponding input buttons (e.g., HDMI 1, OPTICAL, AUX, BT) on the remote control to select your desired audio/video source.
6.3. Bluetooth Pairing
- Select the BT input source on the receiver. The display will show "BT PAIRING".
- On your Bluetooth-enabled device (smartphone, tablet, etc.), enable Bluetooth and search for available devices.
- Select "RCA RT2781HB" from the list of devices.
- Once paired, the receiver will indicate a successful connection, and you can stream audio wirelessly.
6.4. USB Playback
Insert a USB flash drive containing audio files into the USB port on the front panel. The system will automatically switch to USB mode and begin playback. Use the remote control to navigate tracks and control playback.
6.5. AM/FM Tuner
Select the TUNER input source. Use the TUNE +/- buttons on the remote to scan for radio stations. Use the MEMORY buttons to save and recall your favorite stations.
6.6. Sound Adjustments
Use the dedicated controls on the front panel or remote for fine-tuning your audio:
- Bass/Treble: Adjust these to enhance low or high frequencies.
- Balance: Adjust the left/right speaker output balance.
- Subwoofer Volume: Control the output level of the subwoofer independently.
6.7. Remote Control
The included remote control provides full functionality for your home theater system.

Figure 6.1: Remote Control Layout
This image displays the remote control for the RCA RT2781HB system, featuring buttons for power, volume, input selection, tuner controls, and sound adjustments.
7. Maintenance
- Cleaning: Wipe the unit with a soft, dry cloth. Do not use liquid or aerosol cleaners.
- Ventilation: Periodically check that the ventilation openings on the receiver are clear of dust and debris.
- Storage: If storing the unit for an extended period, unplug it from the power outlet and store it in a cool, dry place.
8. Troubleshooting
| Problem | Possible Cause | Solution |
|---|---|---|
| No power | Power cord not connected; Power outlet not active. | Ensure power cord is securely plugged in; Test outlet with another device. |
| No sound | Incorrect input selected; Speaker wires loose; Volume too low. | Select correct input source; Check all speaker connections; Increase volume. |
| Bluetooth not pairing | Receiver not in pairing mode; Device too far; Interference. | Ensure receiver is in BT mode; Move device closer; Restart both devices. |
| Poor radio reception | FM antenna not connected or positioned incorrectly. | Connect FM antenna securely; Adjust antenna position for better reception. |
9. Specifications
| Feature | Specification |
|---|---|
| Product Dimensions | 16.93 x 12.68 x 5.47 inches |
| Item Weight | 20.9 pounds |
| Item Model Number | RT2781HB U |
| Batteries | 2 AAA batteries required (included) |
| Connectivity Technology | Auxiliary, Bluetooth, Coaxial, HDMI, Optical, RCA, USB |
| Controller Type | Corded Electric |
| Compatible Devices | Television, Speaker |
| Total HDMI Ports | 4 (3 In, 1 Out) |
| Audio Output Mode | Surround |
| Surround Sound Channel Configuration | 5.1 |
10. Warranty and Support
For warranty information and customer support, please refer to the documentation included with your purchase or visit the official RCA website. Keep your proof of purchase for any warranty claims.