
Streamlight TLR-VIR II
Streamlight TLR-VIR II (Model 69192) Instruction Manual
Visible LED/IR Illuminator/IR Beam with Rail Locating Keys
Brand: Streamlight | Model: TLR-VIR II (69192)
1. Introduction
The Streamlight TLR-VIR II is a low-profile, weapon-mounted tactical light designed for versatile illumination needs. It integrates both a visible white LED illuminator and an infrared (IR) LED illuminator/IR laser, making it suitable for various operational environments, including those requiring night vision equipment.
Key Features:
- Visible White LED: Provides 300 lumens of bright white light.
- Infrared LED: 850 Nm, 600mw/SR (minimum) radiant intensity for optimal illumination with night vision equipment.
- Infrared Laser: 850 Nm, Class 1, eye-safe IR laser with 3 mrad adjustment increment markings. Output power is less than 0.08mw.
- Extended Runtime: IR illuminator/IR laser operates for 12 hours on a single battery.
- Adjustable: Features windage and elevation adjustment screws for precise aiming.
- Compact Design: Low-profile and lightweight aluminum construction.
2. Safety Information
WARNING: This product contains chemicals known to the State of California to cause cancer and birth defects or other reproductive harm. Always handle with care and follow all safety guidelines.
Always ensure the device is pointed in a safe direction when adjusting or testing. Avoid direct eye exposure to the laser beam. Read and understand all instructions before use.
3. Setup
3.1 Battery Installation
- Ensure the unit is in the 'OFF' position.
- Unscrew the battery cap located at the rear of the unit.
- Insert one (1) CR123A lithium battery with the positive (+) terminal facing towards the head of the light.
- Securely screw the battery cap back into place.
Note: A CR123A battery is included with the unit. Always use high-quality lithium batteries for optimal performance and safety.
3.2 Mounting the TLR-VIR II
The TLR-VIR II is designed for secure attachment to MIL-STD-1913 (Picatinny) rails found on compatible devices such as airsoft guns, M17/M18 pistols, and long guns.
- Select the appropriate rail locating key for your firearm's rail system. The unit comes with various keys to ensure a snug fit.
- Loosen the rail clamp screw on the TLR-VIR II.
- Align the rail clamp with the rail slot on your firearm.
- Slide the TLR-VIR II onto the rail until the locating key engages with a rail slot.
- Tighten the rail clamp screw firmly to secure the unit. Ensure it is tight enough to prevent movement under recoil, but do not overtighten.
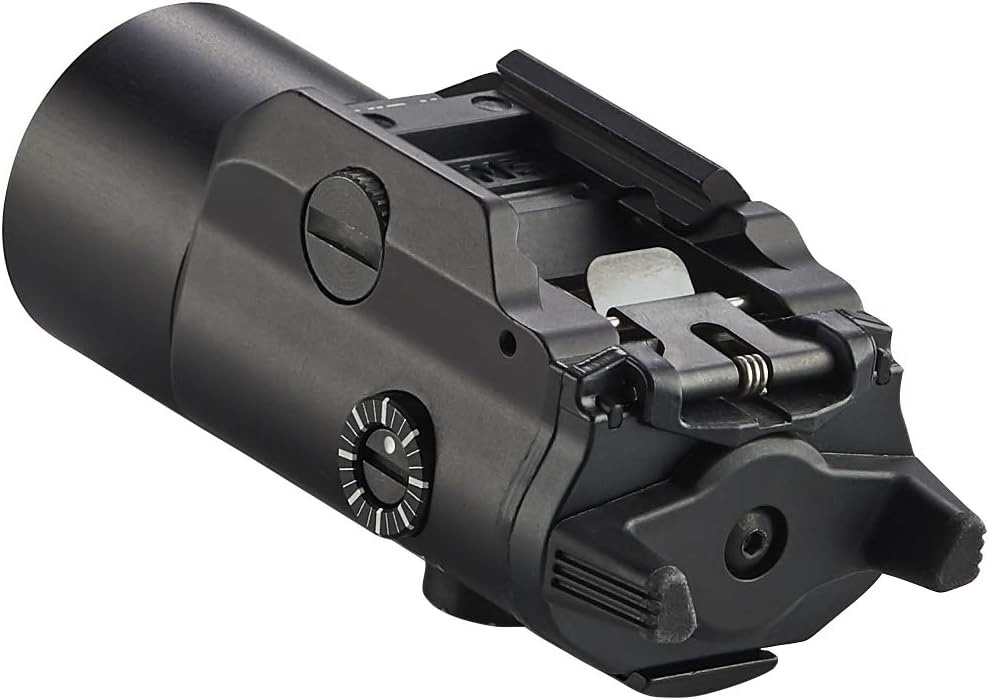
Figure 1: Rear view showing the rail clamp for mounting.

Figure 2: The TLR-VIR II securely mounted on a firearm's rail.
4. Operating Instructions
4.1 Mode Selection
The TLR-VIR II features a rotary mode selector switch located on the side of the unit. This switch allows you to select between Visible (VIS), Off (OFF), and Infrared (IR) modes.
- VIS (Visible Mode): Activates the white LED illuminator.
- OFF: Turns the unit off.
- IR (Infrared Mode): Activates both the IR LED illuminator and the IR laser simultaneously.

Figure 3: Top-down view highlighting the mode selector switch (VIS, OFF, IR).
4.2 Activating the Light/Laser
Once a mode is selected, the unit can be activated using the ambidextrous momentary/steady-on switches located at the rear of the unit.
- Momentary Activation: Press and hold either activation switch. Release to turn off.
- Steady-On Activation: Press and quickly release either activation switch. Press and quickly release again to turn off.
4.3 Windage and Elevation Adjustment (IR Mode)
The IR laser can be adjusted for windage and elevation to zero it with your firearm. These adjustments are typically performed when the mode switch is set to the IR position.
- Locate the windage (horizontal) and elevation (vertical) adjustment screws on the side of the unit. These are often recessed to prevent accidental changes.
- Using a small flathead screwdriver or appropriate tool, turn the adjustment screws in small increments.
- Test the laser's point of impact and adjust as necessary until it aligns with your point of aim.

Figure 4: Side view indicating the windage and elevation adjustment screws.
5. Maintenance
5.1 General Care and Cleaning
- Wipe the unit with a clean, soft cloth after each use to remove dirt, dust, and moisture.
- For stubborn grime, use a damp cloth with mild soap and water. Avoid harsh chemicals or abrasive cleaners.
- Ensure the lens and laser aperture are clean for optimal light and laser output. Use a lens cleaning cloth if necessary.
5.2 Battery Replacement
Replace the CR123A battery when the light output diminishes or the unit fails to activate. Refer to section 3.1 for battery installation instructions.
Important: Always dispose of used batteries responsibly according to local regulations.
6. Troubleshooting
- Unit Not Activating:
- Check battery orientation and ensure it is fully charged.
- Ensure battery cap is securely tightened.
- Verify the mode selector switch is not in the 'OFF' position.
- Dim Light Output:
- Replace the battery with a fresh CR123A.
- Clean the lens and reflector.
- Laser Zero Shift:
- Ensure the rail clamp screw is sufficiently tightened to prevent movement on the firearm's rail.
- Re-zero the IR laser using the windage and elevation adjustment screws (refer to section 4.3).
- For consistent zero, consider marking the adjustment screws after zeroing to detect any accidental shifts.
7. Specifications

Figure 5: Key specifications and dimensions of the TLR-VIR II.
| Feature | Detail |
|---|---|
| Brand | Streamlight |
| Model Name | TLR-VIR II |
| Part Number | 69192 |
| Color | Black |
| Material | Aluminum |
| Item Weight | 3.82 Ounces |
| Product Dimensions | 3.3 x 1.45 x 1.4 inches |
| Compatible Devices | Airsoft guns, M17/M18 pistols, Long guns with MIL-STD-1913 rails |
| Mounting Type | Rail |
| Night Vision Compatible | Yes |
| Type of Bulb | LED |
| Luminous Flux (Visible) | 300 Lumens |
| IR LED | 850 Nm, 600mw/SR (min) radiant intensity |
| IR Laser | 850 Nm, Class 1, <0.08mw output |
| IR Illuminator/Laser Runtime | 12 hours |
| Battery Type | 1 CR123A (included) |
8. Warranty and Support
The Streamlight TLR-VIR II is covered by a Limited Lifetime Warranty. For detailed warranty information, service, or support, please visit the official Streamlight website or contact their customer service department.
For further assistance, you may also refer to the Streamlight Store on Amazon.
Related documentsTLR-VIR II


Ask a question about this manual
Ask about setup, troubleshooting, compatibility, parts, safety, or missing instructions. Manuals+ will review the question and use this page’s manual context to help answer it.