
1. Product Overview
The Sinocare Safe AQ Voice Blood Glucose Monitoring System is designed for the quantitative measurement of glucose in fresh capillary whole blood. This system is intended for self-testing by people with diabetes and by healthcare professionals as an aid in monitoring the effectiveness of diabetes control. The device features voice guidance and light prompts for ease of use.

Figure 1.1: Sinocare Safe AQ Voice Blood Glucose Monitor kit, including the meter, lancing device, test strips, lancets, and carrying case.
2. Kit Components
Your Sinocare Safe AQ Voice Blood Glucose Monitoring System kit typically includes the following components:
- Sinocare Safe AQ Voice Blood Glucose Meter
- Lancing Device
- Sterile Lancets
- Blood Glucose Test Strips
- Code Chip (if applicable, though Safe AQ Voice is often no-code)
- Carrying Case
- User Manual
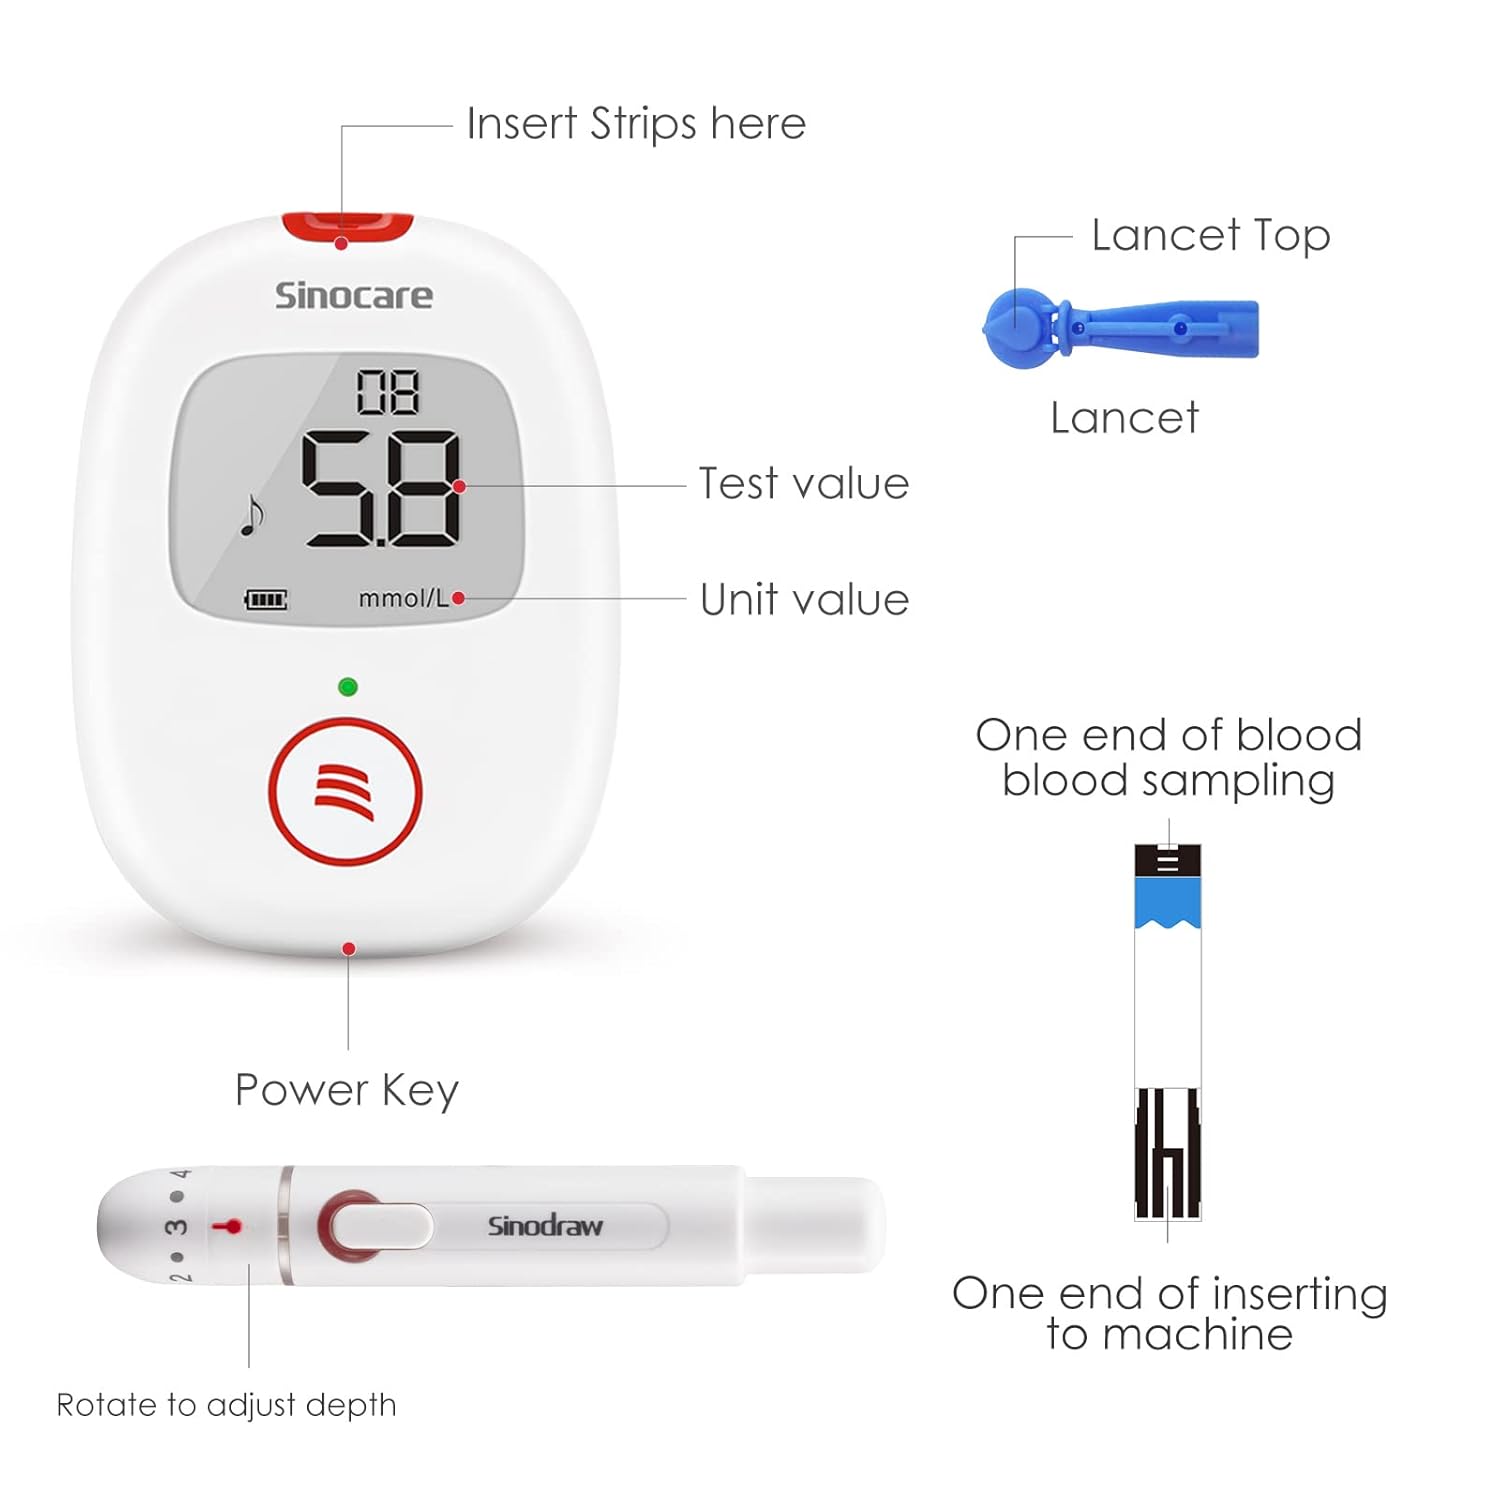
Figure 2.1: Key components of the Sinocare Safe AQ Voice meter and lancing device, showing strip insertion slot, display, power key, test value, unit value, lancet top, lancet, and lancing device depth adjustment.
3. Important Safety Information
Please read all instructions carefully before using the Sinocare Safe AQ Voice Blood Glucose Monitoring System. Failure to follow instructions may lead to inaccurate results.
- This device is for in vitro diagnostic use only. Do not use for diagnosis of diabetes.
- Keep the device and all components out of reach of children.
- Do not use expired test strips or lancets. Check the expiration date on the vial.
- Store test strips in their original vial with the cap tightly closed.
- Avoid extreme temperatures and direct sunlight.
- Always wash and dry your hands thoroughly before and after handling the meter, lancing device, or test strips.
- Dispose of used lancets and test strips properly in a sharps container.
- Consult your healthcare professional for interpretation of results and for any medical concerns.
4. Setup Guide
Follow these steps to set up your Sinocare Safe AQ Voice Blood Glucose Monitor for first use:
- Install Batteries: Open the battery compartment on the back of the meter and insert two AAA batteries, ensuring correct polarity.
- Set Date and Time: Refer to the full user manual for detailed instructions on setting the date and time, if required. This ensures accurate record-keeping.
- Prepare Lancing Device:
- Unscrew the lancing device cap.
- Insert a new sterile lancet firmly into the lancet holder.
- Twist off the protective cap of the lancet.
- Replace the lancing device cap.
- Adjust the penetration depth by rotating the cap. Start with a lower setting (e.g., 2-3) and adjust as needed for a sufficient blood sample.
- Pull back the cocking handle until it clicks, indicating it is ready to use.
5. Operating Instructions: Performing a Blood Glucose Test
Follow these steps for an accurate blood glucose measurement:
- Prepare for Test: Wash your hands with soap and warm water, then dry them thoroughly.
- Insert Test Strip: Take a new test strip from the vial and immediately close the vial cap tightly. Insert the test strip into the meter's test strip port. The meter will turn on automatically and display a blood drop symbol, indicating it is ready for a blood sample. The voice prompt will guide you.
- Obtain Blood Sample: Place the prepared lancing device firmly against the side of your fingertip and press the release button. A small drop of blood will form.
- Apply Blood Sample: Gently touch the tip of the test strip to the blood drop. The blood will be drawn into the strip by capillary action. Do not smear the blood. The meter will beep and begin a countdown.
- Read Results: After 5 seconds, the test result will be displayed on the screen and announced by voice. The meter also features a light prompt (green, yellow, or red) to indicate if your blood sugar level is normal, careful, or low/high.
- Dispose of Used Materials: Eject the used test strip and lancet into a sharps container.
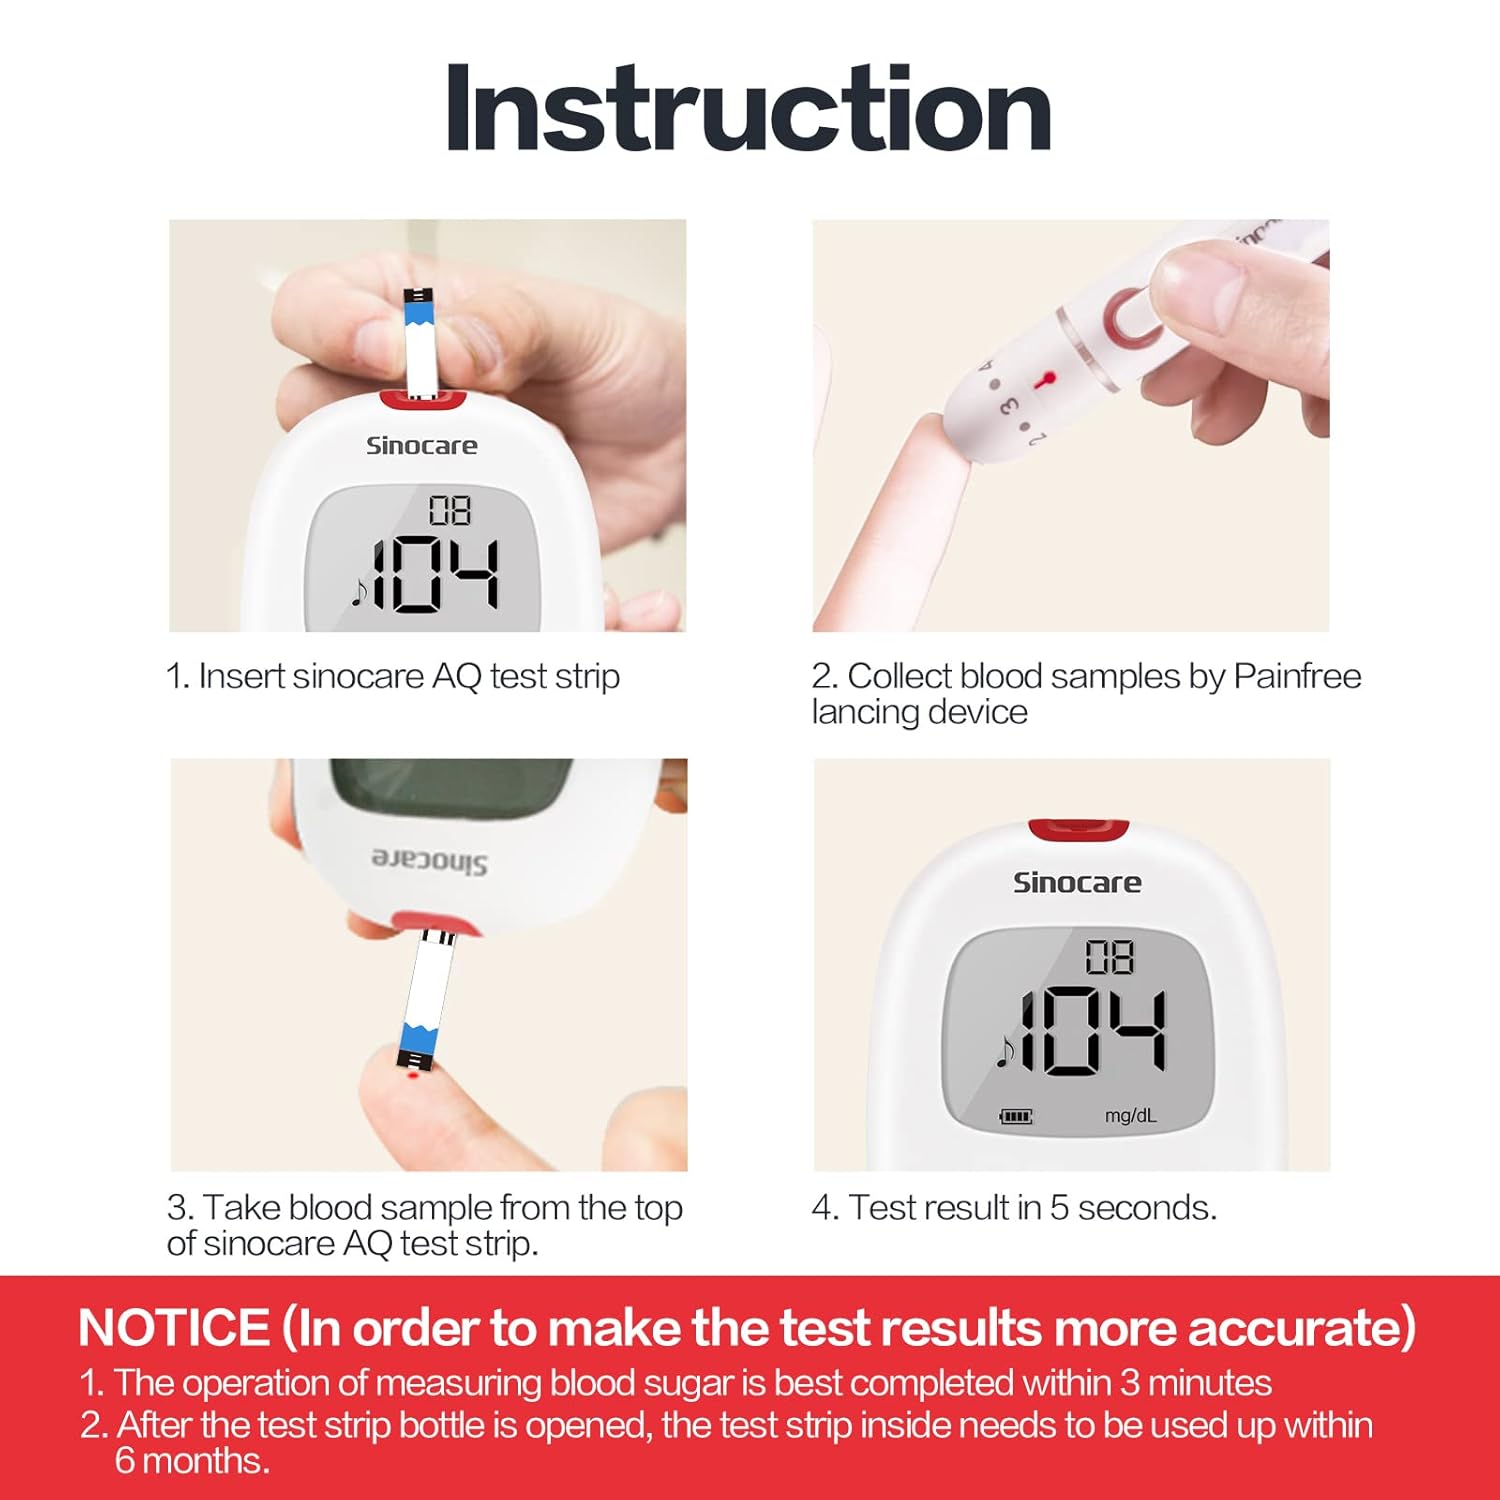
Figure 5.1: Visual guide for the testing process: 1. Insert test strip, 2. Collect blood sample with lancing device, 3. Apply blood sample to test strip, 4. View test result in 5 seconds.

Figure 5.2: Features like one-click disposal of used strips, adjustable lancing depth for minimal pain, and minimal blood sample size required.

Figure 5.3: Explanation of voice guidance and light prompts: Green for normal blood sugar (3.9-7.0 mmol/L), Yellow for careful (7.0-13.9 mmol/L), Red for low (<3.9 mmol/L) or high (>13.9 mmol/L) blood sugar.
Important Notice for Accurate Results:
- The operation of measuring blood sugar is best completed within 3 minutes.
- After the test strip bottle is opened, the test strips inside need to be used up within 6 months.
6. Maintenance and Care
Proper maintenance ensures the longevity and accuracy of your device:
- Cleaning the Meter: Wipe the meter's exterior with a soft, damp cloth. Do not use harsh chemicals or immerse the meter in water.
- Storage: Store the meter and test strips in a cool, dry place, away from direct sunlight and extreme temperatures. Keep them in their original carrying case.
- Battery Replacement: When the low battery indicator appears on the display, replace the batteries promptly with two new AAA batteries.
- Test Strip Storage: Always keep test strips in their original vial and close the cap immediately after removing a strip to protect them from moisture.
7. Troubleshooting
If you encounter issues with your Sinocare Safe AQ Voice Blood Glucose Monitor, refer to the table below for common problems and solutions:
| Problem | Possible Cause | Solution |
|---|---|---|
| Meter does not turn on. | Dead or incorrectly inserted batteries. | Replace batteries with new ones, ensuring correct polarity. |
| "E-3" Error Message. | Insufficient blood sample, damaged test strip, or meter malfunction. | Repeat the test with a new test strip and ensure adequate blood sample. If error persists, contact customer support. |
| Inaccurate results. | Expired test strips, improper storage, incorrect testing procedure, or interference. | Check test strip expiration date. Ensure proper storage. Review operating instructions. Avoid testing in extreme conditions. |
| Blood not drawn into strip. | Insufficient blood sample, or strip not properly touched to blood. | Ensure a sufficient blood drop. Gently touch the tip of the strip to the blood drop, allowing capillary action to draw it in. Do not press the strip against the skin. |
For other error codes or persistent issues, please refer to the comprehensive user manual or contact Sinocare customer support.
8. Technical Specifications
| Specification | Detail |
|---|---|
| Brand | Sinocare |
| Model Number | Safe AQ Voice 50kit |
| Measurement Time | 5 Seconds |
| Sample Volume | Small blood sample (typically 0.6 microliters) |
| Battery Type | 2 x AAA Batteries (not included) |
| Item Weight | 310 g |
| Package Dimensions | 17.7 x 16.6 x 5.2 cm |
| Technology | Advanced Glucose Dehydrogenase Technology, Anti-interference |

Figure 8.1: Details on the advanced glucose dehydrogenase technology, which ensures accurate measurement by not being interfered by maltose and galactose, and optimal test environment conditions.
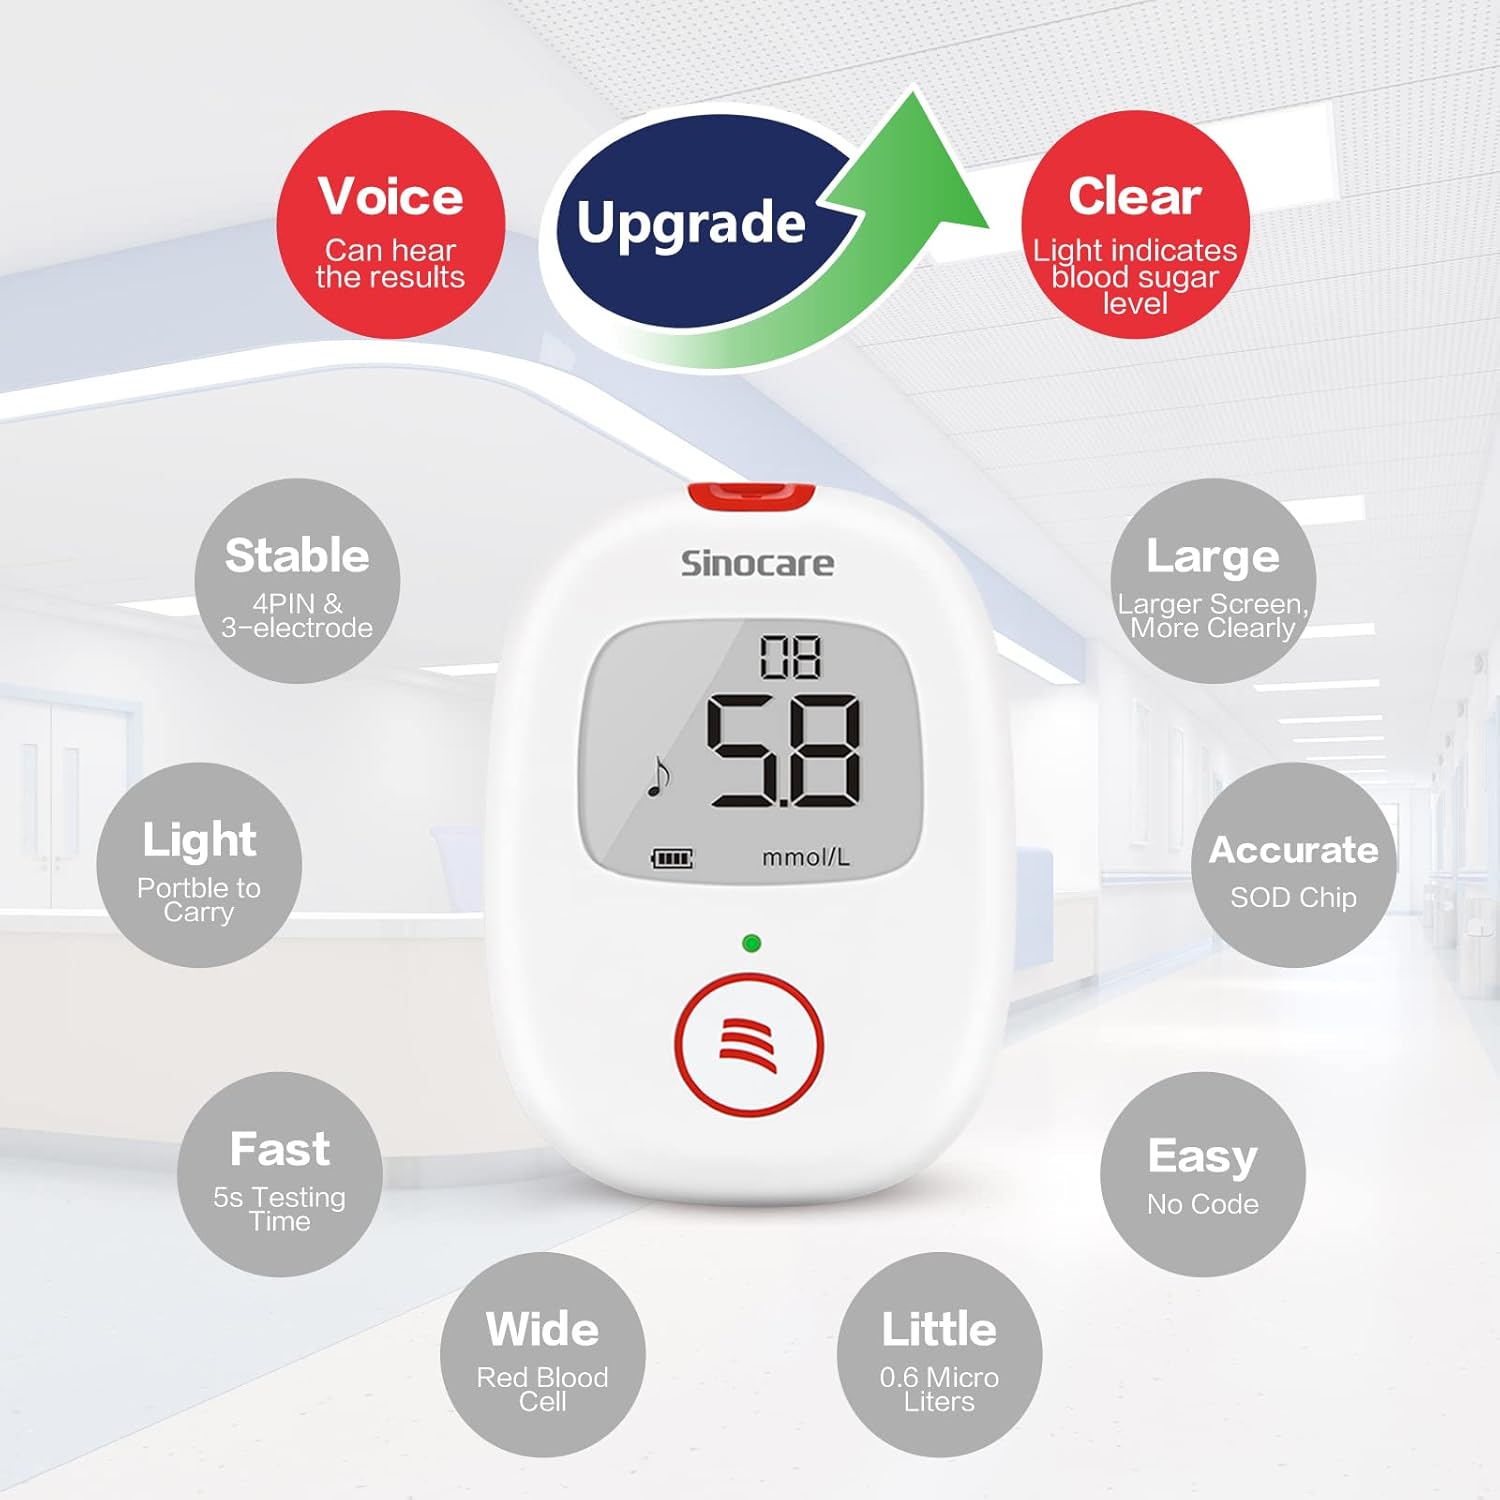
Figure 8.2: Overview of key features including voice guidance, clear display, stable performance, large screen, portable design, accurate SOD chip, fast 5-second testing, easy no-code operation, wide red blood cell range, and small blood sample requirement.
9. Test Strip Compatibility
The Sinocare Safe AQ Voice Blood Glucose Monitor is specifically designed to work with Sinocare Safe AQ Test Strips. Using incompatible test strips may lead to inaccurate results or device malfunction.

Figure 9.1: Visual representation showing that Safe AQ Smart and Safe AQ Voice meters are compatible with Sinocare Safe AQ Test Strips, while other models like Safe Accu are not.

Figure 9.2: Detailed compatibility chart illustrating which Sinocare glucometer models (Safe Accu, Safe Accu 2, Safe AQ Smart, Safe AQ Voice, Safe AQ Angel, Safe AQ UG, Gold AQ Plus, Safe AQ Pro I) are compatible with their respective test strips.
10. Warranty and Customer Support
Information regarding the product warranty and specific customer support contact details is not provided within this manual. For warranty claims, technical assistance, or further inquiries, please refer to the product packaging, the manufacturer's official website, or contact the retailer from whom the product was purchased.


